It's been a long time since I posted. I didn't realize it had been so long. This past year and a half has been a whirl wind of activity and changes. I am still a Stampin' Up! Demonstrator and still love their products and still get to create, just not as much as I use to before. At least not yet, but changes keep happening, so hopefully I'll get more time soon.
This past year I encountered a ton of health issues and at times found it difficult just to keep up with life. Battling cancer takes a toll not only on your health, your time, but also on your family and your life. But like many others I am a survivor. By the grace of God, and love and encouragement of friends and family, I have made it through. Forever changed, but able to spend another day loving and caring for my family and sharing with my friends. God has definitely blessed me many times throughout the battle.
Having a major illness has made me re-think some things and honestly I'm still processing some possible changes. I have been debating whether or not to restart this blog back. Before it was mainly just Stampin' Up! ideas and information, which I may still continue to do that way. I've also been considering making it a compilation of all the different things I'm interested in at the moment. Both creative and items pertaining to life. Sometimes it's just fun to share things you learn along the way. I'm not sure how many who use to read this will check it out again or if you all have an opinion of things you'd to see or read about but I'm open to suggestions. Do I keep it strictly Stampin' Up! or make it a mixture?
Right now, besides crafting, I check out biblical items (bible studies, devotions, etc), organizing ideas (as I'm trying to re-vamp and catch up in my home), recipe ideas (to make my family healthier) and things that just overall improve life. If I can combine those and be creative at the same time, it's even better.
One very, very basic organizing tip I learned recently was to put like things together. Now I know that sounds very basic, but not having grown up being organized, it was a new concept. I am one of those people who have a junk drawer in every room. I never thought about having one place for all like things. So I started going through some things and found multiples of some items I didn't know I had.
For instance, Scotch tape. When I started cleaning out and organizing some things in my home, I started collecting the tape in a box to put into one area. I didn't realize how much tape I had collected and had until I did that. I had a shoe box full of Scotch tape and refills. The same went for my Snail refills and other adhesives. I made a box just for them and they are now nicely labeled on a box in my shelf and I realized I won't have to buy any for several months (smile). So the other day when I ran out of mono adhesive, I walked over to my cabinet, pulled out my nicely labeled adhesive box and found a new one. Didn't have to go digging for one. So basic and yet so refreshing at the same time.
So is there anything in your life that you have a "lot" of that's spread around at your house? When I started looking around and thinking about how some of my items were laid out, I realized I have a lot of work to do. It's refreshing though, to not have to keep up with where they are all at. As soon as our schedule slows down a bit, I'm hoping to do even more organizing. I can't wait until I can get into my craft room and organize it. Maybe I'll be brave and post some pictures. It has become our catchall room where we throw everything when we need to clean up quickly. Maybe some of you have an area like that too? If so, you'll have to share. Maybe we can encourage each other. I definitely want to make mine usable again. Just have to work out the right timing of it all.
So give your thoughts? Do you want just Stampin' Up! ideas or variety of ideas? Leave me a comment or send me an e-mail.
Blessings,
Lisa
Tuesday, June 11, 2013
Sunday, September 4, 2011
cd holder gift
 A friend of mine got married this year. One of the things I did for her was make a slide show using the My Digital Studio. It's cool that you can not only create a scrapbook, print it out, but also add music to it and create a slideshow of it on a DVD. I created the slide show, and burned it to a DVD. Then I started thinking about how to package it. This is what I came up with. The very top has a notch cut out of it so she can pull the DVD out. You just untie the ribbon to remove it. I almost used a belly band, but I thought this was prettier this time. It's hard to see but I also stamped the background too. I colored the flower using a blender pen. The main colors I used are concord, pear and olive. I also added a touch of daffodil (for flower center) and suede for the branches.
It was actually pretty quick to make.
I just measured the width
 of the cd added a little to the cardstock so I could fold up the side edges to glue together. I then punched half a circle in the top, tied the pear ribbon around it all and then added on the top sections.
I hope you enjoyed my packaging idea. I thought it turned out pretty and was really happy with it.
Hope you have a great day today.
Sunday, July 31, 2011
scrapbooking your faith - winter
 This was my January SYF. We discussed having winters in our life. Times when things aren't always going right or are "darker" so to speak. Winter with it's starkness and lack of light can feel that way at times. It's during those times that we need to focus more of our time and energy on God and his wisdom. If we rely on him, he can direct our paths and help us through the harder times. He can help us focus on the beauty that winter brings into our lives. I know I love to look at an area (especially a wooded area) after a fresh batch of snow has fallen. Sometimes it's almost magical a
 nd extremely beautiful. What we have to remember is that the winter times help strengthen us and helps us persevere.
I know it's not really the time to think about winter in the middle of a hot spell of our summer. I apologize for being so far behind. I guess you could say at this time, I'm still going through a winter of sorts with trials. I know though through it all God will remain faithful and I will persevere.

These pages mainly use the Big Shot, but it also uses the Snow Swirled stamp set.
thoughts and prayer sympathy
 We had a friend of ours who had a close family member die recently. I had to make them a card letting them know that I was thinking of them. One of my favorite sets to use for this type of card is the Thoughts and Prayers stamp set. I just stamped it on glossy cardstock with Staz On ink. I then used a post it note as a mask and then inked up my card using a dauber. I used various scallop punches to make the clouds at the top. It's also hard to see in this picture but I also added little blades of grass with a marker. The saying is punched out with the large oval and matted with the scallop oval. It is raised up on dimensionals.
I hope you enjoyed the card today. I thought it was somewhat clean and simple, but also very nice for the occasion.
Tuesday, June 28, 2011
toddler birthday card
 We got invited to a friend of ours child's 2nd birthday party. She likes stamping and scrapping too, so of course, I had to make him a card to celebrate the occasion.
 I saw how to make this giraffe on our Stampin' Connection site that demonstrators have access to. I first saw this giraffe on a card made by Maureen Albert. Her card was different, but I just thought it was the cutest thing. I like punch art in general, but I thought this one was especially fun because our gift included lots of animals, including zoo animals.
This little card is basically lots of punches. I used mainly current ones but I did use at least one retired one. I used the five petal flower for the ears. The owl punch for the eyes, nose and top of the little things on his head. I used the slot punch (retired) for the little things on his head too. You could cut little strips instead. I used 1 3/8" circle and scallop circle punches. The large and small oval and the 1/2" and 3/4" circles. I inked the edges in the respective colors and the head is actually popped up with dimensionals. I stamped the saying from Teeny Tiny wishes and added some 1/8" espresso ribbon. Except for trying to figure out the right sizes to put where it was really an easy and fun card to make I think.
So I hope you enjoy my share today.
Have a great day.
Lisa
Wednesday, June 22, 2011
second fathers day card.
 I made this somewhat cute and fun card for my husband from the kids. They kind of remind me of raccoons or at least the ones that use to visit my grandmother's house. The ones that visited her were always wanting food or attention, which my kids always seem to want one or the other at our house. Her raccoons constantly made a chattering noise because there were so many and my kids always seem to talk or make noise. They are quietest when they sleep. :)
They are good and creative kids for the most part, but they are definitely busy. I just couldn't resist making this card like this because of that.
I do only have one raccoon stamp and yes its nose faces left, which would be the one on the right side. So how did I get the other one? Well you can't tell in this picture, but I cheated. I stamped the raccoon on a piece of transparency and cut him out and flipped him over. I tried to put the glue under the darker parts of him, but you can still see a little near the bottom. So that's how I cheated. I did watercolor the bear with my blender pen and ink pads. The star is stamped on daffodil paper and then cut out.
So I hope you like my idea. It too could be used for other events - camping, birthday etc. Hopefully it inspires you to come up with some other creative options when things don't work exactly like you want them too. Have a great day.
the open sea fathers day card
 I like this set and I'm sad it didn't make it into the regular catalog. It is only available through the end of August. It's a good manly set. It's also great for some travel pics and even boat or beach scenes.
 I used it for one of my 2 father's days cards. Even though I made a Father's day card, it could also make a cool birthday card or thinking of you, miss you etc. The saying could be interchanged.
For this card I aged the log sheet with my soft suede ink and my spiral punch, which I'm really sad to see this punch retire. Stampin' Up! is the only company that I have personally seen that type of punch in and it was one of my first favorite punches for the style. It was different and I liked that.
I stamped the boat on Whisper white and then colored it in using my blender pen and my ink pads. I also added some cherry seam binding which I love and am glad they are continuing. I got the saying from Teeny Tiny wishes. It's hard to see in this picture, but the Baja is also Versa Marked with both the anchor and the other directional symbol in the set.
Overall a nice and manly type of card, which I have to say is hard for me. I do prefer flowers and butterflies. I hope you enjoy this card idea today. Have a great day.
Saturday, June 18, 2011
scrapbooking your faith - christmas
 Since I'm so far behind I'll post two in one day. This was our Christmas Scrapbooking your faith class. I always feel torn around Christmas about what to scrapbook. Why, because we don't ever have any pictures really that share our faith during these times. We go to services and Christmas events, but most are quieter times where you don't really take pictures. So all I really take pictures of is the gift exchanges and decorations and such. So all I can do with the other part is journal it.
 Since I only have the other to scrapbook, I wondered how I could
 add a religious element to the pages. One of the ways was to use the Come to Bethlehem set. Being smaller though it got kind of lost on the page, so I had an idea. I decided to punch out a circle and stamp the image. I then used my dauber and inked the bottom to look like sand and then inked the edges to give depth. Then I used my tab punch and made it look like an ornament. Several of our decorations that we have in our home share our faith, so it will fit right in with the pictures. It also fits in with the gift giving, b
 ecause Christ was the perfect gift we could ever receive.
 I used the Jayne's type alphabet and the concord ribbon and papers. A tip I used for my stamp set was that I cut the star separate from the wise men. I don't know why but I didn't like the look of a dark star. By cutting it apart I have a choice. With the clear mount I can put the star anywhere I like now. I also used Elements of style for the vine look behind the letters and popped up several of the ornaments. It's hard to see in these pictures but the one ch
 erry cobbler ornament has the tinsel wrapped around it that we sold in the holiday mini. It only took a small bit to wrap around it, maybe 3" or so. It just gave it an extra sparkle it seemed, kind of like being on our tree.
So I hope you like these pages and it gives you ideas of some things you can do to share your faith.
Have a great day.
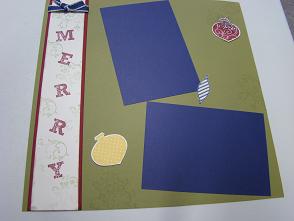
scrapbooking your faith - trust
 Seems like I'm farther behind then I remember. It's almost this time of year again. It won't be long for sure, especially as fast as time seems to be flying.
This was either last September's or last October's Scrapbooking your faith class (seems like we had to cancel one month). The theme was trust. We talked about learning to trust God, especially when life seemed scary or unknown. He knows the plans for us and we don't, so we need to learn to trust and rely on God more in our lives.
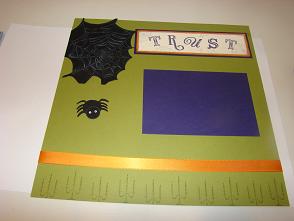
These pages could be used for Halloween pictures or also to share about a time in our life where we had a challenge or needed to place more trust in God.
We used the Wicked cool set that will be in the new catalog along with the Broadsheet alphabet. I think the only things retiring are the bat punch and the pumpkin satin ribbon. I will miss them. I thought the bat
 punch was really cute for the fall and I love the satin ribbons. The spider was made with punches too. I used circle punches and the bat punch for the legs cut really close together. It's attached with linen thread to the spider web. It's also on a dimensional so it's like he's floating down so to speak.
So I hope you enjoy the pages and have a great day today.
Tuesday, May 31, 2011
masculine guitar birthday card
 This is a card that was made for a someone that likes to play games like
Guitar hero. I thought this stamp and card idea was great for the person it was made for. It's hard to see the detail of this card, but it is shiny and sparkles some. The lighting wasn't very good the night that I took the picture. Sorry I don't have a better picture. The guitarist is actually cut out and popped up with dimensionals. I used the edges of the dimensionals to pop up the smaller areas. I hate to waste stuff, so I use even the smallest of scraps when I can.
It is stamped twice. That way I didn't have to cut out the cords and small details, just the main character. It also gave it more of a 3d type of effect which was cool. The star is also popped up as well as the saying. I used the seam binding ribbon and the Word Window and Modern label punches. The background is just the brayer bounced around with various colors.
It's somewhat a basic card, but it fit the need and they enjoyed the card.
The inside has stars popped up on it too as well as another saying. Sorry I forgot to photograph the inside. I hope it gives you an idea for a masculine card next time you need one. Hope you have a great day today.
Saturday, May 21, 2011
wedding shower card
 We know several people getting married in the next couple of months. Most all of our friends went from getting married to having children, so there weren't too many weddings for a while, but several baby showers.
 One of our friends had a shower recently and this is the card I made her. It was at a busy time, so I wanted a simple but elegant card.
I used the Elegant lines embossing folder and embossed some whisper white paper. I then took a dauber and my frost white shimmer paint and daubed all the raised areas which created a shimmer effect on the raised area (if you look really close you can see it). I then tied some organza ribbon around it creating a tone on tone look. I wanted a little pop, so I punched a scallop oval out of Basic black. I then stamped Congratulations with my black and then punched it out with the large oval punch. I raised the saying up with Dimensionals for added pop.

On the inside I added a saying and Congratulations in the same basic black. The cool thing with the clear mount is that I put both of these on my block at once, lined them up and stamped. Pretty cool. I decided I needed a little something else so I took the large flower from the wedding sweet set and stamped it subtly in the lower left corner. If you look really close you can see it. Sorry it was the best picture I could get at the time. It is there though. I think it's fun to add little touches to the inside or the envelopes to make the cards even more special.
Hope you enjoy my share today. Blessings. Lisa
Wednesday, May 18, 2011
mothers day card and new mini set
 Hi everyone,
Sorry its been so long. Life just gets somewhat crazy at times. I haven't had as much time to create lately, but have created items for my classes and when I need items. Just need to pick out time to document them and download them all. We have had a busy few weeks being active in several things. We've had church activities, after school activities, field hockey, etc. Seems like some days we meet ourselves coming and going. I'm sure some of you can relate. I'm hoping summer brings somewhat a reprieve although, it's starting to look somewhat busy already. So I've made a few cards outside of my class time cards and this is one of them. This was my Mother's Day card for my mother. This new set is in the new mini that's out. It's called Fabulous Florets and I just love this set. I've already used it in several colors even. This one uses Rose Red and Pretty in Pink (I hope you can see the stamped flowers). I added some Pear seam binding that is being rolled over and can still be purchased. I did cut out layers of the flower. I basically stamped it 3 times, cut out each one making it smaller each time. I added dimensionals between the layers to give it a pop. Made it look really pretty and 3 dimensional. It was overall an easy card, but thought it made for a pretty Mother's day card. Even though that holiday is over, I think it would still be pretty for birthday, showers, thinking of you, etc type of cards. You wouldn't even have to add the layers, I just did that to mine just because I wanted too.
I've also been working on a digital album idea too that I hope to have done soon. There is a sale going on in May for printing those. So I've been spending extra time doing that too. I'll have to remember to post some pages when I'm done with it. It's all about a trip we took in April to South Carolina with Boyscouts. So anyways, I hope you enjoy my card today and I hope you continue to create. Blessings. Lisa
Saturday, March 5, 2011
scrapbooking your faith - august
 In August we talked about challenges and how we deal with them. Several had been having some trials in their lives and so we took time to reflect on some of that.
My pages that I chose I tried to keep upbeat. Because even when we have trials, we can still have joy and/or blessing can still come during and from those times. We also discussed how we are never alone as God is always with us. :)
My one page I copied the idea from the Stampin' Up! catalog for the most part but the
 other side I just made up to go with it.
The saying on the top picture says, "If at first you do succeed try not to look astonished." The other is a quote from John lennon that says, "Life is what happens to you while you're busy making other plans." Both I thought were fitting when it comes to challenges. One because life does happen no matter what and I know lots of people that have been astonished when something worked out. That saying always brings a smile to my face, because I've seen it happen more then once.
The main sets used on this was the Eastern Blooms stamp set and the Full of Life stamp set. I cut out some of the flowers and punched out some of the others. The main colors were Crumb Cake, marina Mist, Perfect Plum and Concord Crush. The ribbon and some of the words were also in Pear Pizazz.
Hope you enjoy the pages and always remember God is with you and loves you. Hope you have a great day.

Eastern blossoms birthday
 I just love this new tree branch stamp from the new mini. It comes from the Eastern Blossoms stamp set. I colored this one and made a little birthday card using it. It was a fairly easy card and filled my need to color, which I get from time to time as you guys know.
I used Pretty in pink and rose to color in the flowers and pear and olive for the leaves. I stamped the saying and punched it out too and the ribbon is our new Rose Red seam binding. I love having different colors of ribbons that match.
I hope you enjoy my little share today.
I know I've been a slacker a lot lately and I apologize. We have so much going on right now and I don't see it getting better soon. I'll try and post as often as I can. I'm still creating when I can and have various class items to post. I just have to get time to post them. :)
Hope you have a great day today.
Saturday, February 12, 2011
more valentine projects
Do you  all remember the little fortunes we made in school.? You know the ones where you pick a color and move the fortune as many times there were letters. Then you did a number and did it again until you got to the end and you lifted up the fortune for that person. Well these were made the same way. They make cute little candy holders. Just fold them and add handles. I also rounded my points to make it a little more baskety. I know that's not a word, but I couldn't help it.
I thought this was a great idea. Stampin' Up! shared it with us demos and I couldn't resist. I gave these to my club members. Each one was slightly different as I used our hostess 6x6 pack to make them. I forgot to take pics of the group though, so this is all I have left.
Isn't it cute?
My handle is the Dotted Scallop Ribbon punch.
 I also made some more mini cards. Here is one of them. It uses the Filled with Love set and the heart of hearts embosslit from the big shot. I stamped the background on it and then I added a punched heart using the full heart punch. Don't you just love it when they coordinate? Then I backed it with a black heart from the embosslit - another coordinating piece. Then I added some real read grosgrain ribbon and then a little gem in the top right hand of the heart. The heart is also raised up on Dimensionals.
Pretty quick and easy card.
So I hope you enjoy more Valentine ideas.
Sorry I've been such a slacker posting. Life has been very busy lately. I'll be glad when it slows down.
 all remember the little fortunes we made in school.? You know the ones where you pick a color and move the fortune as many times there were letters. Then you did a number and did it again until you got to the end and you lifted up the fortune for that person. Well these were made the same way. They make cute little candy holders. Just fold them and add handles. I also rounded my points to make it a little more baskety. I know that's not a word, but I couldn't help it.
I thought this was a great idea. Stampin' Up! shared it with us demos and I couldn't resist. I gave these to my club members. Each one was slightly different as I used our hostess 6x6 pack to make them. I forgot to take pics of the group though, so this is all I have left.
Isn't it cute?

My handle is the Dotted Scallop Ribbon punch.
 I also made some more mini cards. Here is one of them. It uses the Filled with Love set and the heart of hearts embosslit from the big shot. I stamped the background on it and then I added a punched heart using the full heart punch. Don't you just love it when they coordinate? Then I backed it with a black heart from the embosslit - another coordinating piece. Then I added some real read grosgrain ribbon and then a little gem in the top right hand of the heart. The heart is also raised up on Dimensionals.
Pretty quick and easy card.
So I hope you enjoy more Valentine ideas.
Sorry I've been such a slacker posting. Life has been very busy lately. I'll be glad when it slows down.
Thursday, February 3, 2011
more valentine club projects
 This was our third mini card we did. It was on a real red base with a black mat. The whisper white we stamped the xoxo stamp with pretty in pink ink and inked the edges. Then we punched the black scallop and red circle. On another white piece of paper we used the stamp set called I heart hearts and stamped 2 hearts and then cut around them and popped them up with dimensionals. It gave the little card some added dimension. I made some more of these cards and I need to take some pictures. they are really fun to make.
 This is the last item we made. It is a gatefold card that opens in the middle. It doesn't quite look like that though as the black mat goes past the middle, so it overlaps it. The left side is secured closed behind the heart mounted on the right side with a dimensional. It all slides underneath and fits just snugly. I thought it a fun way to open the card and a cool twist on that type of card. The little heart and circle in the middle of the Love word are punched pieces and the little heart is raised up on dimensionals. The little hearts at the bottom are also hearts from the heart punch from the itty bitty punch pack. To top it all off I added a little jewel to the red heart. I love how that set matches some punches. I love it when things match and are easy to use to create that little wow.
So I hope they give you some ideas for some more valentine cards. Hope you have a really great day today.
Saturday, January 29, 2011
mini valentine cards
 Here is one of three mini cards we made for club to fit in the little magazine box. This one is real red basic black and then our new glitter paper and the dsp that was on special earlier this month. The glittered heart is punched out with our full heart punch and the black outline is the scalloped heart of heart embosslit used with the Bigshot. I tried to make simple, reproducible cards to make it easy to make Valentines this year.
I love this new glitter paper. Its so shiny and adds such a pop to the cards and items.

This second one uses the same embosslit and also uses a stamped image from the Filled with Love stamp set. It is also punched out with the full heart punch and lifted up with Dimensionals. The sayings are also from the Filled with love set and are stamped using Basic Black ink. All these were really quick to make. They are 3 x 3 cards which fit our mini envelopes really well.
So I hope you enjoy my mini cards and they inspire you to make some fun valentines for the ones you love, because its always good to let others know that we love and care for them.
Wednesday, January 26, 2011
valentine mini magazine box
 Valentine is fast approaching so for our club meeting this month our focus was on Valentines. We made this mini magazine file type of box. We made it with Pretty in Pink paper.
 It wasn't my idea, but I can't remember where I first saw it. I had written down some notes about it last year and now I can't remember where I saw it or who originally created it or if it even said who created it. If I find out or remember I will update my post.
It is a fairly simple design. Its made out of one piece of 8 1/2 x 11 piece of paper cut down and scored and folded. We decorated these boxes fairly simple, but you can make them as elaborate as you want.
It can also be used for other holidays too. I can see Birthdays, thank you notes, Christmas, etc. Just change out colors and stamp set. This little box holds several 3x3
 cards with envelopes.
I used the stamps from the Filled with Love stamp set to decorate this box. The heart matched the heart punch and the backing is the Scalloped heart of hearts embosslit. I then added some Real Red grosgrain ribbon and some Dimensionals and was done. I also added a gem to the front of the circle. Sorry I didn't get a picture of that part. You can sort of see by this picture that I stamped the circle with red, then I matted it with a pink circle and then a red one. Using our great punches of course.
So I hope you enjoy my share and are gearing up your holiday treats for the people you what to share with this holiday season. I'll post the cards next. Have a great (and warm) day.
Friday, January 14, 2011
birthday cakes card
 This is a card I made using the hostess set Birthday Bakery.
It was a fun card to make. I had to decide what colors to color the various cakes. It's kind of fun deciding do I want a chocolate cake with strawberry icing or vanilla, etc. :) It can make you hungry for sure and it definitely wasn't a "day for just a sliver". :)
I used the cherry cobbler seam binding as the ribbon. I think Cherry is probably my favorite new color and I used it for a lot of items around the holidays.
Also SU doesn't have a light gray marker anymore, so I used Sahara Sand to color the platters. So I hope you enjoy my creation. Hostess sets aren't hard to get and with Sale-a-bration around the corner, it's a great time to plan a workshop or become a demonstrator. Let me know if you are interested.
Hope you have a great day.
Tuesday, January 11, 2011
scrapbooking your faith - July
 These were July's pages. This set and roller was in the mini at the time. I really liked this Fourth of July set and hope it returns. We just stamped and punched out the stars. Some are raised up on dimensionals. The saying is one from the matching roller that I cut apart to use for various sayings. It's also up on dimensionals.
 The fireworks are stamped in red and navy too. The ribbon is navy grosgrain with a small piece of real red for the knot. Just a little variance that I thought went with the pages. It's also hard to see, but there a
 re little firecrackers stamped in Versa Mark on the bottom of the right side red. If you look really hard you can see it in the picture.
 I like the saying too - God bless the USA. We are really truly blessed in this country with all the freedoms and all that we have. Sometimes we have to take time out and remember how blessed we are.
I hope you like
 the pages and it helps you, even at this time of year, to remember the blessings you in particular have. Everything from food, to shelter, to freedom of religion and just freedoms in general. Even freedom to speak your mind for the most part. Something not found in all areas of the world.
Hope you have a warm and safe day today.
Subscribe to:
Posts (Atom)