So I hope they give you some ideas for some more valentine cards. Hope you have a really great day today.
Showing posts with label class items. Show all posts
Thursday, February 3, 2011
more valentine club projects
So I hope they give you some ideas for some more valentine cards. Hope you have a really great day today.
Saturday, January 29, 2011
mini valentine cards
I love this new glitter paper. Its so shiny and adds such a pop to the cards and items.
This second one uses the same embosslit and also uses a stamped image from the Filled with Love stamp set. It is also punched out with the full heart punch and lifted up with Dimensionals. The sayings are also from the Filled with love set and are stamped using Basic Black ink. All these were really quick to make. They are 3 x 3 cards which fit our mini envelopes really well.
So I hope you enjoy my mini cards and they inspire you to make some fun valentines for the ones you love, because its always good to let others know that we love and care for them.
Wednesday, December 29, 2010
scrapbooking your faith - may - church family
The church I just hand drew and cut out the various pieces. Then used those to create more. The clouds are punched scallop ovals. The door is just smaller then a circle punch and slide through to round the top. It's also stamped with the woodgrain background stamp and then I added a gold brad to make a doorknob. The grass is just the pinking hearts border punch.
I stamped a couple of sayings - one is the definit
The m
scrapbooking your faith - easter
This one was the Easter pages that we had done back in April. There are some things in this picture that are hard to see. First the sun has shading on it and then each little ray has a bit of glitter added to it for extra sparkle. The crosses have the wood grain background stamp stamped on them and then we colored in nail holes with a marker. The concord mats and the sand are spritzed with shimmer paint mixed with alcohol so they both sparkle. The ribbon was a ribbon from the last catalog and a bulk buy for demonstrators, but could be substituted for a different kind. The shadows were just created with a dauber. These are 2 - 12x12 pages pushed together. There is one cross on one side and two on the other. I thought these were a neat change of type of page. Everyone is wanting the mats for the 4x6 pictures so that is what we are incorporating for now. Limits the creativity a little, but really helps in the completion process which many of us need right now.
I hope the pages inspire you some and help you share some of your faith and traditions with your family. So many times we scrapbook events or trips and very little about what we believe, our traditions and what is important in our lives today. That's why this class was formed to help us at least take a few pages to share those types of things.
I hope you enjoy the pages as it won't be long before that season arrives again and our focus shifts from Christ's birth to his death and resurrection.
Hope you have a great day today.
Wednesday, September 15, 2010
Just believe club project
Basically we stamped the flowers with black stazon on Whisper White paper. We then took Daffodil Delight, Pumpkin Pie, Bashful blue, Not Quite Navy and Night of Navy to apply shading to the card. We also used markers and colored in the saying (Pumpkin and Navy) and then punched with the 1 3/4" circle. The Pumpkin circle was cut using the Big Shot and the circle die.
The ribbon is our fun new 1/8" taffeta ribbon in Daffodil Delight. It was a pretty quick card even with all the shading. I hope you enjoy the card today and I hope this reminds you to take time to enjoy some of God's beautiful gifts he gives us.
Blessings.
Saturday, August 7, 2010
butterfly builder roller birthday card
This was another card that we did for our last club night. We used the new builder wheels with the jumbo roller. I left out the middle wheel so we could use the new satin Razzleberry ribbon in the center. It's so pretty and adds a nice shine to the card and the space looks really good with that width of ribbon. I rolled the wheels with Old Olive ink. I used the Punched Posies hostess set for the butterflies. If you don't have this one, then Butterfly Prints in the main catalog is really close. For these butterflies. We used Rich Razzleberry and Concord Crush to ink the butterflies using the Rock and Roll technique. The middle one is popped up with dimensionals to give some dimension to the card. :) I just thought this was a fun and pretty easy card for a birthday. You basically just roll it, tie on ribbon, stamp and punch 3 butterflies and your done.
Like I've said lately, I really like easy as the schedule has been a little crazy and will be even more so when school starts.
So I hope you enjoy today's share.
Thanks for looking and have a great day.
Wednesday, August 4, 2010
owl 3x3 for you card
This was a little card I made for them last time they came. It uses our new owl punch. I also used our bird punch (for the leaves) and I also used the Big Shot to texture his little belly area using the textured embossing folder to do that.
I also used the saying from Teeny Tiny wishes which is a great versatile set with lots of different sayings. It's one of my favorites since there are so many to chose from.
This punch is kind of fun to work with. I've also seen several other things made out of it that I'll have to try soon. I mean if you look at the base of it what can you make out? hhmmm? I see a flower, an animal head (without the feet) and possibly some other items too. I'll have to play around with it some more, so I can share some of the different items it makes. If you see something in it you'll have to share what you come up with too. That's one of the fun parts - being creative and sharing together. With our new Stampin' Connections website that demos can access there are thousands of ideas out there. I love being able to access that and getting to see and get all the new stuff first. It becomes almost like Christmas...too fun.
So anyways, I hope you enjoy my little note card. I also hope you have a great day tomorrow and are able to stay cool. Blessings.
Tuesday, July 13, 2010
club card - black magic with a twist
So I hope you enjoy my share today. I'm not sure how much I'll post this week as we have VBS at our church and my daughter has field hockey practice too. Just another busy, busy week. I'm sure many of you can relate and understand the crazy schedule thing.
I hope you have a great day and get some time soon to be creative. Blessing.
Saturday, July 10, 2010
club card - flores suaves
This card was one of our club cards we made. The flower is colored with the ink pads and a blender pen. If you haven't ever used blender pens they are cool. It's basically a wet pen. You dip it into the ink and then apply it to your paper. It's like an instant marker, just a little softer.
The cool part is that it can be re-used again and again. Just wipe off the old ink and it's ready to go for the next color. Kind of like an aquapainter, just not as wet.
Here I used Rich Razzleberry and Certainly Celery and Old Olive to color the flower. The background paper was an easy version of the emboss resist technique. The paper already came embossed with the swirls and all we had to do was color it with Razzleberry ink. I just took a sponge and sponged the whole piece of the paper. This particular paper retired, but the Presto Patterned paper is different, but does the same effect and is still available. Of course you can always emboss your own paper too and it has a similar effect.
The words are popped up off the card and I also used white grosgrain ribbon.
This card looks really pretty in real life in my opinion. I think it's one of my favorites so far.
So I hope you like my share today. Hope you have a great day. Blessings
Friday, May 14, 2010
milk carton bird house
If anyone knows, just let me know and I'll update. I keep saying I'll get more organized but it's just not working yet. We just have too much going on. I think I need to hire an organizer to set me up and then maybe I have a slim chance. :)
So anyways this birdhouse is made using the milk carton die. We stamped it with the wood grain background stamp in Chocolate chip. We punched a circle out of the one end for the hole. Used the scallop border to trim the edges of the top piece which is a Brocade Blue. Then punched a bird and leaves using the 2 step bird punch using bashful blue and certainly celery. We stamped the wing with the stamp set Vintage Vogue which will be in the new catalog. I used basic black marker for his eye. This one is made to set flat, but you could also punch a hole in the top with the cropodile and string a ribbon through and make an ornament out of it too. You could also crinkle up some strips of paper for fake straw to look like a nest inside. I ended up buying malted milk ball egg shapes to put inside as they looked somewhat like real eggs. I think most got eaten during class though. :) I guess I shouldn't expect chocolate would last long with a group of ladies . :) Oh well, we all had fun and got our chocolate fix in too. So in all it was fun night. I always have with my club ladies.
Hope you have a great day again today.
Thursday, May 13, 2010
happy birthday flower punch card
To make this card we stamped the Tempting Turquoise paper with the set from the last mini called With All my heart. We then punched it out using the extra large fancy flower punch. The Whisper white piece is punched using the scallop trim corner and border punches. The stem is just a thin strip of Certainly Celery. The leaves are actually a 1 3/4" circle punched shape punched twice. First you punch out a circle then you feed a little less then half of the circle back into the punch and punch again. Voila, you have your leaf shape. We also took a bone folder and made lines down the center to give them some character. The saying is stamped in Turquoise and was from the Well Scripted set that was also in the mini, but really any set could be substituted. I then punched it with the wide oval punch and popped it up with dimensionals. This is all layered on Night of Navy and Tempting Turquoise papers.
It was a lot quicker to make then you think. It makes for a fun and somewhat bold and happy card I think.
So I hope you enjoy my birthday card for the day. I also hope you have a good day today. Seems like several of my customers are going through some harder times and I was trying to think of some ways to be a better encourager. Maybe you know some too in similar situations. How could you do that? I'm thinking about making some thinking of you cards or praying for you cards soon to send as soon as I can. Maybe even some thank yous to those who do a lot of work and don't get a lot of praise. Hmmm... I'll have to plot some more ideas. You'll have to share what you come up with too.
Wednesday, May 12, 2010
mothers day club card
So basically we used the 2 step bird punch for the leaves, 3 circle punches, crystal brads for the centers of the flowers and then the stamp set Well Scripted for the saying.
I thought it a fun card to share. Since my sister is in this class too, I also made our mom another card using this technique but using other colors. I'll have to download that picture next to show you what that looks like.
This card uses a retiring color (lovely lilac) as well as certainly celery and whisper white. Lovely lilac is one I'll miss as my daughter loves purple.
For those of you that like some of the retiring colors I would recommend purchasing them soon. They have had a greater then usual demand for some of them. There are some already on back order and some they are trying to fill with textured paper. It won't be long that it will switch to while supplies last.
Thursday, April 15, 2010
Scrapbooking your faith - love
These are the pages we did for our scrapbooking your faith class. Sorry I'm a couple months behind posting. I just realized that. This is the one we did the end of February. Yes I know it's retired paper, but this is not a class that I'm trying to make money on. It's put together to help us scrapbook more about ourselves and our faith. Something I tend to do little of with all the birthdays and special events that we have. I so need to do so much more of that and this class helps me do that. It also allows me to have bible study with my friends and grow stronger as a Christian as we learn and share together.
These pages would also look pretty I believe with the designer series paper located in the current mini. It's full of pinks and reds and it glitters. What's neat about the paper that's on these pages is that it's flocked and was in the Holiday mini. I had hoped to use it before it retired, but I did get to show it off during that time. I just thought it went really well with pages on love and couldn't help but use it. Even though the pages are retired, I hope the pages give you ideas that you can use in your albums.
I liked the way these pages turned out as I thought they could be used in a myriad of ways. We could focus them on people we love or a specific person, about our relationship with God and how he loves us and we him or even how you share love with others - mission, working with kids, youth, etc. You could also scrap gifts/talents he has given you that you love and how you use them or even what your favorite love languages you have are and how you share them. I could keep going on with ideas.
We started out our lesson by defining love and looked at various scriptures that did that (i.e. 1 Corinthians 13). We also talked about how love is an action - an act of doing. How when we have a growing faith and hope (positive outlook) it is so much easier to share and spread love. We also talked about various bible characters that we had been discussing lately and how they shared and showed love. How much God loves us - enough to give us his son. We also talked about if we share our gifts (talents) with love how much more we can do there. We just have to be open to the opportunities God gives us and realize that if it is his will he will provide all the resources we need to teach others about his love.
So I hope you enjoy my pages and the really short synopsis of the study. We spend about an hour in the bible study part, so that was definitely the quick version. As always if you have any questions, just ask.
Wednesday, April 14, 2010
kids scrapbook class
The class time onsite includes everything you need to make these except for adhesive and kid friendly scissors.
Part 2 of the class is an additional $7 and includes page protectors and a covering (as shown) that you also make in class. So if you'd like part 2 too then the total would be $24 for both parts. When you rsvp I'll need to know which parts you'd like to do (i.e. part one or part two). I'll assume if you say part two that you mean both parts.
A lot of these page ideas came from demonstrator marlise Klein. I changed up a few to match more of my customers tastes, but the general ideas and many of the pages originally came from her. She was generous enough to share these ideas with demonstrators on our stampin connection a great new site that SU set up for us demonstrators to share ideas.
This could also be made up as a class to go, but I'd have to share what other items you would need to complete it on your own. For that type of class I haven't included shipping either - that would be extra.
If you have any questions just ask.
Sunday, April 11, 2010
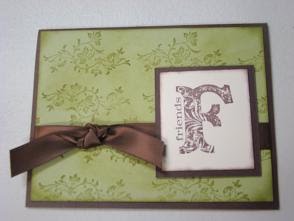
friends card in 2 colors
So if they stamped their paper, their card looked like the top one.
The main difference between the top and bottom one is one the color - the bottom is pretty in pink and the ribbon - the top one has satin ribbon. Isn't it pretty? I think it makes it look more elegant then the grosgrain. Both are pretty though, but on this card I think I like the satin. I didn't have it when I stamped the other cards, so I wanted to point out the difference on this post.
I'm also sorry to have left you hanging for so long. We ended up going out of town, somewhat last minute and I was having some internet issues there and then we've been enjoying our last day or so of freedom before school starts back tomorrow. Hopefully I'll be better this week. So I hope you enjoy the post. Have a great day.
Wednesday, January 20, 2010
club projects - valentine project 2 pretty in pink
So here is another of our club projects.
This was our second club project that we did.
This one uses pretty in Pink and rose red as it's main colors. It also showcases the new pinking hearts border punch (notice the little hearts it punches out - several haven't caught that). It also uses the scalloped heart of hearts embosslit, which coordinates so well with the full heart punch. It is popped up on dimensionals to give it some dimension. lol. Sounds so lame, but it does add so much. I used a dauber to shade the heart with pink a little to create a shadow effect. Same with the little hearts punched with the new small heart punch. Of course it looks extra yummy with the new pretty in pink satin ribbon. I love the feel and look of this ribbon. Very pretty. The stamped image is also the new jumbo roller called I {love} love and is rolled using pretty in pink. So I hope you enjoy my little Valentine card. It was fun to make and not very hard really and uses a ton of new fun things.
Monday, October 26, 2009
table setting die
One item that is in the mini is this new table setting die (which could be a $10 item). I decided to show a couple of projects off using it at my last club. I made a place card for each member and I made them this little treat bag using the swirl cut out image. The swirl part can be used to make flowers or pine cones or little ornaments, whichever you prefer. I chose to make a flower using our new Rich Razzleberry paper. I used the hostess set Holiday best for the words colored with Razzleberry and Old olive. The leaf is also cut out with the die. It can be used as a leaf or petal. The rest of the bag is made using the Top Note die and a cello bag.
So I hope you enjoyed my little treat and I hope you have a chance this week to share a little something with someone - even a little thank you encouragement email is a great way to think of someone and so easy or better yet a hand made card or a phone call even. We have so much to be thankful for - how about you?
Thursday, October 8, 2009
mummy card for club
Now the coffin, I played around with a couple ideas for it. Like the little kid vampire, I thought about having it open at the bottom, but I wanted to change some stuff up so this one opens to the side. It's a little more boxy looking because of the attachment to the back. If you like the more pointy style then you will have to have one that opens like the little vampire. To make the coffin you measure in from the top 1" and down 1" and that gives you your corner cut. Then you measure 1 1/2" down from the 1" cut and then also 1" in from the bottom corner and cut between the two.
I stamped the front using batty for you using black It's punched out matted with black and then a pumpkin pie scalloped circle. The scallops on the circle are also pierced with holes. It is raised up with dimensionals. The background is stamped with the sanded background.
The inside is made the same way, except I started with a slightly smaller piece of paper for the backing. J
I added the mummy to the back of the card. I stamped Happy Halloween from Teeny Tiny Wishes in black. The eyes are punches. I punched out a pumpkin pie piece for the back of the eyes, white for the middle and black for the fronts. I placed the eyes before laying down all the strips (so you do it as you go).
So I thought this would make a fun card for Halloween, but if you don't send halloween cards but scrapbook you can use it too. I thought you could cut the card apart and this would be fun on a 12 x 12 layout about Halloween.
Hope you enjoy. Have a great day.
Monday, October 5, 2009
club project card halloween
We used the Eat, drink & be scary stamp set to stamp the hats in black and old olive. They are on whisper white and cut out. We then wrapped either pumpkin pie or basic black grosgrain ribbon around them. I used the trio flower punch to punch out the flower and the paper piercer to poke a hole in the center and then added on with a glue dot. This is all placed on whisper white, backed with pumpkin pie and then basic black. It's mounted on old olive. I then stamped "You are one of a kind" in basic black on the bottom from the One of a Kind stamp set.
I thought this was a cute card. Now the question is who would be the recipient of it? Who gets the one of a kind witch hat? haha. Back when I was younger I would have had great fun with this card antagonizing my friends.
Of course back then I would have been right there with them seeing what we could get into at the time. Now I'm older and more of a home body, but I'm sure all of us have some humorous or almost humorous stories to tell of our past. So I leave you with those thoughts - pondering who would be the recipient of your "One of a kind" card.
I hope you have a great day today. :) Enjoy your memories.
Thursday, August 20, 2009
club hello card
Here is what I used for this card:
paper: crushed curry, old olive, whisper white
ink: rose red, old olive, crushed curry
stamps: hello again
accessories: crushed curry polka dot ribbon, 1" circle punch, 2 way glue pen, dazzling diamonds glitter, dimensional
Subscribe to:
Posts (Atom)