Showing posts with label halloween. Show all posts

Saturday, June 18, 2011

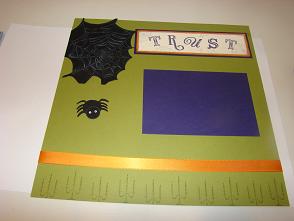
scrapbooking your faith - trust

Seems like I'm farther behind then I remember. It's almost this time of year again. It won't be long for sure, especially as fast as time seems to be flying.

This was either last September's or last October's Scrapbooking your faith class (seems like we had to cancel one month). The theme was trust. We talked about learning to trust God, especially when life seemed scary or unknown. He knows the plans for us and we don't, so we need to learn to trust and rely on God more in our lives.

These pages could be used for Halloween pictures or also to share about a time in our life where we had a challenge or needed to place more trust in God.

We used the Wicked cool set that will be in the new catalog along with the Broadsheet alphabet. I think the only things retiring are the bat punch and the pumpkin satin ribbon. I will miss them. I thought the bat punch was really cute for the fall and I love the satin ribbons. The spider was made with punches too. I used circle punches and the bat punch for the legs cut really close together. It's attached with linen thread to the spider web. It's also on a dimensional so it's like he's floating down so to speak.

So I hope you enjoy the pages and have a great day today.

Thursday, November 4, 2010

6x6 ghost page

This was a cute little page I did for a demonstration. It can be used for a 6x6 scrap page or you can move the sentiment down and make it a 3x6 card. I love the versatility of it and even if Halloween is over, I know some of you have some cute pictures to scrapbook.
This page was really easy. I used the jumbo roller to roll the bats for the background using Old Olive ink. I scalloped a piece of Concord crush and added our new black lace ribbon to the top. I used a saying from the Wicked cool set and punched it out using the large oval and then punched a scallop oval using Concord again. The ghost if you look closely are basically upside down owls with the feet cut off. I just punched them out, inked the edges and then used my black marker to add eyes.
I thought it a great idea - using the owl punch that way. I'm not sure who first thought of it, but I got the idea from our Stampin' Connection site that demonstrators can send ideas too.
Anyways I thought it was fun and thought it might help you come up with a fun page idea for your pictures.
Hope you are having a great day.

Sunday, October 31, 2010

pop can mummy

Hi everyone,
I'm sorry I dropped off the face of the earth from a blog stand point. Time flies without realizing it. Who knew middle school would take so much time? Take that in consideration with a new sport my child is playing, the bible study I'm teaching now, my son starting boy scouts, and all the fun holiday projects I've been making have taken all my free time. Sorry it's been so crazy. I know these are too late for this year, but might give you some ideas for next year.

Now this mummy idea isn't new. I made a card with it last year. What was fun about this project was that we made pop cans with them. We just took a fruit can and I opened the bottom of it with a safe can opener. I then covered it with vanilla cardstock and a few vanilla strips edged with soft suede ink. I used punches to punch out the eyes. Really fast and easy. Then we filled them with treats, rimmed the bottom with crystal effects and sealed the bottom back on. They can pop the top that way. It was funny though, my daughters teachers were afraid to open them - afraid something would pop out. That would be a fun idea though. I might have to think about that for next time. Too fun.
I hope you have a Happy Halloween today and get more treats then tricks. :)

Thursday, October 8, 2009

mummy card for club

Several members saw a card using a mummy last year and talked about how cute it was. So this year I decided to come up with a card and let them do the actual mummy. I'm not the originator of the mummy, nor do I know who first created it. I've seen it on more then one site over a couple of years, so I really don't know who to credit for it.

Now the coffin, I played around with a couple ideas for it. Like the little kid vampire, I thought about having it open at the bottom, but I wanted to change some stuff up so this one opens to the side. It's a little more boxy looking because of the attachment to the back. If you like the more pointy style then you will have to have one that opens like the little vampire. To make the coffin you measure in from the top 1" and down 1" and that gives you your corner cut. Then you measure 1 1/2" down from the 1" cut and then also 1" in from the bottom corner and cut between the two.
I stamped the front using batty for you using black It's punched out matted with black and then a pumpkin pie scalloped circle. The scallops on the circle are also pierced with holes. It is raised up with dimensionals. The background is stamped with the sanded background.
The inside is made the same way, except I started with a slightly smaller piece of paper for the backing. Just cut the edges the same way you cut the front. Next I took a 5 1/2" x 4 1/4" piece of white and then tore it into strips. I also had a small white piece that I tore and very easily tied into a knot. I inked all edges with caramel ink using a dauber. I then laid them on the mat and trimmed the excess to fit and then re-inked those edges. I added the little knot with a glue dot.
I added the mummy to the back of the card. I stamped Happy Halloween from Teeny Tiny Wishes in black. The eyes are punches. I punched out a pumpkin pie piece for the back of the eyes, white for the middle and black for the fronts. I placed the eyes before laying down all the strips (so you do it as you go).

So I thought this would make a fun card for Halloween, but if you don't send halloween cards but scrapbook you can use it too. I thought you could cut the card apart and this would be fun on a 12 x 12 layout about Halloween.
Hope you enjoy. Have a great day.

Wednesday, October 7, 2009

club extra - sweet treat

This is the little extra thing that I gave club members this month. It uses the sweet treat cups. I stamped the image from the Sweet Centers set in Elegant Eggplant and punched out with 1 3/4" circle punch. I added candy to the cup, popped it through the hole and added a olive background piece to help hold the candy in. Before I added candy though I lined up the cup with the back green piece and added the saying part that I punched out to the back of the piece, so when they open it they will also see the saying. I then added a pumpkin pie piece of cardstock as the final background. I added a sucker stick to the back with pop up glue dots stretched around and then placed another piece of cardstock over that to help hold it down.
I like the little sweet treat cups. They were fun to work with and easy. They even come with adhesive attached, which makes attachment a breeze.

If you wanted to you could make a little escape hatch for the candy using another hole punch and tag, but I let these be the way they were.
Hope you enjoy my little treat and have a great day.

Monday, October 5, 2009

club project card halloween

I know a lot of people don't send Halloween cards anymore, so I opted not to put Happy Halloween on the front of this card, although you could. I thought they could put a thank you or thinking of you sentiment on the inside of this card and it would be a good one to send in October. I couldn't resist using these cute witch hats though. Of course I had to make one a little more girly then the others to make it "one of a kind", but if you didn't like the flower a small star should work too. The olive hat is also on dimensionals so it is raised up above the others.
We used the Eat, drink & be scary stamp set to stamp the hats in black and old olive. They are on whisper white and cut out. We then wrapped either pumpkin pie or basic black grosgrain ribbon around them. I used the trio flower punch to punch out the flower and the paper piercer to poke a hole in the center and then added on with a glue dot. This is all placed on whisper white, backed with pumpkin pie and then basic black. It's mounted on old olive. I then stamped "You are one of a kind" in basic black on the bottom from the One of a Kind stamp set.
I thought this was a cute card. Now the question is who would be the recipient of it? Who gets the one of a kind witch hat? haha. Back when I was younger I would have had great fun with this card antagonizing my friends.
Of course back then I would have been right there with them seeing what we could get into at the time. Now I'm older and more of a home body, but I'm sure all of us have some humorous or almost humorous stories to tell of our past. So I leave you with those thoughts - pondering who would be the recipient of your "One of a kind" card.
I hope you have a great day today. :) Enjoy your memories.

Thursday, October 1, 2009

September club project 1

Here is one of our club projects last week. It's called a peekaboo box because when you open it you can peek at the candy inside. I hope give dimensions to this box later. It is made with the web roller on olive paper with a black roller ink. I used the batty for you stamp set and punches to decorate the front. I punched the spider out and lifted him up with a dimensional. The inside has a window sheet covering the hole and all the items were punched with punches. I'll try and type up more later as my kids need to get off to school.
Have a great day.

Tuesday, September 22, 2009

cute vampire card

Okay, I have another cutesy Halloween card. No we don't believe in vampires here, but when I decorated this card I just couldn't resist making him. I thought he fit just right with this card front. He's really cute and he lifts up off the back of the card when opened (see last picture).

I thought the front looked a little creepy with the From the Crypt set, so I had to make it cute inside. Since it has a bat on it, I thought it would be cute to have a little vampire on the inside. I could just see some little kid knocking on our door with a costume looking like this vampire. So that's what you get when you open the card a cute vampire saying, "Trick or treat, smell my feet give me something good to eat". Okay, he only says Trick or treat, but I could just seem some little kid saying that with a horrible vampire accent to boot.

The front is embossed in black embossing powder and smudged with black ink. The base of the card is Chocolate chip but the front is covered with old olive.


The inside sayings are from Teeny Tiny wishes (Happy Halloween) and then the Trick or Treat is from the hostess set Holiday Best. It's inked with Old Olive, pumpkin pie and basic black markers. The cape is an old olive rectangle and I angle cut the top, flipped the cut off piece over and added it to the right side. I curled and roughed up the bottom corner a little to look like it was moving. The head is circle punched, then I did another circle in black and then took the smaller circle and punched twice to make the part in the hair. The teeth are from the small star punch. The eyes are just basic black marker.


To make the card I measured over 1 inch from each side at the top. Then down an inch and cut that corner (both sides). Then I measured over an inch on the bottom and cut from the side to the inch mark on the bottom. I cut a slit in the back of the card to make the vampire stand out. The saying at the top is punched out with the Word Window punch and then matted with the modern label punch.

So I hope you enjoy my card. Different for me, but I thought he was really cute and couldn't resist sharing him.
Hope he makes you smile.
Have a great day today.

Friday, September 18, 2009

halloween triangle box

Last year I showed on the blog a triangle box that we had made in club. It was hunter colored and reminded me of a tree. I saw a somewhat similar idea recently (sorry it was several weeks ago and I'm terrible at writing down where ) and thought it was a fun idea to use the same box for a Halloween project. It almost has a feel of a witch's hat. It was a quick and easy project. If you don't remember how to make it you score your paper in half and then score points to the center of each end (the old entry has a pattern). Just fold the box, punch holes and tie closed. Of course you should always fill with your favorite candy or small gifts etc first before tying it together.
I used Basic Black paper, pumpkin pie and Basic Black grosgrain ribbon. I stamped the saying on white with old olive, basic black and pumpkin pie markers. I used the Eat, drink and be Scary and From the crypt stamp sets (stamped in white craft ink). I punched out the saying using the tag punch (small I believe, but would have to double check and I'm not currently home to do that). So I thought this a fun little treat pouch for Halloween. I hope you enjoy the project and the new twist on an old share. Have a great day.

Thursday, September 10, 2009

punched spiders

I was working on making some items using my new sweet centers stamp set and treat cups. I thought it would be cute if you could put some Halloween type stuff in there (something besides candy that is). So I was trying to figure out some smaller punched items to fit and I decided on a spider (although I might have to try some pumpkins too), so SU doesn't have a spider punch, so I need to stamp and cut one out or make spiders to fit in it and the smaller one shown actually fits into the cup. both of these were made using circle and square punches or corner punches. Basically you start low on your paper with the punch and you just ease up a little each time and snip off a narrow leg (not the whole corner/square). Then you just trim to the desired size (length) and glue to the back of the circle. I then added another circle to the back to finish it. I haven't put on eyes yet as I wasn't sure if I would want punched eyes, white gel pen eyes or googly type eyes, but I thought I'd show you a punched spider you can make fairly easy. I thought the thinner the legs the cooler it looked, so punch really close together. Each punch gets bigger too so that helps with the placement. So I hope you enjoy my little spider and it gives you some ideas. Hope you have a great day

Wednesday, September 9, 2009

Trick or Treat matchbox and a feedback question

Wow, I don't know if my counter is off or if I actually got that many hits in one day. Kind of cool if it's right though, but I'm not sure what caused the jump. Made me wonder what exactly caused the spike. I didn't know if you guys thought the spider or card was just super uber cool or if it was something I said or something else all together.
I'd love to hear from some of you to hear what you are checking out, so feel free to post a comment (please keep it friendly as my kids check out my site from time to time) or you can email me suggestions/comments more privately. I realized my email address wasn't on here, so I thought I'd add that just in case someone did want to respond more privately (share opinions but please be kind in the way you phrase your comments).

I'm really interested in what you all think of my blog actually. I typically enjoy feedback. Now if it's critical type feedback you might have to throw in some chocolate to soften the blow maybe (milk not dark :) ) or even salty snacks help sometime too, but I'm always asking my customers, family and friends for input and like to hear honest feedback.
I'm curious if you'd like less commentary or more? More stories or less? More instructions and creative projects or is that about right? So if you get a chance, post a comment or send a quick email and let me know what you are liking please.
I'm also curious if you liked the Halloween item or not? If you did, I made some more items that are Halloween, more cutesy I believe, but definitely and totally Halloween. Like I said before I struggle with that one some, but for some reason I enjoy the fun/funny, cute parts of the holiday.

Okay, enough of the babble and onto the project.
This project is a Big Shot Matchbox. I used olive paper to make the box. I then cut a small piece of the Cast a Spell paper to add to the top and then placed a black mat on top of that. I then stamped the image (from Holiday Best Hostess set) using Pumpkin pie, Old Olive and Black markers. A really quick box to put together. It folds together really easy and you basically just use a small piece of sticky strip to hold the top together and the bottom typically just holds itself together, although a little snail helps on the two sides sometimes if needed. You can get two boxes and 6 tags out of 1- 12 x 12 sheet of paper.
You cut your paper at 6 1/2 x 5 1/2 but you alternate how you cut it, in order to get 4 cuts out of it. You end up with just a little square left over in the middle when you are done cutting. If you need a visual let me know and I'll take some pictures of cutting the cardstock for you.
So I hope you guys had a great day today and leave some feedback when you get a chance. Thanks.

Tuesday, September 8, 2009

creepy halloween?

Okay, I debated for a while whether or not to post this card. Partly why it took me so long to post some things this weekend was I was debating what to post and the issues the Halloween items might bring up (Some people just don't like Halloween or what it represents). I bought the Halloween set From the Crypt this year. It's creepy and I had no idea why I liked it. I never buy anything creepy for Halloween. Since I spent almost half my life (yeah, I'm getting old now and can't say half anymore) as a non-Christian I grew up loving Halloween - at least the fun dress up and get candy, nothing creepy part. My kids love dressing up in costumes and pretending and love to get candy. Besides putting out some regular pumpkins or a spider (my daughter loves bugs) that's about all we do. Of course, my kids will dress up throughout the year (I have a great picture of my son trying to be three characters at once one day - Spiderman, Luke Skywalker, and Indiana Jones). He had parts of each - a spiderman mask, a skywalker light saber and an Indiana Jones hat. It was hilarious. He was a super, super hero. lol. He even dresses up into different characters and then gives me autographs from that character he's dressed as like they do at Disney World. He's really cute and creative and to watch him do that is really fun.

So I really have no idea why I like this set. The bat and spiders my daughter and I both like as they are normally found in nature, but the skull- it's so unlike me. So I started thinking about it and here is a little of what I came up with after thinking about it. Artistically I think I like how they have all the little drawings coming out of it (a little hard to see in this picture), but it has pumpkins, bats, trees, etc - all kinds of things around it. I think hidden pictures are cool. If you look closely at the left eye (it's right eye, but to the left), it looks like a little mouse sitting down. My sister sees that most of the time, just like the other image she sees a mustache guy, so go figure. So I kept trying to figure out why I'm interested in this set, since all the others before have been cutesy that I have gotten, as I like the spirit of Halloween but tend to shy from the creepy or some of the creepy history surrounding it. We just like the costumed/candy part of the holiday really and being with friends.

I'm not totally sure of my answer and it may evolve even over time, but I think it also reminds me of how thankful I am. Really. When I see this skull - which those types of things typically remind you of death, I realize how thankful I am. I don't really see creepy (ok well it's creepy), but I also think thankfulness. I'm thankful, because I know of the hope I have in being a Christian. That when I die, I'll be with my heavenly father. Now I know my body left behind will end up looking like this, but I won't. That to me is something to be thankful for.

There are even crosses in this picture if you look closely at it. Now they are more the graveyard type, but still they are there to help remind me. So when I see this picture I'm reminded to thank God for the blessing He has given me. I'm grateful that I won't be separated from Him when I die, but will live forever with Him eternally. So that's some of my thoughts on this set and why I think I like it.

So if you see more of this stamp set on a card, I hope you remember to also give thanks too or if you aren't a Christian and want to learn more, please feel free to ask. We are always open to questions. So that's some of my thoughts on why I bought this set. It may not make sense, but I get myself most of the time, so if you have questions ask. Print doesn't always describe things well. I have another item I made that I might show later too using this set again, I'm still thinking about it though.

so anyways, since the card was "creepy" on the outside (to most) , I had to cutin (is that a real word?) it up a little on the inside. This spider actually hangs. It folds up inside the card and when it gets opened it swings a little, which you don't expect in a card. It's made by using the 1 3/4" circle punch and then I just cut 1/8" strips and fan folded them and glued them to the circle, then put another circle on the back to hide the attachments. I added linen thread in between too, to hold it onto the card. The saying uses the hostess set Holiday Best and is colored in with black, pumpkin, and olive markers. It's stamped on whisper white and backed with pumpkin paper and I used the ticket corner punch to create the corners. They eyes are just punched circles and I used a marker to make eyeballs.

The front of the card I backed the skull with the stamp set Extreme elements from the growing up section. I didn't plan it that way, but it's cool how the pumpkin almost fills the face, but that was totally by accident. Those elements could be used for all kinds of background, but thought it cool to use for Halloween too. The saying on the front is from Teeny tiny wishes stamp set and the actual skull is heat embossed with black embossing powder.
So I hope you like my spider idea. I think I need to make my legs a little shorter to close better, but for a first try I think it came out kind of cute as a moving type card.
So I hope you enjoy the card and if I shared something that doesn't make sense let me know. Thanks and have a great day today.

Wednesday, October 22, 2008


Here are a couple of Halloween cards I displayed at club meeting. Aren't these cute?
I got this card idea from demo Dannie Graves. It was super easy.
Papers: pumpkin pie, basic black, ww
ink: creamy caramel
accessories: 1 3/8", 1 1/4" and 3/4" circle punch I believe (I'd have to check to make sure if anyone is interested), sponge dauber


This one is made with the Big Shot Top note die. I either got this idea from Patty Bennett or Dawn Griffith. I can't remember which. They each had this idea displayed, but I modified it slightly with the round tab punch for the nose, they used a half a circle to make the nose.
What I used for this:
paper: old olive, basic black, ww
ink: old olive, basic black journaler
accessories: Big Shot, Top note die, snips, 1 1/4" circle punch, 3/4" circle punch, round tab punch, sponge dauber to ink edges of green. This could be mounted on a card front or on a bag or made into a tag. I think it's really cute. How about you. I've also seen a mummy and a dracula made with the top note die. The Dracula had gray skin and black hair cut in an upside down w (rounded). They also used the sanded stamp to make his eyes look bloodshot. A Dracula with bloodshot eyes. Too funny. Okay, it's getting late and I'm tired, but at least I didn't crack some corny halloween type joke.

Tuesday, October 21, 2008

nugget box ideas

One of the things we made at club was a nugget box. We decorated it for Halloween. We made Frankenstein. He was quick and easy and cute.
If you slide the middle out (see next picture) he holds three little Nugget Candies.

Here is what I used to make this particular box:
Paper: old olive, black, ww
ink: black journaler
accessories: snips, 1/2" & 1/4" punches, sticky strip


This is part of what it would look like inside. You could also wrap the nuggets with dsp or labels stamped with boo or a saying, etc.
That would look cute too. Even the stamp set that has the quote from Frankein Stein - "Friend, Good" would be cute stamped on it.


Also here is another idea - a mummy box. This Sahara sand paper and carmel ink to sponge the edges. then 1/4" and the double circle punch for eyes. This picture only shows the top layer, but it's made the same way. Isn't he cute. Both of these ideas were from another demo, they weren't mine.


You could also use other themes like this fall box, which uses the Juntos paper and the sizzix Leaves die cut. These are also cute with birthday themes, wedding themes, baby shower themes, even a little teacher gift - stamp ABC on the inside, etc. All kinds of ideas. How would you use it? You'll have to let me know. Post some ideas or pictures.