Monday, December 27, 2010

step-mother's journal


One thing I did this year was purchase journals for a few of my family members. It is one of the newer items that Stampin' Up! creates for you with it's MDS print service. This was one of them. Each one I made had a different look and color scheme to it. My other one I made was more relaxed and traditional and my daughter's was more funky like. This one is busier, but I still like it. I'm showing you the front and back. The spine had printing on it too (had the name on it, which I think is cool). You just create it in the digital program and then upload it to the printers and you get back a journal. Fairly easy to do.

We had a get together a few months ago and we got her family and our family together and we took pictures of each family and all the grandkids. I thought what a fun way to showcase some pictures for her. Now every time she writes in her journal, she can see pictures of her grandkids and her family. What fun!

Sunday, December 26, 2010

Thank you card - Christmas

This was a card I gave out to most of my club members. It uses the embossing folder and some white craft ink. It's really pretty in person and the snowflakes really show up. This picture isn't the best though. I used the new Cherry Cobbler seam binding which works similar to regular ribbon. The saying is stamped and punched out and added on with dimensionals. I like the Baja with the Cherry cobbler. They look good together.

I really appreciate all the support my club members give. They come every month excited to create new things and it makes it fun sharing items with them. So I gave them a small little gift and one of two different cards.
The top one or this other one, which is the same snowflake embossing folder, just with a different color scheme. This one I inked it up using some bashful blue. I then punched a couple snowflakes and added on the same thanks with dimensionals. I then added a couple of jewels and some navy satin ribbon to round it all out. I liked them and I had fun making them. I hope they enjoy them too.

Saturday, December 25, 2010

Christmas card - mds

This was the front of our Christmas card that we got a few samples made. I wasn't exactly sure how they would turn out, so I only got a few to begin with. They turned out really cool though. You can print on both sides, which was one thing I thought turned out really neat and we had not gotten before. It had thicker paper and the print quality was really good. We got some others made to to compare to and there was quite a bit of difference, both with the picture quality and paper thickness.
This was one of the new size cards. There are several options on the MDS program and you can chose which direction you'd like and I chose this one. Since I wasn't sure how the printing on the back would come out I had a little more blank space then I needed to have, but it's okay. I know now and hope to make some fun ones for future use.

I chose some of our more fun pictures for the back. It was so hard to get pictures of our kids this year. I think we took about 20 just to get the 3 on the front. They kept making faces or laughing or poking on each other. If you have a sibling, I'm sure you know what I'm talking about.
So anyways, I wanted to share my card with you guys.
I hope you have a great day and an awesome Merry Christmas.

Wednesday, December 22, 2010

come to bethlehem bags

These were some little gifts that my kids gave to their church teachers. Just a little something to say thanks for all their hard work and for working with them. It wasn't a lot and definitely not what a teacher is worth, but just a little something to say I'm thinking of you - thanks.
We really appreciate all the teachers and adults that work with our kids, because it really does take a village to raise a child.

This was made with the Come to Bethlehem stamp set and I used my new circle punch to punch out a circle of whisper white. I then stamped the magi in concord and then I used my Crumb cake dauber and colored in the sand and the edges of the circle. I then stamped the saying and punched it out using the modern label punch. To get the red behind it, I just punched out a second punch and cut it in half to make the ends red. It is also raised up on dimensionals. I then just filled one of our cellos with some goodies and then added the embellishments. It's hard to tell here but the star has glitter on it too, so it sparkles.

Saturday, December 18, 2010

calendar page - boyscouts

I made some calendars for some Christmas presents this year. This is one of the pages.
This was November's page. I chose my son for November because that's his birthday month. This year he started boy scouts and is really enjoying it, so I picked boy scout pictures for this page.

The calendar page, I included a picture on too. I like how you can coordinate the two and put them together and how you can put pictures on the calendar part too. I've been trying to keep the calendar pages simple. This is one of the busier pages, but still pretty basic in design.

If you haven't checked out My Digital Studio you should. It's pretty easy to manipulate and move around in. The projects come out really pretty too and makes a great keepsake item. You can also make them into DVD/CDs to give to people. Lots of choices on how to finish your project.

Tags til Christmas

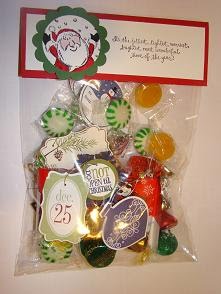
Here are some of the tags I made for the teachers. Several are just plain stamped and others I punched or colored in. They were fun to make and I hope they like them. I tried to vary colors some too, but it's hard to see in this picture. The santa suit is Riding hood red, Navy is the snowman, Concord is the ornament, Cherry cobbler is the ornament, Pear is Dec 25th and olive is the main color of the tree limb as well as chocolate and espresso. Before putting them into the bags I punched holes and added linen thread or the retired su silver cording to hang them.
The hardest was the Santa suit, coloring in the black on the belt took some time, especially around the buckle. I ended up cheating on the buttons and used my Crop-o-dile to punch out some black circles. I hope you enjoy my tag share today. Have a warm and great day.

Monday, December 13, 2010

jolliest time bag

I have been looking at this stamp set for a while, so I finally decided to get it. It's a fun set and reminds me of my childhood, so I decided to get it. It has a santa, a snowman, a tree and a saying. All are happy, fun images. I took the santa image and colored him in using the markers (Real Red and Basic Black) and then I used my blender pen and Blushing bride to color his face. I also used my two way glue pen and some Dazzling Diamond glitter to highlight some of the snowflakes falling down, but that's hard to see on this picture. It makes for a fun, sparkling snowfall. For this package I just punched out using the 1 3/4" circle punch and our new scallop circle punch. I used Garden Green and real red papers. All the candy and tags are in one of our large cello bags. This is my sons treat bag for his special area teachers. It's a mixture of hard candies and chocolate along with some Christmas tags. I hope they like it. We had fun making them.

I also made this image into a tag. You can also make it into an ornament. It has varied usage. It's a fun image I think.

I got the punched out idea from Demonstrator Becky Roberts. She had some samples using it, and I thought what a cute idea. It was the last sample I saw before finally deciding to purchase the set.

So I hope you enjoy the share. Christmas is coming and it is very exciting for our family. Lots to look forward too. Hope you have a great day.