Thursday, October 30, 2008

scallop envelope tag


This envelope was made with the Big Shot and the scallop envelope bigz die. We made this item at club. I used a Christmas theme, but really this idea could be used for any theme - birthday, baby, etc.
This one is made with the following items.
Stamps: Winter Post (mini)
inks: bashful blue, chocolate chip, kiwi kiss
papers: very vanilla, Frosty Day DSP
accessories: ticket corner punch, sponge dauber, big shot and scallop envelope bigz die.

Tuesday, October 28, 2008

SU's birthday promotion ends Friday

SU's birthday promotion ends on Friday, October 31st. Let me know if you would like to order any of those sets before the sale disappears. You can also order yourself through my website - http://detailmama.stampinup.net.

more about bags, tags and gift card class

okay, the class will be at my house on November 22 at 10:00am. The cost is $33 which includes a whole set of DSP and a whole pack of rub-ons. You'll leave with 5 boxes/bags, a cd holder, 4 gift card holders and 10 tags and the instructions so you can make more later (see picture of previous post). You will use part of your DSP and rub-ons to complete these projects but you will have a lot left over to use for more boxes, ornaments, scrapbooks, cards, etc. The class includes everything but the cutter and adhesive. For this project it is recommended that you bring both a sticky adhesive (i.e. sticky strip) and a regular adhesive. If you need to order some let me know when you sign up.

This is a good class to have to help you package all the nice presents you will have for others. It will also teach you how to make several boxes/bags and a gift card holder which you can use for other events, just substitute your favorite paper or theme.

I need to know who is interested by November 10th to get the supplies in in time.
Here are some closer up pictures of some of the items to be made. Most of these ideas I got from Stampin Up! The one set of boxes I got from convention the tags idea from a demonstrator that one a contest on the SU site and the rest I made up.

This first one is the box that holds the tags.


This second box has a lift off top


This third one is the triangle shaped box. When you open it up it looks like a square but changes to a triangle when closed.


This last picture that I'm showing now is 3 of the 4 gift cards.
So what do you think? Look like fun?

bags, tags and gift card class


These are the items that I was going to use for my bags, tags and gift cards class. You would basically get all the materials you see here, except for adhesive. You would make 5 boxes, one cd holder and 4 gift card holders and 10 tags. You would have almost a 1/2 a pack of DSP left over to make more items or use for card making or scrapbooking. You will also have almost a whole pack of rub-ons left over too. You use about 7 or so in the class and the rest are yours to use in anything you want. Most of these ideas came from SU. One of the benefits of being a demonstrator is they help provide you with ideas. Anyways, I will write more details shortly. Unfortunately I have to get the kids ready for school.

Saturday, October 25, 2008

Happy Fall pages


These are 2 12 x 12 pages that I displayed the other night at club. They were fun to make. I'm really liking my Big Shot. I also like Juntos, which is this fall looking paper. I think the colors of it are perfect for this season. What kind of fall card or scrap book page can you come up with? I'd love to see it.


These pages were made using the following supplies.
Paper: Juntos, chocolate chip
Ink: brown journaler
accessories: Big Shot, Leaves die, Gogo Alphabet die

It's hard to see, but around the Happy and Fall squares there is faux stitching made with the brown journaler.
What do you think?

Friday, October 24, 2008

Club thanks card


This is a card we made at club. The picture doesn't really do it justice. I guess I need to try and take my pictures during the day when I can, which might be harder now that it gets darker earlier.
This looks a lot prettier in person. This is a 6 x 3 card, it will fit into the open ended envelopes.
Here is what I used to make this card.
paper: Juntos DSP (in Spanish catalog), ww, chocolate chip
ink: chocolate chip
stamps: Thank you Kindly
Accessories: Big Shot, leaves die, key tag punch, dauber, dimensionals

Wednesday, October 22, 2008


Here are a couple of Halloween cards I displayed at club meeting. Aren't these cute?
I got this card idea from demo Dannie Graves. It was super easy.
Papers: pumpkin pie, basic black, ww
ink: creamy caramel
accessories: 1 3/8", 1 1/4" and 3/4" circle punch I believe (I'd have to check to make sure if anyone is interested), sponge dauber


This one is made with the Big Shot Top note die. I either got this idea from Patty Bennett or Dawn Griffith. I can't remember which. They each had this idea displayed, but I modified it slightly with the round tab punch for the nose, they used a half a circle to make the nose.
What I used for this:
paper: old olive, basic black, ww
ink: old olive, basic black journaler
accessories: Big Shot, Top note die, snips, 1 1/4" circle punch, 3/4" circle punch, round tab punch, sponge dauber to ink edges of green. This could be mounted on a card front or on a bag or made into a tag. I think it's really cute. How about you. I've also seen a mummy and a dracula made with the top note die. The Dracula had gray skin and black hair cut in an upside down w (rounded). They also used the sanded stamp to make his eyes look bloodshot. A Dracula with bloodshot eyes. Too funny. Okay, it's getting late and I'm tired, but at least I didn't crack some corny halloween type joke.

Tuesday, October 21, 2008

nugget box tutorial

I've had a request to post the dimensions of the nugget box, so I thought I'd also show how to make these boxes.
First you will need the following materials to make this box.
5 1/4" x 3 3/4" piece of cardstock for base of box.
5 1/8 x 3 1/16 piece of DSP or cardstock for cover.
Scorer or paper cutter with score blade or bone folder
Sticky strip or strong adhesive
If you want labels to cover the inside you will need that or 3 pieces of dsp 1 x 3 1/4 to cover nuggets.
3 nugget candies - I used Hersheys (sorry, don't know how to make a copyright symbol).
Whatever you want to decorate it with (birthday sentiments, baby, halloween, Christmas, etc.)

Take your base piece and score all 4 sides at 1/2" and 1 1/8". When you get done you should have a rectangle shape in the middle of the paper.
Use scissors to cut off the 3 small boxes that make an "L" shape at each corner (do this 4 times). When you are done you should have a stair step type shape at all 4 corners.
With the long side facing you (so it looks like a typical rectangle) cut along the score line to the 1 1/8" mark creating little tabs.

You should end up with a picture that looks like this. I'd trim the flaps a little (see the v shape in the middle) to make sure it closes right. (sorry about the box quality - it's late and I was being lazy, so I took the one closest to me apart rather then going downstairs and cutting a new piece, but you get the idea right?)
Then place sticky strip in the middle rectangles on each side.
Fold in all your score parts.
Take the backing off the sticky strip. Fold up both sides and attach the little flaps to the long part of the box (long part is bottom of picture). Fold the top part of the long side over the tabs to secure. Do both long sides (tabs should be hooked to long side). Then fold over short side and make sure all sides are down tight.
Next take your top piece. Score the long side (5 1/8" side at your stomach (unless you turn your cutter)) at 11/16, 2 1/4, 2 15/16, & 4 7/16 marks (see pic). Fold the score lines and wrap around your box (do it this way so you don't make it too tight to move) and then secure with a good tape like sticky strip. Then decorate how you would like to decorate. See my previous post for a few ideas. Don't forget you can decorate the nuggets too with paper and such. The ideas are vast if you think about it. Hope this helps. Let me know if you need clarification on anything.

nugget box ideas

One of the things we made at club was a nugget box. We decorated it for Halloween. We made Frankenstein. He was quick and easy and cute.
If you slide the middle out (see next picture) he holds three little Nugget Candies.

Here is what I used to make this particular box:
Paper: old olive, black, ww
ink: black journaler
accessories: snips, 1/2" & 1/4" punches, sticky strip


This is part of what it would look like inside. You could also wrap the nuggets with dsp or labels stamped with boo or a saying, etc.
That would look cute too. Even the stamp set that has the quote from Frankein Stein - "Friend, Good" would be cute stamped on it.


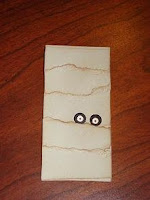
Also here is another idea - a mummy box. This Sahara sand paper and carmel ink to sponge the edges. then 1/4" and the double circle punch for eyes. This picture only shows the top layer, but it's made the same way. Isn't he cute. Both of these ideas were from another demo, they weren't mine.


You could also use other themes like this fall box, which uses the Juntos paper and the sizzix Leaves die cut. These are also cute with birthday themes, wedding themes, baby shower themes, even a little teacher gift - stamp ABC on the inside, etc. All kinds of ideas. How would you use it? You'll have to let me know. Post some ideas or pictures.

gift for club


Here was my little gift I gave to my club members. Sorry, but I don't have a lot of time to post this morning. I'll post the rest of the items as soon as I can. What's inside? Ancient chinese secret. :) Just kidding.
Here is what I used.
paper: pumpkin pie, ww
stamps: Eat, Drink and be Merry
ink: black, pumpkin, & chocolate markers
accessories: pumpkin striped ribbon, curly label punch, pillow box die, big shot, sticky strip.

Saturday, October 18, 2008

christmas ornament with vinyl


After the bowl, I took another section of the vinyl and put it on an ornament. Then stuffed the ornament with paper strips. I thought it made a cute ornament.
I used the Big Shot and the Join in the Cheer Decorative strip die with the white vinyl.
I can't wait for Christmas.

Friday, October 17, 2008

christmas bowl

Okay, I've definitely had fun playing with the Christmas stuff. It is my favorite holiday. This is not the best photo, but you get the idea.
This was an inexpensive bowl I found at Hobby Lobby, but any clear bowl would work. To decorate it, I used the Sizzix Big Shot and the Sizzlet snowflake and cheer long die and our new vinyl (decor elements) and created some snowflakes and a word and attached them to the bowl. Doesn't it come out cute. The possibilities are endless really. A nice jar filled with cocoa or a mix, or a gift would be neat too. I think this bowl would look really pretty with a set of colored ornaments (kind of like my earlier ornament post - check out ornaments) in it with rub ons on them. Right now I have some of the different ornaments from the mini in there. Some of them my kids made and enjoyed doing. I'm thinking about maybe trying to have a time for ornaments. Is anyone interested? If so let me know.

Thursday, October 16, 2008

gift class registration and other info

This is a reminder. Gift class registration is due by Monday (see post a day or so ago for details). Also, club meeting is Monday. I've been working trying to get the stuff ready for that. I'll post those ideas after club meeting. There are a couple of specials right now. It's SU's birthday so they are having a special on select birthday stamps. See here for info on the SU site. They also have a special on the large aqua painter for $7.25 each, which is cheaper then the cost of two in the catalog. You can shop for these items through me or through my website . Don't go through the SU site though, they want customers to use demonstrators, so they give you more benefits through our sites.

Snow Swirled Christmas card

Here is another card I show cased at my Christmas SAS. Since a couple liked it and needed some picture reference for it, I'm posting it here too. I like how the red paper reflects off the gold ep and makes it look like a reddish gold.
I've gotten to make several Christmas items lately and I am getting into the Christmas spirit to some degree. Hey, it's only like what 10 weeks till Christmas roughly. Man, it's coming up quick. I can't believe it's mid October already. It will all be here before you know it. If you all need anything to prepare for the holidays let me know. We can see about materials for cards, gifts, gifts for you, etc. We can set up wish lists too and your husbands / boyfriends / family can contact me too and I can give them some ideas that way :) . Let me know if you are interested.

Here is what I used to make this card.
Paper: chocolate chip, ruby red, old olive, holiday treasures dsp
ink: versa mark
stamps: snow swirled
accessories: ticket corner punch, gold embossing powder, heat gun, gold cord, olive 5/8" ribbon

Monday, October 13, 2008

Christmas stamp-a-stack

Well, the Christmas Stamp-a-stack has come and gone. Here is what we did in class. I thought they were fun to make. I hope the class did too. Several of these cards were cards that I had seen something similar to before by other demos, but I modified them to use current stuff. I apologize for not knowing where the original idea was taken from. I need to be better organized. I look for ideas so far in advance and then can't remember where I've seen them.


This first card is made with the Holy Triptych set. Here are the supplies used to make this card. I tried to keep this one simple but elegant.

Stamps: Holy Triptych
inks: black Stazon; Markers - barely banana, summer sun, bashful blue and brocade blue, pale and perfect plum, certainly celery and old olive, creamy caramel, close to cocoa
paper: Perfect plum, brocade blue, very vanilla
accessories: ticket corner punch old olive grosgrain ribbon


This second card is a card idea where I liked the idea of using some non-Christmas sets in a non-traditional way.
stamps: Heartfelt thanks and Warm words
inks: mellow moss, always artichoke, real red
papers: real red, artichoke, ww
accessories: real red grosgrain ribbon, glue dot, ticket corner punch

This third card is also made with a non-Christmas set. It took a lot of work to cut it all out, but was pretty fun to create. It was also taken from a similar idea by another demo. If you look closely the white is also speckled using the spritzer.
Stamps: Pick a petal and Curly label punch bundle
ink: basic black and always artichoke; always artichoke marker
paper: artichoke, real red, summer sun, ww
accessories: snips, 1 3/8" circle punch, mono liquid glue, glitter, dimensional, large oval punch, spritzer


The fourth card is another idea that was altered slightly from another demo. It looks crooked in this photo, but I promise it is straight. The tree is embossed in silver. Simple but elegant.

Stamps: Snow swirled and Heard from the heart.
inks: versa mark, night of navy
papers: brocade blue, night of navy, ww
accessories: white grosgrain ribbon, dimensionals, silver embossing powder, heat gun


The final card is another non-Christmas set and has been around for a while. This idea has been seen before. I used the brayed sky technique to create the winter scene. I like this one. It's fun. I'm also going to show pictures of two other cards that I played with during my time in my second class as we had time to play with the ideas a bit. The first one was part of the class the next two were played with to get different effects.

Stamps: Lovely as a tree, Sincere Salutations
inks: versa mark, night of navy, bashful blue
papers: night of navy, brocade blue, ww, glossy white
accessories: black embossing powder, brayer, heat gun, cutter

This was stamped and then cut to create the window effect.


This one made a lighter ground area to make it look more like snow.


This second one did the masked background but also a masked moon. Which one do you like? I think they are all fun effects.
I'd love to hear what you think and what you are trying. Leave me a post and let me know what you think of the ideas. I'd love to see what you are working on. Keep me posted.

Sunday, October 12, 2008

gift class

gift class
On November 1st at 10:00 am, I will be offering a gift class. I picked a few items to start with and then I have some add on items if anyone is interested. I was trying to keep the class affordable and at the same time offer a variety thus the add-ons. Let me know if you are interested. It will cost $27. You will make an acrylic post it note holder with a beaded pen, a create a calendar from the mini (with stamped inside pages), a pocket note/calendar holder (included) a cd holder which will hold 3 cards and envelopes (included) or you can use it separately to package a cd for Christmas.

I need to know by 9:00 pm October 20th if you are interested in this class to get the parts in time.
If you want to add add-ons to your class, please list the item number along with your class registration.

What are the add ons?


Item 1: a chipboard clipboard to go with the create a calendar.

The only thing different from this one and the class is the
flower rub-ons down the side (those aren't included). You can stamp it though, like the big flowers. Cost to add on clipboard $10.00 (inlcudes heart, ribbon, etc to finish clipboard).


Item #2: a beaded candle
This is stamped with spotlight on Christmas and Priceless (which is hard to see). The cost to add on this item is $6.00


Item 3: a perpetual calendar

This includes the calendar and you can use my stamps and inks to decorate. The front page has bella dsp and pink piroutte and Chocolate ribbon. I also have a picture of a sample page - February. it will cost $15.00 to add this on.


Item 4: I wish card set - idea from Linda Aarhus another SU demo.
Supplies to make 12 cards and a box. Cost $20.


Item 5: I w
ish box plus kit - idea from Kelly Gettelfinger another SU demo.
this includes supplies to make 4 boxes, 2 mini cardstock albums, tags and cards. Only thing not pictured is the mini envelopes. Cost to add on $25.00 One is an accordian album and the other is a tag book.


general update

Hey Everyone,
It is good to be back home, but we had an awesome (albeit hot) vacation. Our kids are just at the best age for Disney World. The Halloween party was fun and the best thing - no long lines. We all got to trick or treat (even us adults) and we had a beautiful Snow White and a dashing Indiana Jones with us. We are trying to download pictures, but those of you that know us, know we have a ton. So Jon has had the camera tied up doing this. I hope to have some pictures of some projects soon. I've got several to take. We have gone non-stop since we got back. Besides the ton of regular activities to keep up with and the ton of laundry from our trip, I also had a class to prepare for. I just completed my Christmas SAS for World Card Making Day and I'll have to post those pictures soon. I'm also preparing for my gift class which I'm holding on November 1st. Keep a look out for those details too.
here is a picture of one item I had already taken a picture of before we went. I wish you could really see the detail in this picture. The shininess of the embossing almost gives it a stain glass feel. It was fun to do, so I thought I'd share.
Here is what I used:
Paper: old olive, elegant eggplant, night of navy, ww
ink: Versa mark, navy, eggplant (sponged); markers - navy, not quite navy, rust, olive, summer sun, close to cocoa, eggplant, blush
accessories: black embossing powder, heat gun, sponge, samj, white gel pen, silver cording, ticket corner punch
stamp set: Holy Triptych

Thursday, October 2, 2008

away from my computer

I will be away from my computer the next few days. If you need something you can feel free to order from my SU website. My website. If you click on the shop now feature you can see all the new products available (i.e. decor elements). The specials are also listed on my page as well and there are many. I hope you have a great weekend. I'll post when I get back.

Wednesday, October 1, 2008

World Card Making Day promotion

From October 4-11th, Stampin' Up! is hosting a World card making Day special. During that time frame you can order the Simply Sent card elements or the Simply Sent card kits at 20% off. See pages 176-177 of the Catalog for descriptions of these sets. These are extremely easy and quick sets to put together. They will be on discount for only one week. I will be placing an order on Saturday October 11th (orders in before 3:00pm) if anyone is interested or you can order from my SU website http://detailmama.stampinup.net if you prefer that route. I'll have samples that weekend for anyone attending my stamp-a-stack. Don't miss out.