Saturday, January 31, 2009

happy heart card

Here is an idea that I cased from another demo, but I really liked it. It uses the Happy Heart stamp set that was in the mini and is now in the main catalog. I've made several Valentines lately and I like this one because it's different somewhat. I especially liked the knot in the ribbon and the holes.

I stamped the stamp that looks like a tic tac toe board in riding hood red and then colored the three hearts in pink piroutte, close to cocoa and baja blue and cut them out and put dimensionals under them. I then layered it with close to cocoa paper. I stamped the "I heart you" in riding hood red and punched out with the curly label punch and then cut out a baja square and rounded the corners. I tied a knot in my riding hood red ribbon and glued it to the back of the pink. On the pink I used my mat guide and punched holes all the way around two sides (before you put ribbon on.) I then dimensionaled the i heart you over the ribbon and added the whole top to a riding hood red piece of cardstock. Pretty quick and easy. Hope you enjoy and don't forget to make something special for those you love. It's so much fun to surprise them with something. If you get a chance you ought to try it.

Thursday, January 29, 2009

club projects - project 3 love you much

Isn't this picture pretty. It's so nice when you don't have to go out in it. This is what it's been like here this week. We had a pretty good ice/snow storm and school has been out almost all week now. Now they say we might get some more on Monday. Oh, dear, at least we have power. Last I heard there were like 183000 still without power in this city alone not including the state and there are even more without both power and water. I hope everyone is at least staying warm.
I took the couple days that we couldn't get out and worked on organizing my craft room a little. Not that you can really tell it, but I did work on it - really I did. I'm such an addict.

Well this is the third and final project we made for club. I did get this idea from another demo. One of the perks of selling SU is getting to see other demo's ideas. We used the Love you Much Bundle. Saturday is the last day to buy this stuff at the bundle price which is 20% off.
On this card I used the Candy Lane paper and pink piroutte, close to cocoa, white and riding hood red paper.
I used real red, pretty in pink, close to cocoa markers and pretty in pink grosgrain ribbon.
I used a silver brad for the flower center and punched out a red heart that had been stamped using white craft ink and raised with a dimensional. We scalloped the pink with the scallop border punch.
It was a fun and easy card to make. Next I'll have to show my little note cards. I'm having fun making those. They are really quick and easy to make. Well I hope everyone does stay warm and has a great day. God bless

Wednesday, January 28, 2009

club projects - project 2 love you much

It is very cold here today. We've been iced in the last couple of days, so I've taken some time to pick up a bit so I haven't created much in the last couple of days. So here is another of our club projects. I hope to share more soon, but for now here are some instructions to help you remember if you've done this before or if you have never done it before these might help.

Here is a second project we made with the Love you Much Bundle. It was fun and quick to make. It could be filled with candy or small gifts, etc.
This idea can be used for other holidays too (Easter, birthday, Halloween, etc).
We stamped the big heart in white and heat embossed and cut out. The red hearts were punched out and glued on and then the dashes were made with the white gel pen. The pink ones were stamped in Riding Hood Red and punched out. The top one is popped out with a dimensional. The white part is stamped with the three heart stamp that matches the punch with pink piroutte on both sides.
This is made with the medium envelopes. You seal the envelope then punch each top corner with the tag punch one & a half times to make the handle (it should still be connected in the middle.) You want to cut the two ends that would be the say top left and bottom left if you were addressing it. You also turn the punch face down toward the bottom (long part) when holding it on end. Then you just snip off the little extras to make it a straight edge and then you are done. Hope this helps. Let me know if you have questions. Hope you have a great day and stay warm.

Tuesday, January 27, 2009

club projects - project 1 love you much


Well today is officially a snow day here. Our first of the season. It's bad enough that they canceled school, but people are still out and about. More is coming though and this time it's ice, so hopefully everyone stays safe.
Last night we squeaked in club before it all hit.
Here is one of the items we made. I got this idea from fellow demo Dawn Griffith. This little box will stand up (the picture was easier to take laying down). It's a real cute gift idea for someone special. It opens up and holds chocolate one of my favorite things. :)

Here is what I used to make it and also some dimensions for those of you who would like to know. Also the Love you Much bundle is still on sale. Let me know if you are interested or see my Stampin' Up! site to order it. The sale ends Saturday.

Riding hood red cardstock - 2 1/2" x 11", scored at 2 3/4",3 1/4", 7 1/4", 7 3/4", 9 1/4", & 9 3/4"
After you score it attach dsp to back and fold with bone folder to get a crisp fold (make sure to stick well). Fold the next to last fold out to form a stair step.
The size of the dsp is 2 1/4" x 10 3/4". Here I used the new Candy Land paper with the stripes vertical.
I then pushed the stair step section (where the chocolate slides in) into my word window punch and pushed it in as far as it would go and punched (it should punch between the two score lines). That makes the hole for your chocolate to fit in.

Next attach the top of the folded dsp with a dimensional in each upper corner to the back of the cardstock (make sure bottom is flat on table, so it will stand up on it's own.).
then you place a piece of sticky strip on inside between score lines (see where brown ribbon is.) then you place one edge of chocolate ribbon in the middle and circle around and put the other end to match the others so both ends are in the inside. My ribbon is 10" of chocolate chip.

For the front of the box. I punched the hearts out of Riding hood red with the heart to heart punch and attached to box. I then placed dots on them with the gel pen.

For the front circle piece I punched out a piece of chocolate with the 1 3/4" circle punch and a pink piroutte with 1 1/4 punch. I then used markers and inked up the hugs and kisses stamp from the Love you much stamp set with the following colors (outside scallops and heart with dots with real red, words with chocolate chip). Then I huffed on it and stamped on whisper white paper. I then punched out the middle part with a 1" punch and the rest with the scallop circle punch (yes there is a hole in the middle but it will get covered up).
Then you layer the items (chocolate circle on bottom, followed by scallop stamped image with hole, then pink circle) then layer the hugs and kisses circle on top with a dimensional to help it pop up.

Once done with the circle items find the top (so heart is right side up) and place 3 dimensionals on the back at the top (leave bottom open).
Attach this to front of box so bottom half isn't touching anything.

Add a velcro dot to the bottom half of circle now and remove adhesive.
Make sure box is square before closing the box to attach velcro to other side (leave pieces connected and close, don't try to put each half of the velcro on separate it's too hard to match up.

The next step is to add chocolate and then you are done (if you haven't eaten it all by now. :) )
Hope these help. If you have questions let me know. Thanks

Saturday, January 24, 2009

more birthday fun

I've still been working on some more masculine card ideas. Here is one with the loads of love set and the Loads of Love accessories set.
I added real red cs to a brilliant blue background. I added white ribbon in the middle. I then stamped the truck, presents and person on white paper. I watercolored with the water color crayons and an aquapainter. I backed with black paper to help the truck stand out and used the ticket corner punch on the white before I glued it down. I then punched a black oval using the wide oval punch. then used red with the designer label and I think a circle punch (sorry, I'll have to go down and get it to make sure- I've made several lately) to do the label. I then stamped the saying in blue on white and punched out using the oval punch. It wasn't hard to do, and was kind of fun to color. Some days I have to revert to my childhood and just color. :0) I hope you have fun and take some time to create too.

Friday, January 23, 2009

masculine cards

There has been two things lately I've been in the mood to create it seems. One is the typical pinks and reds of valentines, which I've created several note card types (similar to what I made my daughter) and the other items are more masculine type cards. Those are somewhat harder for me, because I do like flowers and embellishments. What can I say, I'm a girl. Besides the ones in the sas I'm offering, I've also come up with a couple of others lately. This is one that I gave to my Brother-in-Law for his birthday. I did have to add some ribbon, but no bow. I wish I had taken a brighter picture, but this is the best I have, since I gave it away.
I watercolored the image with an aquapainter to make it varied in color. I notice its hard to see the designer label punch under the words too, but it added a nice touch too.

Here is what I used for this card.
papers: Night of Navy, chocolate chi and whisper white
ink: night of navy, chocolate chip, close to cocoa and riding hood red
Stamps: Fun and Fast notes and a Little Birthday Cheer
Accessories: aqua painter, ticket corner punch, wide oval punch, oval punch, designer label punch, white grosgrain

Thursday, January 22, 2009

quick and easy note card for my daughter


My daughter needed a little encouragement, so I thought I'd make her this little note card and stick it in her lunch tomorrow. I wanted to send her the message that I loved her. Everybody needs a little encouragement from time to time. Is there someone that you know that could use a little encouragement? How about sending them a short note, saying how much you love or appreciate them. You might just make someone's day.

On this card I used the Happy Heart stamp set from the mini which is now in the new catalog and stamped the heart in real red on white and cut it out. I placed it on real red paper wrapped with white ribbon. I then layered it on a pink pirouette note sized card. On the inside I stamped the I "heart" u from the same set on the inside in red. I hope she likes it. Now it's your turn. Send someone you know a note of encouragement the next chance you get. Or better yet, send one to several people and let them know you care and make a bunch of people's day brighter. When you do, I'd love to see what you made. Email me and share what you did. :)

Tuesday, January 20, 2009

Birthday SAS

I'm holding a birthday Stamp-a-stack on Feb 22nd (Sunday) at 2:00pm. First 10 to sign up and pay get that time. You make 10 cards (2 each of 5 designs) for $15. Please RSVP by Feb. 6th if you would like to take this class. If that date doesn't work and you want to take the class, email me and we can see what we can work out.

There are 6 cards in this picture. You get to chose between either the red or blue star card for the fifth card. I had originally made the red one and then figured I needed to add the blue one as an option since basketball is so prevalent around here. I wouldn't want to offend anyone. :)

It's hard to tell by this picture but the cupcake one uses the crimper, Crystal Effects and beads. Several have punched or raised items. The blue/red star card uses a masking technique with rollers (I got that masking idea from another demo named Dawn Griffith.) Let me know if you are interested.

New Catalog is available

The new catalog is available and has all kinds of cool stuff in it. I have a list a mile long. You can shop at my website here or you can contact me with an order. If anything shows up as back ordered and won't let you order it, you can typically order it through me. It just means that it will take a little longer to get is all. Some things are already so popular and demand greater then expected that there are some items already being delayed.
The main exception is the Sizzix bag, they had to switch vendors for quality issues so that is temporarily turned off. I'll let you know when they turn that one back on. If you have already ordered it, you will be first out when it comes in.

I apologize for some of the backorder issues, with the holidays, SU taking inventory and then switching to all die-cut stamp sets things have been a little slower. The cool news is that all the new sets are die-cut with the exception of backgrounds and the small alphabets. Yeah!

Saturday, January 17, 2009

Tomorrow

Tomorrow is the deadline for all the following:
Fall/winter catalog (at least the retiring sets and accessories)
Current sampler promotion
inventory blowout sale (including items in new catalog).

The new catalog will be available starting at noon on Monday the 19th. I'm so excited. Can you tell? I already have a list a mile long. :)

It's that time of year again. Coming Feb 1st - Sale-a-bration (the period where you spend $50 in product you get to pick a free item out of the Sale-a-bration brochure. If you'd like to host a party during that time let me know - we can do catalog parties too for those of you that prefer that route.)

Also starting Feb 1st thru April 30 - anyone who places an online order and chooses a demo will receive a free catalog. You can do that at Stampin' Up! and then chose me as a demo or you can go directly to my SU website at www.detailmama@stampinup.net or click here to go there.

Sorry, I don't have a picture today. I spent the time watching my kids basketball games and hanging with some friends. We haven't gotten much time to do that lately, so it was good to do that. I hope to post another picture soon.

Thursday, January 15, 2009

new catalog coming Jan 19th

The new catalog is right around the corner and I'm excited as usual. There is quite a few new things coming out in pretty much every area from stamps to tools to decor elements. It's all pretty exciting. Can you tell my list is already a mile long. :)
This card shows little snippets of one of the new DSP. It's called Raspberry Tart. The circle saying (which fits our punch) is from a new hostess set. The little flower is a little embosslet from Sizzix and is cut out of the DSP too. Of course I had to use a square punch and the scallop border punch. Did you hear that there is a new border punch - it has a lace type look to it. There are also two new heart punches. A new circle cutter, lots of sizzix products, corduroy and latte buttons, new ribbons, canvas cuts, one set of colored rub-ons, single stamps, new stamp kits, scrap kits and gift type kits.... Oh, I could go on and on.
Can you tell I'm addicted. I love fun new stuff. You'll have to visit soon to see what all is new. I hope you are having a great day today. Hope to talk to you soon.
I got this card idea from a fellow demo. I'm sorry, I'm so bad with remembering names. If you see this and you know the who the idea came from, let me know. Thanks

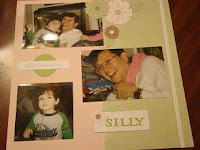
Love is the permission to be...silly

Here are a couple of pages I made with the Love Stories SSKit. I think it's funny. I haven't hardly scrapbooked in a few months and what do I scrapbook - something gross.
I don't know if you can see it very well, but my kids were pulling out their gum and making it long like "a jump rope". Next thing I know their dad has joined in and it's mayhem everywhere. It was pretty funny once you overlooked the "ewwwh" factor. These pages were super easy to put together with the kit. I added a cardstock circle and inked some edges, so in no time they were done. Of course for me, picking out the pictures are the hardest part. Here are a couple of close ups of the pages. You ought to try our kits, they are nice. This one will also be in the new catalog as well as several new sets.


Saturday, January 10, 2009

party hearty gift card sample

Hi everyone,
This is pretty much the last week to get the retiring items both stamps and accessories. There are already some accessories sold out. If you are interested let me know or go online to my site to get what you need.
Anyways, I wanted to show you this cute card I made. It uses the kraft open ended envelopes that are retiring.
What I did was fold the envelope in half under the flap, then added another piece on top of that (this is optional) to make it more square looking. I stamped over the kraft in versa mark with the party hearty stamps and then stamped Make a wish from a Little Birthday cheer set in riding hood red. Then I closed it and on the front I added pacific point and white paper. I stamped Happy Birthday (from a little Birthday Cheer) in riding Hood Red. I then took a scrap of white and stamped the top of the cupcake with pacific point ink. I cut that out and added Crystal Effects to it. While wet I added orange and red beads from the duos to it. I then took a scrap of kraft ran it through my crimper and then cut to match the bottom. I inked the raised area with chocolate to give it dimension and then glued it on the page. After the Crystal Effects dried I then added the top of the cupcake with dimensionals. It was fairly quick and easy to make and then you can just slide a gift card, money or note into the top pocket.

Thursday, January 8, 2009

Scrapbooking

Gosh, I didn't realize it had been so long since I had posted. I guess I've been busier then I thought. I have been busy creating and scrapping. Can you believe I actually got time to scrapbook a couple sets of pages. I can't remember how long it's been since I've done that. I've also been getting club and class ideas together for the spring. I hope to post those soon. I'm still working out some ideas there. I'm also gearing up for Sale-a-bration which starts Feb. 1st. So much to do so little time. :)

Anyways, I wanted to show you these two pages I did. I thought they turned out kind of cute. I'm using the Summer Home paper which is on the retiring accessories list. If you need to see a copy of that let me know. If I get a chance I'll post it on here.
The flowers are like cardstock stickers. You just pop them on in whatever design that you like. I used the Big shot to cut out my letters. I used that saying because this gets sung to my kids every night and since they looked like they were sending hugs I thought it was appropriate. What do you think?

Friday, January 2, 2009

triangle box

Here are closer pictures of the triangle box we made at club. It shows the front and side views. It can hold candy or a small gift. It is stamped with the Winter Post snowflake with Versa Mark. I also used the faux metal technique to do the tag. I talked about the one version of faux metal with the Christmas card and this is the other technique. You create this technique by embossing an image on silver paper. The silver paper was inked using Versa Mark and covered in silver embossing powder. It was heat embossed and punched with the curly label punch. It gives just enough of a difference to look like a little metal tag.

Now how do you make the triangle box? Well, I took a piece of cardstock (here 5 x 10"). I used Hunter Green for this one. I then scored it at the 5" point (middle) on the long side. Then you mark the middle on the short sides. This little image should give you an idea. The lines inside the rectangle are all scored. The little rectangle on the top left side represent where you place your sticky strip. Once you have it all scored and stamped you then place sticky strip in the one corner and fold up your box but don't adhere the one side yet. Then you take your crop-o-dile and punch a hole in the center of the side. Turn around and open back up that end and punch the other side ( so you have one hole on both sides of the point. You then adhere the one side together. Then you add your candy or gift and then pull your ribbon through and tie in a bow to hold it all together (I used Riding Hood Red tafeta ribbon). I then put it all together and then put dimensionals under the tag to help it stick out.
It was a pretty easy box to make. So what do you think?

You can click on the little picture to get a better view of it.

December club

It just dawned on me that I had not posted what our club members did in December. We got delayed a week because we were worried about an ice storm. It ended up being just a couple of days before Christmas and I got caught up with that that I forgot to post what we did.
We made three item and I gave them 2 plus a box.
This first picture shows what I gave them. I made a little candy cane mouse holder which I learned from fellow demo Dawn Griffith. The other item was what I call my sparkly ornaments made with refills and glitter. Each one got a different color. This one shows one of the dark greens. I put each one of the ornaments in a box made from the envelope die made with my Big Shot. I wrapped it in ribbon and used a hostess set colored in red and Olive to place a tag on it. I thought these were all really cute to make and fun to see.
The three items we made were all Christmas in nature. First we made an ornament ball made with dsp from the mini catalog. They had choices on how to pattern the ball. This is shown with the 20 circles cut from the die from the Big Shot.
The tag uses the Top Note Die and is a sample that I saw in the mini. It uses the Winter Post stamp set, jumbo eyelets, Chocolate chip ink and the cording from the mini.
The last item was a triangle box. It's hard to see in this picture but it's stamped with the snowflake from the Winter post with Versa Mark. It has tafeta riding hood red ribbon tying it together and has a faux metal tag on it, wishing everyone a Merry Christmas. You can fill this little box up with goodies or you could even use it as an ornament for your tree. My next post I'll post a close up of it and post some instructions on how to make it. But for now I need to get ready for bed. I stayed up too late last night to ring in the new year.
I hope you all had a great New Year. I can't wait to see what 2009 brings.