Showing posts with label birthday. Show all posts

Tuesday, June 28, 2011

toddler birthday card

We got invited to a friend of ours child's 2nd birthday party. She likes stamping and scrapping too, so of course, I had to make him a card to celebrate the occasion.

I saw how to make this giraffe on our Stampin' Connection site that demonstrators have access to. I first saw this giraffe on a card made by Maureen Albert. Her card was different, but I just thought it was the cutest thing. I like punch art in general, but I thought this one was especially fun because our gift included lots of animals, including zoo animals.
This little card is basically lots of punches. I used mainly current ones but I did use at least one retired one. I used the five petal flower for the ears. The owl punch for the eyes, nose and top of the little things on his head. I used the slot punch (retired) for the little things on his head too. You could cut little strips instead. I used 1 3/8" circle and scallop circle punches. The large and small oval and the 1/2" and 3/4" circles. I inked the edges in the respective colors and the head is actually popped up with dimensionals. I stamped the saying from Teeny Tiny wishes and added some 1/8" espresso ribbon. Except for trying to figure out the right sizes to put where it was really an easy and fun card to make I think.
So I hope you enjoy my share today.
Have a great day.
Lisa

Tuesday, May 31, 2011

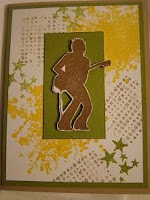
masculine guitar birthday card

This is a card that was made for a someone that likes to play games like
Guitar hero. I thought this stamp and card idea was great for the person it was made for. It's hard to see the detail of this card, but it is shiny and sparkles some. The lighting wasn't very good the night that I took the picture. Sorry I don't have a better picture. The guitarist is actually cut out and popped up with dimensionals. I used the edges of the dimensionals to pop up the smaller areas. I hate to waste stuff, so I use even the smallest of scraps when I can.
It is stamped twice. That way I didn't have to cut out the cords and small details, just the main character. It also gave it more of a 3d type of effect which was cool. The star is also popped up as well as the saying. I used the seam binding ribbon and the Word Window and Modern label punches. The background is just the brayer bounced around with various colors.
It's somewhat a basic card, but it fit the need and they enjoyed the card.
The inside has stars popped up on it too as well as another saying. Sorry I forgot to photograph the inside. I hope it gives you an idea for a masculine card next time you need one. Hope you have a great day today.

Saturday, March 5, 2011

Eastern blossoms birthday

I just love this new tree branch stamp from the new mini. It comes from the Eastern Blossoms stamp set. I colored this one and made a little birthday card using it. It was a fairly easy card and filled my need to color, which I get from time to time as you guys know.
I used Pretty in pink and rose to color in the flowers and pear and olive for the leaves. I stamped the saying and punched it out too and the ribbon is our new Rose Red seam binding. I love having different colors of ribbons that match.
I hope you enjoy my little share today.
I know I've been a slacker a lot lately and I apologize. We have so much going on right now and I don't see it getting better soon. I'll try and post as often as I can. I'm still creating when I can and have various class items to post. I just have to get time to post them. :)
Hope you have a great day today.

Friday, January 14, 2011

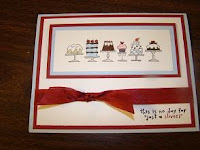
birthday cakes card

This is a card I made using the hostess set Birthday Bakery.
It was a fun card to make. I had to decide what colors to color the various cakes. It's kind of fun deciding do I want a chocolate cake with strawberry icing or vanilla, etc. :) It can make you hungry for sure and it definitely wasn't a "day for just a sliver". :)
I used the cherry cobbler seam binding as the ribbon. I think Cherry is probably my favorite new color and I used it for a lot of items around the holidays.
Also SU doesn't have a light gray marker anymore, so I used Sahara Sand to color the platters. So I hope you enjoy my creation. Hostess sets aren't hard to get and with Sale-a-bration around the corner, it's a great time to plan a workshop or become a demonstrator. Let me know if you are interested.
Hope you have a great day.

Sunday, November 28, 2010

lovely as a tree birthday

I needed a masculine birthday card, so I picked out one of my all time favorite sets and that is Lovely as a Tree. I masked an area and inked it in using Sahara Sand and then stamped the tree using Old Olive and Early Espresso markers. I stamped 3 times without inking to give the variation in the colors. I also did another new one on the outside of the card to make the one in front stand out. I used the new 1/8" Espresso ribbon. I love the new skinny ribbon. Very versatile. I used the saying from Teeny Tiny Wishes and the Word Window and Modern Label punches. A fairly quick card to put together and such a neat effect I think. This style has been around for a while, but I hadn't used it in lately, so I wanted to revisit it again. I keep thinking this set will retire, but I do love it as it can be used for so many different types of cards. It can be used for Christmas (this tree makes a neat Christmas tree), a winter scene, masculine cards, various techniques, and of course all kinds of nature cards.
So I hope you enjoy my card today and have had a great holiday weekend.

Saturday, November 27, 2010

fall birthday card

We have several family and friends that have birthdays in the fall. Here is one of the cards I made. I used the Day of Graditude and On Your Birthday stamp sets.
I love all the colors in the fall and tried to incorporate a few of them on the card. I used Cajun Craze, Old Olive, Daffodil Delight, and Early Espresso. I cut out the large medallion type stamp on the front as well as the little yellow center in the middle. I also cut out one acorn and one leaf. The saying is popped up with dimensionals and is punched out with the Modern Label Punch.

I even decided to decorate the inside since the cajun color was a little darker. I stamped the sayings and then decorated it with a little leaf.
I thought it turned out nice. I love this set and I hope it continues in the next catalog. In case it doesn't the mini ends January 3rd, so if you like it don't forget to add it to your order.
Hope you enjoy my card share today and hope you have a great day.

Saturday, August 7, 2010

butterfly builder roller birthday card

Hey everyone, I hope you are having a good day today.

This was another card that we did for our last club night. We used the new builder wheels with the jumbo roller. I left out the middle wheel so we could use the new satin Razzleberry ribbon in the center. It's so pretty and adds a nice shine to the card and the space looks really good with that width of ribbon. I rolled the wheels with Old Olive ink. I used the Punched Posies hostess set for the butterflies. If you don't have this one, then Butterfly Prints in the main catalog is really close. For these butterflies. We used Rich Razzleberry and Concord Crush to ink the butterflies using the Rock and Roll technique. The middle one is popped up with dimensionals to give some dimension to the card. :) I just thought this was a fun and pretty easy card for a birthday. You basically just roll it, tie on ribbon, stamp and punch 3 butterflies and your done.
Like I've said lately, I really like easy as the schedule has been a little crazy and will be even more so when school starts.
So I hope you enjoy today's share.
Thanks for looking and have a great day.

Sunday, August 1, 2010

elegant lines birthday

Seems like lately with so much going on, I'm really liking easy. To me this card is soooo simple and yet very classy. I just ran the Marina Mist paper through my Big Shot with the Elegant Lines embossing folder.
I just love the embossing folders. They give such deep rich embossing and look so pretty.
I then stamped the birthday sentiment from the Perfect Punches set in Marina mist. Punched it out with my wide oval punch. It's so much fun when sets coordinate with punches. I can't resist those types of set. :)
I then tied on some vanilla satin ribbon and tied in a little bit of 1/8" marina mist taffeta ribbon for the knot. I then added some of our new self adhesive pearls to the little circles that were embossed and that just gave it the last right touch I thought. I didn't come up with the pearl idea, but have seen it on several cards lately along with jewel brads, crystals and various items like that. I don't know who originated the idea, but I like it. For this card though I thought the pearls especially matched the paper and silky look of the satin ribbon perfectly.
So I hope you enjoy the share for the day.
Keep creating and have a great day.

Thursday, July 15, 2010

Because I care razzleberry

Can you tell I like this set? :)
I made this card for a birthday for a family member. I thought it turned out pretty and different. I stamped the flower from this set as the background on Sahara paper. Then I stamped again on white and then colored it with Rich Razzleberry, Certainly Celery and Old Olive. It's also matted on Razzleberry and black paper. The ribbon is our new Razzleberry satin ribbon. I love the way it shines. I used the linen thread to tie it together in 3 different spots for a slightly different feel.
The family that got it really liked the card. They thought it was store bought at first. I think that it's always fun to see the expressions when you tell them you made it. Then they really start to look at it.

This card wasn't difficult at all and this set has such a nice effect. It's definitely been one of my go to sets recently.
So I hope you enjoy my card. Sorry, it's been kind of crazy here this week with VBS. Hopefully I'll get some time to play this weekend.
Have a great day. Blessings.

Thursday, July 8, 2010

Baby's first Birthday

We got the pleasure recently of getting to attend a good friend of ours baby's 1st birthday party. He had lots of fun and got gooey and sticky several times from all the good food. :)

I saw this color combo and similar idea in the new catalog and thought I just have to try this. Since I thought of my friend when I originally saw it, I figured it was a perfect occasion for it, as they love animals and especially monkeys.

I used Baja Breeze and Crumb Cake for the main colors. The happy birthday is from a new set in the catalog called Perfect punches. This particular stamp fits the wide oval punch. I love stamps that match punches and this is a whole set that matches. The monkey is also cut out and raised up on dimensionals for some added 3d effect.

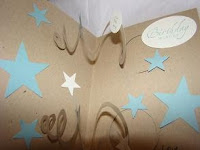
I wanted it to be fun when it opened so I created some spirals with my 1 3/4" circle and then I punched out large and small stars to decorate it with. I also used the School days stamp set in the mini and stamped 1st and then punched it out with a circle punch too (that's what the little circle in the upper middle is). I added some white and baja items over the whole inside of the card. The card goes lower, but I forgot to take a picture before I wrote my greeting on the bottom so I only took the upper portion in the picture. The saying near the top says Birthday wishes and is again punched with the wide oval punch. I like moving fun cards, so I enjoyed putting this together for him for his 1st Birthday.
So that is my share for the day. I hope you enjoy it and have a great day. Blessings.

Monday, May 24, 2010

decorated bag - birthday

One thing I tried on the last couple of gifts I have had to give was decorate bags to put them in. You saw the bag toppers I made the teachers. This time I decorated the bag itself. This is just a plain white bag that I had on hand. I then cut some Razzleberry and Olive paper and made rectangles. I then cut a daisy out of saffron paper using my Big Shot. I love the Big Shot it is so easy to cut out stuff and works on a ton of materials. I then punched a circle out of razzleberry paper and placed it on a Build-a-brad and inserted that into the center of my flower. I then created a bow with my Razzleberry polka dotted ribbon which I think is great and fun. I also inked my edges up with Razzleberry too, but that's hard to see here. This is a bag I put my sister's birthday present in. She really likes the polka dotted ribbon, so I had to add some of that to the package.
so I hope it inspires you to try something fun too. Have a great day.

Wednesday, February 24, 2010

Birthday sab card

I needed a birthday card and I decided to use a slightly different color combo for me. This picture doesn't do it justice, but I gave it away already and can't get a better picture. It's very bright and fun in person. It uses Yo Yo Yellow, Whisper white and Bashful blue as the main colors. The images are from two Sale-a-bration sets - Happy Moments and Whimsical Words. The cake is stamped in black and then I used a blender pen to color in the flowers with bashful (centers yo yo) and the candle flames are also Yo Yo. The words are also colored with the two colors using the markers. On the right edge I used the new Pinking hearts border punch and then added a piece of bashful to the back of the card to help the border stand out. The bashful in the back is also distressed with bashful ink. I didn't think of it at the time, but a little glitter on the candles would have been fun too.
So I hope you enjoy my little card today. Hope you are getting some creating time in. Have a great day. Blessings.

Sunday, January 31, 2010

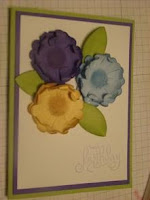
3d flowers birthday card

Sorry I haven't posted much this week. It's year end and I've also felt puny all week. I haven't done much besides go to work this week.
I did make one birthday card this week. I saw this flower idea on the demo site and had to try it. It's great all the ideas that demos share. It's one of the perks of being a demo, lots and lots of ideas. I'm not sure who created this idea, but thought it pretty cool. One of the cards I saw (designed by Joni Miller) had multiple layers on the flowers so it almost balled up. It was her card that inspired my card, but I wanted mine a little looser, so I only did two layers. I also debated what I'd like to put in the center. I just dabbed some color there, but I think several items would work. I think beads, brads, buttons, etc would all look pretty cool.
I used lovely lilac, bashful blue and barely banana for my flower colors and my leaves are celery. I also stamped Happy Birthday in Lilac too.
So how did I make my flowers? With the scallop circle punch. Just punch it out (two of them), wad it up, cut the individual petals and roll them inward. A little time consuming, but has a pretty outcome in my opinion. The picture is a little dark (it was night time), but it looks really pretty in real life. So I hope you enjoy my card share today.
Have a great day and stay warm. Blessings.

Wednesday, January 13, 2010

vintage vogue birthday with bright colors

Here is another birthday card that I made for my mom using the new Vintage Vogue set. It's funny when I first saw the set it didn't excite me as much as some of the other images did. The more I play with it though the more I love it. I think it's one of my favorite sets right now. I keep trying different colors and ways to line up the flowers, etc. This was my quick and easy version. The flowers are stamped with pixie pink, tempting turquoise and green galore. The centers are actually little flowers punched out with the trio flowers punch. The Happy Birthday is from the new Well scripted stamp set and is stamped in black. All of it is stamped on white, then matted with turquoise and then placed on a pixie pink card base. Very bright and cheerful in real life. These are colors that I don't seem to use as much it seems. I typically chose more earth tones or rich regals. It was fun branching out into some different color schemes. Gets me out of my rut and brightens these cold winter days. Plus I just think creating is fun to do. It's good to branch out and try something new once in a while.
So I hope you enjoy my card share today. I hope you also take some time to create and try something new - maybe spice something up a bit. Have fun. That's what makes it all good, that and spending time with friends and family while creating. Have a great day today. Blessings.

Monday, January 4, 2010

vintage vogue birthday

First off this is just a reminder that the Holiday mini is only good through today the 4th. The new mini and Sale-a-bration starts tomorrow.

This is a sneak peek project. It is called Vintage Vogue and is in the new mini. This is a card I made. If you look really closely on the left side I stamped a design down it with Versa Mark but it's really hard to see. The colors of this card are Melon Mambo, Bermuda Bay and Rich Razzleberry. It's a very bright card. It looks a little darker in this picture as it was dark when I took the picture. The flowers are cut out and popped up on dimensionals. I used my new clear mount stamps to make this card. I'm liking these so far, so are my children. I put little clear jeweled brads in the center of varying sizes and the ribbon is the Razzleberry polka dot ribbon that I love. If you haven't noticed Razzleberry will be the color I miss for sure when it retires.
The stamp set has a vintage feel to it and has flowers, a leaf, the Friend stamp as well as some sayings and a couple of vine type images. Very fun. So I hope you enjoy my birthday card today and I hope you have a great day today.

Saturday, December 12, 2009

masculine birthday

I can't believe how big my family's kids are getting. My nephews are growing up so fast. One of the things my one nephew asked for on his birthday was an Itunes card. So naturally I couldn't help but make a card using my extreme guitar stamp and my extreme elements set.
I thought it appropriate. A guitar player for a music card. I thought it a fun thing to put together. I didn't add any frills since it was for a guy. The guitar guy is popped up on dimensionals and I inked the edges. Inside it says Happy Birthday to you from the Birthday wish stamp which is on the dormant list and retiring in early January.
If you didn't know it already there is a list of dormant stamps and all of them retire early in January. They are all the stamps that were new in the last catalog that was less then a year old. Now they are a year old and are now retiring. So I hope you enjoy my card and have a great day today.

Sunday, November 8, 2009

rich razzleberry birthday card

Can you tell that Rich Razzleberry is one of my favorite IN colors? I use it a lot it seems. I'll be sorry when this one goes away for sure. I like this new variation of the purple series. It adds a lot to the color schemes and choices.
This is a card that I made for my step mother's birthday party. We celebrated her birthday last weekend. We went to another birthday event tonight and have at least 3 more planned this month alone, besides Thanksgiving. Lots of family and friend get togethers this month. Is it just me or does this year seem to be flying by? I can't believe it's already so close to Thanksgiving and then Christmas - yikes it will be here before we know it. I hope you guys have already started on your cards or gifts. I know it takes a while for some of you, so hopefully you at least have your stuff ordered.
Anyways, on to this card. I used two stamp sets: Eastern Blooms and Teeny Tiny Wishes.
I used Rich Razzleberry, old olive, whisper white and Crushed curry. I punched the saying using the Word Window and Modern Label punches and it is raised up on dimensionals. The flowers are also cut out and raised up on dimensionals. I curled the edges a little of the flowers but that is hard to see in this photo. The centers are just colored in with the marker. Besides the cutting out of the flowers which took a little time this was a pretty quick and easy card.
So I hope you enjoyed my cards. I thought it fun to show a couple non-Christmas ideas for a bit. Although I plan on working on some more Christmas this weekend. I need to get a jump on things or I won't get done.
I hope you guys have a great day today and I hope you get to take a moment to encourage someone today. God bless.

Friday, November 6, 2009

father's birthday card

I made this card for my father for his birthday. We celebrated his and my step mother's birthday this past weekend. I decided to make him this card as it reminded me of where we grew up. We grew up living right next to a park. Fall was always a great time to live next to there as you got to see all the beautiful leaves up close every day. The best part is that we didn't have to rake most of the leaves as they were in the park. Of course this time of the year we would really see the wild life preparing for winter. It also never failed that every time we would look out we would see a cardinal bird. So I made this card in rememberance of that.
This stamp set is still available but it's on the dormant list. I bought it and then like a month later it ended up on the dormant list, which is sad as I liked this set. There are several sets on the dormant list which are still available, so if you are interested in seeing that list let me know. The birthday sentiment is from a Little Birthday Cheer and is popped up on dimensionals.
So I hope you enjoy my little fall birthday card. I also hope you have a great day today.

Tuesday, June 30, 2009

daisy birthday card

This is a birthday card I made for my mother in law. It uses the Daisy die from the Big shot as well as some punches and some ribbon. It was fairly easy to do. I punched the daisy out and curled the edges some and then stuck all of them together. I then punched out circles for the centers. I then Stamped the greeting on to white and punched it out using the large oval punch. I like how it coordinates with the scallop oval punch. There is white grosgrain ribbon under the saying. It was a quick fun mailable card. I've been trying to watch some with all the new regulations at the post office. This isn't very thick and doesn't have bumps or brads on it.
So I hope you enjoy my card and I hope you all get some time to create today. God bless

Here is what I used for this card:
paper: elegant eggplant, summer sun, really rust
ink: elegant eggplant
stamps: on your birthday
accessories: big shot, daisy die, circle punches, large oval and oval scallop punches, white grosgrain ribbon.

Wednesday, March 25, 2009

celebrate - pop up card

Sorry, I don't have anything really new to show you at the moment. If you've been to some of my classes you've seen this one displayed. I spent the weekend working on my bible study / scrap book class and then I spent half of yesterday it seemed at the hospital as my husband was sick (better today - yeah) and today I had to get off work early to gather kids and help my DD with her project due this week that she is behind on. We realized we didn't have magnets for her idea so we had to go to the store and get them. Anyways, with all that going on I haven't had much time to create unfortunately.

Anyways, this is another card that sort of pops out or up when you open it. I did one for valentines day, but this one is a birthday card with stars instead of hearts. It's fun to create, but this one takes a little bit more time to do. It's several layers with the rolled image, punched out shapes, and stamping. Not to mention making the pop up section, which isn't real long, but does take some time. I could have added more items too. The hard part is deciding when to stop. :)
So I hope you like this one.
Here is what I use for it.
Stamps: A little birthday cheer, Celebrate Everything
Inks: black, So Saffron
papers: real red, black, saffron, whisper white
Accessories: Large and small star punch, 1 3/4" circle punch, glue dots, dimensionals, roller and star roller stamp.
Thanks for looking