Showing posts with label christmas. Show all posts

Saturday, June 18, 2011

scrapbooking your faith - christmas

Since I'm so far behind I'll post two in one day. This was our Christmas Scrapbooking your faith class. I always feel torn around Christmas about what to scrapbook. Why, because we don't ever have any pictures really that share our faith during these times. We go to services and Christmas events, but most are quieter times where you don't really take pictures. So all I really take pictures of is the gift exchanges and decorations and such. So all I can do with the other part is journal it.

Since I only have the other to scrapbook, I wondered how I could 
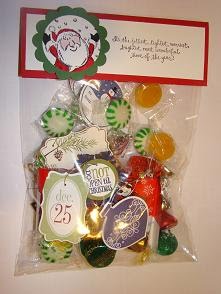
add a religious element to the pages. One of the ways was to use the Come to Bethlehem set. Being smaller though it got kind of lost on the page, so I had an idea. I decided to punch out a circle and stamp the image. I then used my dauber and inked the bottom to look like sand and then inked the edges to give depth. Then I used my tab punch and made it look like an ornament. Several of our decorations that we have in our home share our faith, so it will fit right in with the pictures. It also fits in with the gift giving, because Christ was the perfect gift we could ever receive.

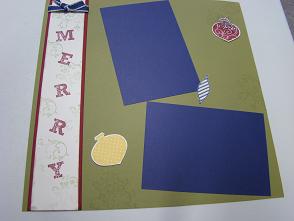
I used the Jayne's type alphabet and the concord ribbon and papers. A tip I used for my stamp set was that I cut the star separate from the wise men. I don't know why but I didn't like the look of a dark star. By cutting it apart I have a choice. With the clear mount I can put the star anywhere I like now. I also used Elements of style for the vine look behind the letters and popped up several of the ornaments. It's hard to see in these pictures but the one cherry cobbler ornament has the tinsel wrapped around it that we sold in the holiday mini. It only took a small bit to wrap around it, maybe 3" or so. It just gave it an extra sparkle it seemed, kind of like being on our tree.
So I hope you like these pages and it gives you ideas of some things you can do to share your faith.

Have a great day.

Saturday, December 25, 2010

Christmas card - mds

This was the front of our Christmas card that we got a few samples made. I wasn't exactly sure how they would turn out, so I only got a few to begin with. They turned out really cool though. You can print on both sides, which was one thing I thought turned out really neat and we had not gotten before. It had thicker paper and the print quality was really good. We got some others made to to compare to and there was quite a bit of difference, both with the picture quality and paper thickness.
This was one of the new size cards. There are several options on the MDS program and you can chose which direction you'd like and I chose this one. Since I wasn't sure how the printing on the back would come out I had a little more blank space then I needed to have, but it's okay. I know now and hope to make some fun ones for future use.

I chose some of our more fun pictures for the back. It was so hard to get pictures of our kids this year. I think we took about 20 just to get the 3 on the front. They kept making faces or laughing or poking on each other. If you have a sibling, I'm sure you know what I'm talking about.
So anyways, I wanted to share my card with you guys.
I hope you have a great day and an awesome Merry Christmas.

Wednesday, December 22, 2010

come to bethlehem bags

These were some little gifts that my kids gave to their church teachers. Just a little something to say thanks for all their hard work and for working with them. It wasn't a lot and definitely not what a teacher is worth, but just a little something to say I'm thinking of you - thanks.
We really appreciate all the teachers and adults that work with our kids, because it really does take a village to raise a child.

This was made with the Come to Bethlehem stamp set and I used my new circle punch to punch out a circle of whisper white. I then stamped the magi in concord and then I used my Crumb cake dauber and colored in the sand and the edges of the circle. I then stamped the saying and punched it out using the modern label punch. To get the red behind it, I just punched out a second punch and cut it in half to make the ends red. It is also raised up on dimensionals. I then just filled one of our cellos with some goodies and then added the embellishments. It's hard to tell here but the star has glitter on it too, so it sparkles.

Saturday, December 18, 2010

Tags til Christmas

Here are some of the tags I made for the teachers. Several are just plain stamped and others I punched or colored in. They were fun to make and I hope they like them. I tried to vary colors some too, but it's hard to see in this picture. The santa suit is Riding hood red, Navy is the snowman, Concord is the ornament, Cherry cobbler is the ornament, Pear is Dec 25th and olive is the main color of the tree limb as well as chocolate and espresso. Before putting them into the bags I punched holes and added linen thread or the retired su silver cording to hang them.
The hardest was the Santa suit, coloring in the black on the belt took some time, especially around the buckle. I ended up cheating on the buttons and used my Crop-o-dile to punch out some black circles. I hope you enjoy my tag share today. Have a warm and great day.

Monday, December 13, 2010

jolliest time bag

I have been looking at this stamp set for a while, so I finally decided to get it. It's a fun set and reminds me of my childhood, so I decided to get it. It has a santa, a snowman, a tree and a saying. All are happy, fun images. I took the santa image and colored him in using the markers (Real Red and Basic Black) and then I used my blender pen and Blushing bride to color his face. I also used my two way glue pen and some Dazzling Diamond glitter to highlight some of the snowflakes falling down, but that's hard to see on this picture. It makes for a fun, sparkling snowfall. For this package I just punched out using the 1 3/4" circle punch and our new scallop circle punch. I used Garden Green and real red papers. All the candy and tags are in one of our large cello bags. This is my sons treat bag for his special area teachers. It's a mixture of hard candies and chocolate along with some Christmas tags. I hope they like it. We had fun making them.

I also made this image into a tag. You can also make it into an ornament. It has varied usage. It's a fun image I think.

I got the punched out idea from Demonstrator Becky Roberts. She had some samples using it, and I thought what a cute idea. It was the last sample I saw before finally deciding to purchase the set.

So I hope you enjoy the share. Christmas is coming and it is very exciting for our family. Lots to look forward too. Hope you have a great day.

Wednesday, December 8, 2010

gift card holder - snowflakes


This is a gift card holder that I made for a teacher. I used the skinny tins that SU sells. I stamped the white snowflakes with white Stazon on the front, back and on inside top of the tin. I then created a belly band to go around it which is the center part. It's stamped in navy and bashful blue using the Serene snowflakes stamp set. I then added thin navy grosgrain ribbon and attached a tag. The tag is a stamp from the Tags till Christmas stamp set. It's stamped in navy and I used my real red, Black and Garden green markers to color in parts of the snowman. I also punched out a navy snowflake using the snowflake punch and layered it behind the tag. They were actually pretty quick and easy to put together, which is good as there are several teachers that will be getting a gift. My kid's teachers are great and my kids love school mainly because they have good teachers. So we are giving them gifts for Christmas.
So I hope this packaging inspires you some too. Especially those of you that like to give gift cards. Hope you have a great day.

Friday, November 12, 2010

Christmas treat box

This is the Big Shot treat box die. With a little bit of bone-folding it's really easy to put together. They are fun to make. I used Old Olive paper to make mine and then rolled it with my jumbo roller and the Jolly Jingles roller with Olive ink. I tied it with real red Grosgrain ribbon. I punched out a white snowflake and then inked the ornament with red and also punched out with the ornament punch. The ornament is in the tags till Christmas set in the mini, which ends around the end of December and is currently on special. I then punched it out popped it up using a Dimensional and then added some olive grosgrain ribbon for the bow and a little pearl for the center. It really was a quick and easy treat to make. I really like quick and easy. Especially lately.
I hope you like the little box today. I also hope you have time to make some little treats for someone special. It's always fun and nice to give little surprises. Hope you have a great day today.

Friday, January 1, 2010

little gifts for club members

Here is a little gift I gave to my club members when we met last. This was a little file I picked up at convention. I thought they were pretty but wasn't sure how I would package them. I ended up putting them into a little pouch made with my table setting die from the holiday mini which expires Jan 4th. I punched it out and folded it up and attached the sides with brads. I then used the Christmas punch stamp (hostess set) and colored with markers (navy, red, olive) and then punched out with the scallop oval and stuck on with dimensionals. I inserted the files and some little mints covered in chocolate and thought it a cute little bonus gift. You could package anything small and slender that way (candy canes, pixie sticks, suckers, etc.) Pixie sticks might be cute for valentines. Hmmm I wonder what else would fit. I'll have to think about it. I bet a thin chocolate bar would fit, maybe a twix or Hersheys or something like that. I'll have to try out different things and see what fit. I see a trip to the store coming soon to get more ideas.
So I hope you enjoy my little treat. I hope you had a great New Years and a great day.

Wednesday, December 30, 2009

ornament punch angels

Sorry, I haven't posted much. It's year end at my real job and I have been working a lot. I also might not be posting as much the next few days as I'm going to try and move some of my items upstairs to start working on stuff up there. I'm getting older now and my knees just aren't the same to keep running up and down. Plus all my classes and events are upstairs, so it makes sense. It will just take time to move all my addiction...er.. I mean stash up. :)
So I'll try and keep up, but can't guarantee it.

So on to the project.
Aren't these the cutest things. I cased this idea from demo Sandi McIver and thought these were just great.
They are made with various punches. Mainly circle punches and then the ornament punch which is available until Jan 4th. I'm hoping it comes out in the new catalog as I've seen really cool stuff made with its shape. The blue angels went through the Big Shot and the petals a plenty folder. The wings I just ran the 2 way glue pen over and sprinkled Dazzling Diamond glitter over it. Their halos are just the gold cardstock punched with 2 sizes of circle punches. The hair is just a snipped circle. Everything is glued together and then hung with the cording also from the mini.
I also made the little red one without the Big Shot as some of my customers don't have that yet and wanted them to see an alternative way to make her pretty too. Here I used the background stamp in versa mark and then clear embossed it on the red. The wings are embossed in silver. Otherwise they are the same. Except that I just realized that the red angel lost her ribbon in traveling up the stairs. I was bringing up so much that it must have got caught on something. At least you can see a little better how it goes together that way. I also added another punch (the color of the hair) to make things look nicer in the back.
Anyways, I did think these were very cute and it was so nice of her to share her idea. I ended up making these for all my club members for Christmas. So fun.

Saturday, December 26, 2009

tag boxes

Here is a box we did for club, holding several tags made with the ornament set and punch. I thought they turned out cute. They have a piece of acetate covering them holding everything in. The colors used for it were Crushed Curry, Night of Navy, Rich Razzleberry and Always Artichoke. Of course it's tied with Rich Razzleberry ribbon and the tag is tied on with linen thread and the ones inside are tied with either silver or gold cording that was in the mini.

I also made this sample box using the Level 2 Hostess set. I didn't add cording to these though as it was to show how you could modify the box as needed. These were punched out using various coordinating punches. These were fairly quick and easy to put together. The hardest part was the acetate as the score lines are harder to see, but other then that a fairly simple design. You just make the outside box and then add the inserts (2 long sections and then one down the middle). Just adhere it down well is all you do. Put the top on and tie it with a ribbon and you are done.

I hope you enjoy the boxes and ideas. You could always substitute the Christmas tags with birthday or other holiday tags and give this gift year round. Have a great day. If you have any questions, just ask. God bless.

pop up Christmas tree card

Wow, Christmas was hectic this year. Normally I'm way ahead and it isn't so crazy. Not sure why I was so far behind this year, but I was. I wonder if any of you were the same. Sorry I haven't posted much the last few days. I love making the holidays special for the family and we had 3 events in a 24 hour period to prepare for and two of them were at our house and the other I helped a lot with.
I know it's too late to make some of these projects but I wanted to show you some fun Christmas projects we have made at club and some other items I made. Maybe they can inspire you to get a jump on next year. lol. I know I need it if it's anything like this year.

This is a pop up tree card that I thought was a lot of fun. We stamped the tree parts, which were cut out with the Big Shot, with the Baroque Motifs stamp set in olive. The red skirt was also cut out with it as well. The front is embossed with olive using the snow swirled tree and Merry Christmas from Four the holiday. It's just such a wow card as everyone always ohhs when you open it up and see it pop up. It was so much fun I just had to share it.

So I hope you had a great day today and got to spend time with friends and family. I hope you got to take time and enjoy the real reason for the season too. I know I had to take time out and thank God for what all he has given me and my family. I wouldn't be where I am today without him. Merry Christmas everyone and have a great evening.

Saturday, December 19, 2009

different snowflakes

Aren't these fun? I had seen some other demos try this and I had to try it too.
We are clutter bugs and keep everything it seems. We always think, we might could use this some day.
Now I don't typically keep cans, but we do recycle them, so we had several of them. I even took an empty one from work as it had snowflakes on it if that says anything. :)
The Big Shot can go through a lot of different sizes and types of materials and this is one of them.
We may have to break down and buy some different drinks to try some different color cans. :) I've heard the green cans like 7up and such make for some pretty snowflakes, maybe an orange drink...hmmm.
It was cool though. The top one is a Coke Santa can. The middle one is a Diet coke with snowflakes and the last one is the coke can again, next to a snowflake punched out of the leftovers of the diet coke can cut out with the snowflake punch. It worked too. It just curled it some, but it worked.
I thought these would be fun on a package, card, on the tree, maybe hung outside as they might hold up (I don't think they rust readily). So fun.
You do have to watch cutting it out and a little afterwards as the edges can be sharp during that process. This isn't a kid friendly project, but still fun. It helps show the versatility of the Big Shot too. Speaking of which, several of it's dies are on sale right now as well as raw vinyl, so if you are interested go to my site and check that out http://detailmama.stampinup.net
Go to Shop now (upper right hand corner) and then click on 12 days.

I'm also working on some card gift ideas, club projects and all the other Christmas stuff we have to do. So I have more to show you, just slower getting to it all, so please bear with me. Hope you have a great day today.

Wednesday, December 9, 2009

bab santa

My son and I had so much fun playing with these. I got these last month with the hostess special and hadn't gotten a chance to play with them yet. This is the build a bear die (bab) or what it cuts out and then I got the Christmas outfit to go with it. I was so busy helping him get all his pieces together that I realized I messed up on two things. One I forgot to add his muzzle. Two I think I would have liked a different buckle better. Other then that it was really fun and he enjoyed it too. He had a little trouble with cutting out the fur pieces but I helped him there. It is really easy as it's perforated. He just turned 6 and still working with scissors though. I'm debating if I want this on a card or a bag for decoration. Decisions, decisions. I don't have time at the moment, but I'll show you one more I did with the leftovers later. Hope you have a great day.

Monday, December 7, 2009

pillow box santa

This is a little ornament that demonstrator Jackie Topa shared on her site. I just had to try it out. It's really cool and you could even fill it up with some money, a small gift, candy, etc. It's base is the pillow box die and then a scallop circle die cut piece, then punches on top. Since it's a box, it's closed up except at the top and that's why you can add a little gift. I love trying new things and finding different ways to use something, so I thought this a great project using the pillow box die. The only thing non SU here is the cotton ball. I love Christmas and especially ornaments, so I thought this a fun one to copy. Thanks to her for sharing her creative ability. That's one thing about demonstrators, there are so many really nice ones and also ones that share so much. It's great. Christmas is coming too and I can't wait.
I hope you guys are keeping up with all your Christmas stuff this year. Time seems to be going fast. Have a great day and don't forget to take time and enjoy the season. We just got our tree today and I'm enjoying the fresh pine smell as I type. Blessings.

Saturday, December 5, 2009

window sheet snowflakes

I went to a craft store recently and they sold something like this and we decorated it similar to this, so I wondered if I could make something using SU items. I thought it turned out pretty cool and the pictures don't do it near the justice of what it looks like in real life. This is a snowflake cut out using the Big Shot and then embossed with the Petal's a Plenty embossing folder. I used one of the thick window sheets so it's really sturdy. It also didn't appear to hurt my folder either. I then sprayed the snowflake with shimmer spray made with the platinum shimmer paint and alcohol, so it has a silvery, glittery look to it. It's also really textured giving it a cool appearance. For the tag I stamped the To/from from the Christmas punch set using platinum shimmer paint, then punched it out with the circle punch and then punched out a mat using brushed silver cardstock. I then punched a hole and threaded silver cording through it all.
Wouldn't this look really cool on a package? If you take the tag off you could make an ornament for the tree too. Not a bad little project for just playing around. This was a cased idea though, but fun. I tried to take a close up with the first photo, but it kept glarring off the shimmer. I need to figure out a way to get clearer pictures of shiny items. I might have to play around some with the camera. So for now, this will have to do. I hope you get the idea though.
Have a great day today.

Thursday, December 3, 2009

table setting tree

I was playing around the other day and I had this swirly olive piece that was cut out using the Table setting die. It was leftover from my flowers I made back in November. I picked it up and it and was playing with it. I thought how when it stretched out it looked like a tree. It need something, so I picked up some scraps and started punching circles and stars out. Then I thought they needed some bling so I added some glitter. I punched a hole in the middle and threaded some gold cording to let it hang and I glue dotted the star on (it has glitter too). I thought it a fun easy project. I think my kids would have fun doing these too. I hope you enjoy and get inspired to make some ornaments or other Christmas projects too. Have a great day.

Sunday, November 29, 2009

ribbon wreath

I was so excited. I actually got to play in my craft room for a few hours yesterday. I made some ornaments, figured out club ideas and made a couple of other decorations. It was fun. I love making Christmas stuff, especially now before it gets too crazy. Growing up we'd all get together the day after Thanksgiving and make Christmas stuff, but we don't get to do that much anymore. I say stuff because it could have been a little bit of everything - an ornament(s), gifts, decorations, even goofy junk - it just had to deal with Christmas. So it was fun to take part of a day and do some creating this weekend. Reminded me of old times a little bit. If you can't tell Christmas is my favorite holiday. I love it all - from the true meaning and its significance to the secular side and all the fun entailed in giving. To me it's just great.

Anyways, I was inspired by the little ribbon wreath in the Holiday mini to make this little wreath. Mine has more ribbons that are closer together and I made a smaller layer on top to give it dimension, but it's a similar idea. I also chose little ribbon knots on mine verses buttons and I tied a bow on mine. I thought it a fun and easy project. My sister made one too. She is using hers as a ring around a candle - a very creative use for it I thought. I love it when others share ideas. We all learn from each other and it makes it way more fun.
So I hope you enjoy my little project and are inspired to make some fun Christmas stuff of your own. I'll share more in the next few days. Have a great day. Blessings.

Sunday, November 1, 2009

bitty box and card

okay, I just had to show you a little card my son made.
To me it's really cute. Yes it's uneven, but he's 5. He played with some materials after one of my classes. He cut a small piece of paper and ran it through the Big Shot. He then sat down on his own and cut out the green background card base and colored in the petals and dots all by himself. No instructions or ideas from me. I haven't even made anything with the dots or petals colored in, so it's neat he created it on his own. The thing in the center is a heart that he drew. Isn't it sweet. I just had to brag and show off his design.
Next is a little box we made at Regionals. It is one using the bitty box and envelope die. I placed the image on the ribbon, so it just slides off that way and you can reuse it and not tear it open. Inside is several tags using the same images, but used with different colors and rearranged some. I just realized I didn't take a picture of the tags. It makes for a cute gift idea. Who wouldn't love a little box filled with tags for the holidays.
It used Real Red textured cardstock to make the box and we used the Real Red polka dot ribbon to tie around it for decoration. We also used the stamp set called Berry Christmas from the mini. I cut out the leaves and added them on for some dimentsion and I tied the ribbon with linen thread. It was a fun little box to make and I hope you enjoy seeing it.
So I hope you enjoy my shares today and have an awesome day.

Items used for the box
paper: real red textured, whisper white, bashful blue
ink: real red, bashful blue, chocolate chip, certainly celery
stamp: berry Christmas
accessories: real red polka dot ribbon, linen thread, snips, Big Shot, Bitty box die, sticky strip, dimensionals

Tuesday, September 15, 2009

fancy favor simple snowflake box

This is the new fancy favor box. It's really easy to put together. I love die cut boxes. It saves so much time. I also used the new simple snowflake stamp set and matching snowflake punch. They fit really well together. I rolled the bag with the jumbo Whimsy wheel with brocade blue before putting it together. I thought it went well with the snowflake, kind of like wind blowing in the background. I can see this being useful around Christmas time for some little gifts. Maybe a gift of tags, jewelry, candy, etc. Choices, I like them for sure. So I hope you enjoy my little box and have a great day today.

Here is what I used:
paper: Brocade blue, whisper white
ink: brocade blue (pad and roller ink)
stamps: simple snowflake, jumbo Whimsy wheel
accessories: Big Shot, Fancy Favor box, sticky strip, Cropodile, white grosgrain ribbon, snowflake punch, jumbo wheel

Monday, September 14, 2009

Christmas thanks

I thought this would make a really pretty Christmas thank you card.
I didn't come up with the design of this card and if I could find where I put my printout I'd like to give credit for it (some days I wish I was better organized). I made this a few weeks ago but I am just now posting. If I remember right it wasn't a thank you card, but I thought it would make a really pretty thank you card. I thought this would make a nice set of cards to give someone as a way to say thanks. So since I can't find my printout, if you know who first colored in the snowflake and put a ribbon behind it like this let me know please.

This stamp set is called Serene snowflakes it is in the new mini catalog and I think it's really pretty. I used my Real Red marker (you have to use skinny edge in parts). I stamped it with stazon. It's mounted on real Red and Old Olive. It's backed with the Real Red polka dot ribbon (turned backwards) and then I stamped A note of thanks in black at the bottom (from the Thank you kindly set). There is a crystal brad in the center, but if you want to mail these I'd switch it out or just use the gem to make them mailable.
This card is a 4x4 card, so it's smaller, but can still fit in an envelope.
So I hope you enjoy my card and have a great day today.