Wednesday, October 21, 2009

another mds

Here is another page I did with My Digital Studio. I added some stamps from the All in the family set. I just used a basic design since I wanted to show off the pictures and the special bond between father and son.
It was so quick and easy to do.
I hope you enjoy the page. Sorry, I've been a slacker. It's been crazy this week. One thing after another. Hopefully I'll be back on track more next week. I'll try to sneak in some more time to spend on here soon. Thanks for being patient.

Saturday, October 17, 2009

my digital studio

I'm so enjoying My Digital Studio. I've already created some cards, a book, scrap pages, a flyer and I'm working on a calendar. It's been really fun to play around with. It's easy to work with too.
I put together a couple of pages of our trip to Salt Lake city this summer. This is some fun we had in our free time.

These two pages are in my book. I tried to put on each of my double layouts at least one rhyming thing and then I hid a mouse on each page. There is a stamp set in the digital studio that you can't buy and it includes cats and it has a mouse in it. My kids like the story Good Night Moon, so I did something similar and put a mouse on each page. The fun thing was that you can color match stamp sets, so sometimes I made the mouse really hard to find. Hey, I couldn't make them all easy. Gave them something to look forward too. :)

Also, didn't this paper match her shirt so well? I couldn't resist using it. Besides Designer papers and cardstock you can also use your own pictures as background.


Sorry I haven't posted as much lately. I'm having 5 events this month which is a lot for me especially when you add on work and all the kid's stuff too. It's no excuse, but it does take time away from my creative side some. Anyways, I hope you enjoy seeing a couple of my sample pages.
Hope you have a great day.

Sunday, October 11, 2009

celebrate your day card

This weekend was busy for us. We had at least 2-3 items every day this weekend. We got to spend time with friends and family both days. I got to have my first Stamp-a-stack yesterday for this Christmas season. Today, I got to celebrate my nephew's 16th birthday. They are involved with a lot of sports and are really busy, so we got to celebrate his birthday early. So in about a week, another teenage driver will be on the road. I hope my sister survives :)
So I made him this card using the extreme elements and Celebrate Everything stamp sets. I thought it somewhat fun and the brown spots almost reminded me of tire treads, so we got a kick out of that a little, since he will be driving soon. On the outside it says, "Celebrate your day" and on the inside it said, "Celebrate you, happy birthday" (this saying is from a little birthday cheer stamp set.) He's a great kid and I hope he has a great day on his birthday coming up soon.

This card is made on Whisper white and is matted with brilliant blue and garden green cardstock.
The elements and saying are stamped in the following colors: Soft Suede, Garden green, brilliant blue, & crushed curry. I also used the crushed curry polka dot ribbon (turned to the backside - since it was a guy card).

So I hope you enjoy my little card. Remember to be kind to young/new drivers today too because in a little over a week, there should be another one. Have a great day today.

Thursday, October 8, 2009

mummy card for club

Several members saw a card using a mummy last year and talked about how cute it was. So this year I decided to come up with a card and let them do the actual mummy. I'm not the originator of the mummy, nor do I know who first created it. I've seen it on more then one site over a couple of years, so I really don't know who to credit for it.

Now the coffin, I played around with a couple ideas for it. Like the little kid vampire, I thought about having it open at the bottom, but I wanted to change some stuff up so this one opens to the side. It's a little more boxy looking because of the attachment to the back. If you like the more pointy style then you will have to have one that opens like the little vampire. To make the coffin you measure in from the top 1" and down 1" and that gives you your corner cut. Then you measure 1 1/2" down from the 1" cut and then also 1" in from the bottom corner and cut between the two.
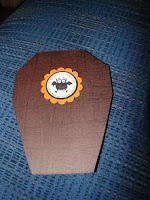
I stamped the front using batty for you using black It's punched out matted with black and then a pumpkin pie scalloped circle. The scallops on the circle are also pierced with holes. It is raised up with dimensionals. The background is stamped with the sanded background.
The inside is made the same way, except I started with a slightly smaller piece of paper for the backing. Just cut the edges the same way you cut the front. Next I took a 5 1/2" x 4 1/4" piece of white and then tore it into strips. I also had a small white piece that I tore and very easily tied into a knot. I inked all edges with caramel ink using a dauber. I then laid them on the mat and trimmed the excess to fit and then re-inked those edges. I added the little knot with a glue dot.
I added the mummy to the back of the card. I stamped Happy Halloween from Teeny Tiny Wishes in black. The eyes are punches. I punched out a pumpkin pie piece for the back of the eyes, white for the middle and black for the fronts. I placed the eyes before laying down all the strips (so you do it as you go).

So I thought this would make a fun card for Halloween, but if you don't send halloween cards but scrapbook you can use it too. I thought you could cut the card apart and this would be fun on a 12 x 12 layout about Halloween.
Hope you enjoy. Have a great day.

Wednesday, October 7, 2009

club extra - sweet treat

This is the little extra thing that I gave club members this month. It uses the sweet treat cups. I stamped the image from the Sweet Centers set in Elegant Eggplant and punched out with 1 3/4" circle punch. I added candy to the cup, popped it through the hole and added a olive background piece to help hold the candy in. Before I added candy though I lined up the cup with the back green piece and added the saying part that I punched out to the back of the piece, so when they open it they will also see the saying. I then added a pumpkin pie piece of cardstock as the final background. I added a sucker stick to the back with pop up glue dots stretched around and then placed another piece of cardstock over that to help hold it down.
I like the little sweet treat cups. They were fun to work with and easy. They even come with adhesive attached, which makes attachment a breeze.

If you wanted to you could make a little escape hatch for the candy using another hole punch and tag, but I let these be the way they were.
Hope you enjoy my little treat and have a great day.

Monday, October 5, 2009

club project card halloween

I know a lot of people don't send Halloween cards anymore, so I opted not to put Happy Halloween on the front of this card, although you could. I thought they could put a thank you or thinking of you sentiment on the inside of this card and it would be a good one to send in October. I couldn't resist using these cute witch hats though. Of course I had to make one a little more girly then the others to make it "one of a kind", but if you didn't like the flower a small star should work too. The olive hat is also on dimensionals so it is raised up above the others.
We used the Eat, drink & be scary stamp set to stamp the hats in black and old olive. They are on whisper white and cut out. We then wrapped either pumpkin pie or basic black grosgrain ribbon around them. I used the trio flower punch to punch out the flower and the paper piercer to poke a hole in the center and then added on with a glue dot. This is all placed on whisper white, backed with pumpkin pie and then basic black. It's mounted on old olive. I then stamped "You are one of a kind" in basic black on the bottom from the One of a Kind stamp set.
I thought this was a cute card. Now the question is who would be the recipient of it? Who gets the one of a kind witch hat? haha. Back when I was younger I would have had great fun with this card antagonizing my friends.
Of course back then I would have been right there with them seeing what we could get into at the time. Now I'm older and more of a home body, but I'm sure all of us have some humorous or almost humorous stories to tell of our past. So I leave you with those thoughts - pondering who would be the recipient of your "One of a kind" card.
I hope you have a great day today. :) Enjoy your memories.

Thursday, October 1, 2009

September club project 1

Here is one of our club projects last week. It's called a peekaboo box because when you open it you can peek at the candy inside. I hope give dimensions to this box later. It is made with the web roller on olive paper with a black roller ink. I used the batty for you stamp set and punches to decorate the front. I punched the spider out and lifted him up with a dimensional. The inside has a window sheet covering the hole and all the items were punched with punches. I'll try and type up more later as my kids need to get off to school.
Have a great day.