Sunday, January 31, 2010

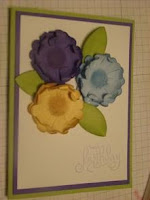
3d flowers birthday card

Sorry I haven't posted much this week. It's year end and I've also felt puny all week. I haven't done much besides go to work this week.
I did make one birthday card this week. I saw this flower idea on the demo site and had to try it. It's great all the ideas that demos share. It's one of the perks of being a demo, lots and lots of ideas. I'm not sure who created this idea, but thought it pretty cool. One of the cards I saw (designed by Joni Miller) had multiple layers on the flowers so it almost balled up. It was her card that inspired my card, but I wanted mine a little looser, so I only did two layers. I also debated what I'd like to put in the center. I just dabbed some color there, but I think several items would work. I think beads, brads, buttons, etc would all look pretty cool.
I used lovely lilac, bashful blue and barely banana for my flower colors and my leaves are celery. I also stamped Happy Birthday in Lilac too.
So how did I make my flowers? With the scallop circle punch. Just punch it out (two of them), wad it up, cut the individual petals and roll them inward. A little time consuming, but has a pretty outcome in my opinion. The picture is a little dark (it was night time), but it looks really pretty in real life. So I hope you enjoy my card share today.
Have a great day and stay warm. Blessings.

Friday, January 29, 2010

breast cancer card - happiness always and a share

In February I'm holding a SAS and I'm giving part of the proceeds to breast cancer research. I made some alternate cards for people to see in case they want to send out cards that use the Ribbon of Hope stamp set.
This was one of the cards. It is really pretty in real life. The picture doesn't do it justice. That's really Chocolate Chip in the picture even though it looks black. It's whisper white, chocolate and pretty in pink. The white background is textured with polka dot embossing folder and sponged with a light pink. The ribbon is stamped in pretty in pink and cut out and raised up on dimensionals. The saying is from Whimsical Words ( a Sale-a-bration set you can earn free.) It's punched with the wide oval and highlighted with some chocolate and raised up with dimensionals as well. The ribbon is the new satin ribbon in the mini which is absolutely gorgeous in real life.

Okay, I know this isn't stamping but I have to show a couple of things my son did. He is really creative in my opinion, so I thought I'd share. My son turned 6 in November by the way and is in Kindergarten. He's learning about American symbols/landmarks in class. So a couple of days ago he decided he wanted to make some and disappears in his room. These were 2 of the ones he made.
This first one is made out of Legos - Can you tell what it is?

It's the Statue of Liberty. The spikey things are a part of her crown. The brown thing is her torch that people can go up into and see out. He even put the eyeball legos in there too. The little green thing under the brown thing represents her hand holding the torch. He was very detailed telling us about it. As a parent you wonder what your child is doing in their room when they are quiet, but that day this is what he was doing. I thought it extremely cute for a 6 year old.


The second item is a drawing he did. He taped 3 pieces of paper together (with the lady bug tape (which you can see he used to tape to his wall).
He then proceeded to draw and color an American bald eagle. It's hard to see the feet, but they are there. It's standing on a rock and has grass under the rock. It's probably almost the size of a real eagle too (a little on the small side, but pretty close.)

Aren't these clever? I just had to share. I hope you enjoyed the card and the fun things my son made. I enjoy hearing kids talk who have pride for their country and love learning about it. It's always fascinating what they say. We are truly blessed here with the freedoms we have and I'm glad he is learning about it. So blessings today to all of you and have a great day.

Monday, January 25, 2010

maculine bday

We celebrated my brother-in-laws birthday this last weekend and I needed a masculine birthday card. I struggle with masculine cards a lot. Girly cards, kid cards, etc no problem but I have to work a lot harder to come up with masculine cards. After much debating I finally decided on this card, which I really ended up liking. One of the things he likes to do is play golf, so I made this card for him. Inside I also added a piece of white and stamped golf balls all over it in going gray (stamped off first to make them lighter). I then used Happy Birthday from Well Scripted in the mini in brocade.

For the outside I used the following supplies:
stamps: all in the family, family accessories too, On your Birthday.
inks: brocade blue (& marker), basic black, going gray(& marker), close to cocoa marker (hair), blush blossom.
paper: whisper white, brocade blue basic black
accessories: blender pen.
I also drew little lines on the club to look like ridges - sort of like real clubs have.
It ended up being a fun card even though I didn't really bling it up a lot. Tricky for me to not do as it's instinct for me to add such things. I think it's the girl in me. :)
He seemed to enjoy it and that is all that really mattered really. So I hope you enjoy my birthday card and it inspires you to make some masculine cards too. Have a great day today.
Blessings.

Friday, January 22, 2010

sale-a-bration thinking of you

This is a little card I made using a new sale-a-bration set. This is similar but different to one of the cards we will be making in a SAS next month. For that SAS all the cards will feature some sort of pink, because I decided to donate part of the kit fees and part of any sales that day to breast cancer research. It seems like nowadays most of us know someone who has had or has breast cancer or who has/had breast cancer themselves or even some other form of cancer. So I thought I'd do a little part and donate part of the proceeds to that cause. One to help remind us to do our checks, but also to remind us what our friends and family members mean to us - as life is short and we never really know how long we have together here. So remind someone you care about to pay attention to their body and to remember to do their monthly checks.

So now on to the card. The colors in this card are Pixie Pink, Tempting Turquoise and green galore. The stamp sets are Happy Moments (a set you can earn free during Sale-a-bration), vintage vogue and Sincere Salutations. The flowers are colored with a blender pen using pixie, turquoise, summer sun, close to cocoa and certainly celery. The Thinking of you is in basic black.
The flower on left is stamped in Versa Mark and is from Vintage Vogue (a set from the mini). I thought this a bright happy card and one that you could easily send to someone to lift there spirits and just say, hey, I'm thinking of you as everyone needs encouragement from time to time.
So that's my little posting for today. I hope you have a great day. Blessings.

Thursday, January 21, 2010

milk carton and eggcellent eggs kit

Isn't this new diecut box cute? I just can't resist the boxes. It's almost as bad as the punches. Yes, yes... I know, I'm a punch addict too, especially if they coordinate with something else. What am I talking about I get them all. So sad and so true. :)
I like how easy the boxes are to just cut, stick and fill with goodies. They are great for my patience level. Now this die is really small, but you could still fill with little candies, toys, etc and it makes a super cute package. It even opens like a real milk carton.
I also decorated it with the Eggcellent Eggs kit. That kit is while supplies last and is a fun little kit. It comes with egg holders, which could also be used on cards or scrapbook pages - one even looks like cut grass. I used two of the blue strips to go around my carton here. It also has several pages of die cut flowers, a page of leaves, rub-ons, and little gems. You basically punch them out, layer them and glue them on to your item. So super easy and in those fun pastel colors - just made for Easter type pages, cards or also baby or pretty much anything that you would use pastel colors. So this is my fun easy project for the day. I hope you enjoy it. Have a great day and blessings to you all.

Wednesday, January 20, 2010

club projects - valentine project 2 pretty in pink

Hey everyone, I hope you are having a great day and are staying healthy. Seems like a bug is going around here and lots of people are getting sick, so hopefully you are doing well today.

So here is another of our club projects.
This was our second club project that we did.
This one uses pretty in Pink and rose red as it's main colors. It also showcases the new pinking hearts border punch (notice the little hearts it punches out - several haven't caught that). It also uses the scalloped heart of hearts embosslit, which coordinates so well with the full heart punch. It is popped up on dimensionals to give it some dimension. lol. Sounds so lame, but it does add so much. I used a dauber to shade the heart with pink a little to create a shadow effect. Same with the little hearts punched with the new small heart punch. Of course it looks extra yummy with the new pretty in pink satin ribbon. I love the feel and look of this ribbon. Very pretty. The stamped image is also the new jumbo roller called I {love} love and is rolled using pretty in pink. So I hope you enjoy my little Valentine card. It was fun to make and not very hard really and uses a ton of new fun things.

Monday, January 18, 2010

club projects - valentine project 1 sweet treat

This was one of our club projects we made tonight. We punched holes in the cardstock so you can sneak the candy out (see where the heart is). The little tag holds it all in. You pull the tag up and it reveals the hole to get the candy out. The heart and a saying is actually on the tag, which I forgot to take a picture of with it pulled out. The saying actually says "follow your heart it knows the way" from the Whimsical words set from SAB.
The base of the card is made with the Big Shot, but you could use any border punch really. Then I used heart shaped Sweet treat cups and Whimsical words again for the outside of the card. All the edges are inked with red ink and all the sayings are in red as well. I used the full heart punch to punch the hole for the sweet treat cups. Red gingham ribbon also finishes out the tag. A cute little Valentine card with a treat. A fun little project.
Hope you enjoy it. Now is the time to order for Valentines day. Hope you have a great day today.
Blessings.

love bug valentine

Since I have a daughter that just loves bugs I couldn't resist making up this Valentine card using the Love Bugs set (hostess). It was really fast and simple to do.

I stamped the little bugs on white cardstock and then punched with the full heart punch. It's cute that they fit right in there. I matted it with a heart die cutted with my Big shot using the new scalloped heart of hearts embosslit die. I love how these two coordinate so great together. The red heart is cut out using the same embosslit. It's textured with the dots too and is cool. The ribbon is the new satin ribbon and is gorgeous - such deep color. I love it. The saying on the bottom is from a new set called with all my heart (in the mini). I used my basic black and real red markers to color it in as well as the bugs. It really is a pretty quick card. I hope you enjoy my card today. Sorry I haven't posted much. I was getting ready for clubs and classes and didn't realize time got by me so fast.
Hope you have a great day today. Blessings

Wednesday, January 13, 2010

vintage vogue birthday with bright colors

Here is another birthday card that I made for my mom using the new Vintage Vogue set. It's funny when I first saw the set it didn't excite me as much as some of the other images did. The more I play with it though the more I love it. I think it's one of my favorite sets right now. I keep trying different colors and ways to line up the flowers, etc. This was my quick and easy version. The flowers are stamped with pixie pink, tempting turquoise and green galore. The centers are actually little flowers punched out with the trio flowers punch. The Happy Birthday is from the new Well scripted stamp set and is stamped in black. All of it is stamped on white, then matted with turquoise and then placed on a pixie pink card base. Very bright and cheerful in real life. These are colors that I don't seem to use as much it seems. I typically chose more earth tones or rich regals. It was fun branching out into some different color schemes. Gets me out of my rut and brightens these cold winter days. Plus I just think creating is fun to do. It's good to branch out and try something new once in a while.
So I hope you enjoy my card share today. I hope you also take some time to create and try something new - maybe spice something up a bit. Have fun. That's what makes it all good, that and spending time with friends and family while creating. Have a great day today. Blessings.

Sunday, January 10, 2010

valentine card - I heart hearts

I love my new stamps. These sets are from I heart Hearts and Well Scripted from the mini. It felt kind of weird stamping black hearts, but I like how they turned out. The cool thing too is out of all these hearts I only had to cut out 3 of them. All the rest work with punches. So much fun. I stamped the words directly on the white too.
Just a fun and easy card. Valentines are fun this year with all the cool new stamps and I'm loving the clear mount stamps too. I like new things. I'm like a kid at Christmas. So I hope you enjoy my little card and get a time to create some things too. It really is fun. Have a great day.

Thursday, January 7, 2010

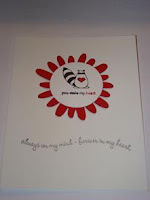
CAS raccoon valentine card

Here is a CAS (clean and simple) card for you today. Sorry it isn't the best picture. I had an extra raccoon that I had punched out, so I looked around trying to figure out what to do with it and came up with this simple idea.
It's basically a whisper white card stamped with a saying from the Stem sayings stamp set stamped in basic black. I then punched out a flower with my Big Shot using flower layers #3 in Real Red. I had already inked up the raccoon with Basic black and then I used a real Red marker to highlight the word "heart" and then stamped the raccoon on whisper white. I colored in the heart in his hand with real red and then punched it all out using the 1 3/4" circle punch. It is also popped up with dimensionals. That's how quick and easy it was. Fun fun, my kids each had to do one too as they loved it. Too funny. The saying if you can't read it says "You stole my heart." The bottom saying says, "Always on my mind - forever in my heart".
I hope all of you are staying dry and warm tonight. It's a really cold and nasty day out. Happy creating and God bless .

Wednesday, January 6, 2010

another monkey card

Can you tell I like the Monkey? Here is another quick and easy card made with him. The clear mounted stamps make things so easy to line up too. This little monkey is stamped 3 times in Chocolate chip on whisper white. It's backed with real red and the edges are inked with chocolate. The base is also chocolate and then I added red polka dotted ribbon turned upside down as I thought that size worked well. I then took the saying from another new set called Love Bandit and punched it out with the Word Window punch and then backed with chocolate punched with the Modern Label punch. I love how those 2 punches coordinate together so well. The little red heart is punched with our new small heart punch and raised up on dimensionals. I thought it a cute little card, especially since I have 3 monkeys who have stolen my heart.
Have a great day today and take some time to have fun creating this week. It really is lots of fun.

new fox & friends card

Sale-a-bration and the new mini are now live. This card shows some fun things from the mini. The monkey is from Fox and friends (I used a clear mount set). The Love you much is from a set called Well Scripted and the little heart is one of our new punches. So much fun.
The middle monkey is raised up on dimensionals and the little red knot is tied around the chocolate ribbon. Just a fun cute card. And yes, I did mean to tilt my monkeys. I thought it made him look like he was doing a cartwheel - kind of like he jumped in to steal your heart kind of thing. He is kind of cute if I say so myself and my kids kept saying, "I want to make a monkey card too", so I guess he got the thumbs up from them too.
So I hope you enjoy today's share. If we get snowed in on Thursday, I'll get time to make more fun things. Here's hoping - as long as the power stays on. Have a great day and stay warm as it looks like a lot of the country is experiencing cold(er) weather.

Monday, January 4, 2010

vintage vogue birthday

First off this is just a reminder that the Holiday mini is only good through today the 4th. The new mini and Sale-a-bration starts tomorrow.

This is a sneak peek project. It is called Vintage Vogue and is in the new mini. This is a card I made. If you look really closely on the left side I stamped a design down it with Versa Mark but it's really hard to see. The colors of this card are Melon Mambo, Bermuda Bay and Rich Razzleberry. It's a very bright card. It looks a little darker in this picture as it was dark when I took the picture. The flowers are cut out and popped up on dimensionals. I used my new clear mount stamps to make this card. I'm liking these so far, so are my children. I put little clear jeweled brads in the center of varying sizes and the ribbon is the Razzleberry polka dot ribbon that I love. If you haven't noticed Razzleberry will be the color I miss for sure when it retires.
The stamp set has a vintage feel to it and has flowers, a leaf, the Friend stamp as well as some sayings and a couple of vine type images. Very fun. So I hope you enjoy my birthday card today and I hope you have a great day today.

Friday, January 1, 2010

little gifts for club members

Here is a little gift I gave to my club members when we met last. This was a little file I picked up at convention. I thought they were pretty but wasn't sure how I would package them. I ended up putting them into a little pouch made with my table setting die from the holiday mini which expires Jan 4th. I punched it out and folded it up and attached the sides with brads. I then used the Christmas punch stamp (hostess set) and colored with markers (navy, red, olive) and then punched out with the scallop oval and stuck on with dimensionals. I inserted the files and some little mints covered in chocolate and thought it a cute little bonus gift. You could package anything small and slender that way (candy canes, pixie sticks, suckers, etc.) Pixie sticks might be cute for valentines. Hmmm I wonder what else would fit. I'll have to think about it. I bet a thin chocolate bar would fit, maybe a twix or Hersheys or something like that. I'll have to try out different things and see what fit. I see a trip to the store coming soon to get more ideas.
So I hope you enjoy my little treat. I hope you had a great New Years and a great day.