Thursday, April 30, 2009

another manhattan die technique

Here is another technique using the Manhattan flower die. I learned how to do this technique from demo Patty Bennett. It's a little hard to get a picture of to show the variations but it is really pretty in real life.
Here is how I made it.
I took shimmery white paper and embossed a piece in the Big Shot using the die. I then turned it over so the grooves face downward (raised side down). I then took my brayer and used Summer sun ink and then just lightly brayed the image. I didn't bray everywhere just here and there (leave gaps). Then I cleaned off my brayer (or use a second) and rolled again using regal rose ink to fill in the gaps. It gave a cool shading technique look. I then cut it out, which is easy with the outline. I did that because the whole sheet ends up with ink on it and you just want the flower part. I attached it to Cameo Coral paper. I then stamped the saying from Oval All in Regal Rose and colored in with Summer Sun and Rose markers. I then punched out with the large oval and then punched banana paper with the scallop circle. It's raised on dimensionals. Hope you enjoy the card and have a great day.

Wednesday, April 29, 2009

new techniques with the sizzix plates

This is one of three new techniques I've learned this week. This is one of the easiest ones. this one uses the Manhattan flower textured die. I inked the actual die (on the smoother side) with classic ink, put in shimmery white paper in the die and textured the paper. The white paper then raised up in the outline (keeping it white and then transferred the color onto the flower part. I then cut out the flower and mounted on white paper. I then stamped the saying with the Oval All set, punched it out with the large oval and then used the same dyed paper with the scallop oval punch and made a mat. It is raised on dimensionals. It was fairly quick and easy card to make. Just rinse the the die to clean it and that's it. So what do you think? Do you like it? I thought it was pretty anyway.

Here is what I used to make this card:
paper: shimmery white, whisper white
ink: regal rose and cameo coral
stamps: oval all
accessories: large oval & scallop oval punch, Big Shot, Manhattan Flower textured die

Tuesday, April 28, 2009

get connected campaign ends Wed

Sorry, I don't have a picture to post for you today. It's been kind of a rough busy last few days and I haven't had time to create anything new. I do plan on sharing my bible study scrap pages, but I have to take a picture and the lighting is not good at the moment. I thought I had one, but if I did it got downloaded to the wrong computer as it's not on this one.
I did want to remind you that the get connected campaign ends Wednesday April 30th. If you are interested, you can order online at my SU site http://detailmama.stampinup.net.
This campaign is where you spend $40 from the mini catalog (not the main catalog) before shipping and tax and you get to pick an item from the under $10 page in the main catalog for free. Just make sure you enter your free item last and it should come up as $0. If it doesn't something is wrong and just ask. Thanks and have a great day.
Monday, April 27, 2009

coloring pretties

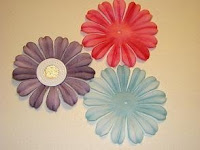
Did you know that you can color the flowers that come in the pretties kit? You might could do most silk type flowers, but you can for sure color these. I've heard there are several ways to do that. You can use reinkers, crayons, stamp pads, pastels & markers I believe. The one I've heard is the most colorfast is the pastel one although it's a much lighter colored flower.
So I decided to try it. I didn't get a chance to try every way, but I did try the reinkers and these are what came out of it. I used Real Red, Baja Breeze and Elegant Eggplant with an aquapainter and this is what turned out. I thought they turned out pretty good myself for a first try. The center of the purple one is one of the new grommets in the mini. I backed it with saffron and added micro beads to give it a sparkle. I've also heard you can color our hardware. Now to try that. Hmm. Looks like I have another project. :)

Saturday, April 25, 2009

scallop circle flowers

With all the sun shining today I couldn't help but post this bright flower card.
I saw this technique used by demo Patty Bennett and I had to try it. I decided to make 3 little sunflowers. I punched out three summer sun scallop circles and then slit each scallop towards the center. I then covered the center with a piece of chocolate that I dotted with chocolate spots to represent seeds. I then used the five petal punch and cut out "leaves" and separated them and attached them under the flowers. For the words I used the key tag punch and then just trimmed it a little in the same shape. I then punched out another one in chocolate to back it. It's raised up on dimensionals, which is hard to tell in this picture. I thought it seemed happy anyways. So I hope everyone is enjoying this great day today. God bless.

What I used to make this card:
Paper: old olive, whisper white, chocolate chip, summer sun
ink: old olive: chocolate marker
stamps: sincere salutations
accessories: key tag punch, scallop circle punch, snips, five petal punch, 3/4" circle punch, dimensionals

Friday, April 24, 2009

Second God's Beauty card

I wanted to make some cards to encourage a couple of people this week. I wish I had more time to do this type of thing. I need to schedule more of this if I can.
I ended up making these two cards to send to them. I used the God's beauty stamp set again as I was wanting to share some of God's beauty. They are pretty much just alike except the bottom one was going to a man, so I put it on white cardstock and toned down the pinks and made a blue butterfly.
I used the scallop circle punch to make the sky. I'll try and remember to show some steps on how to do that. I'm downloading like 900 plus pictures from my camera and it's taking a while. The sun I punched out a 1" circle. Then used the cut out hole to use as a mask to color in the circle with my pumpkin pie marker. The butterfly is embossed in black, colored with markers, and cut out and raised up with dimensionals.
So what do you think, do you like it? I hope you get some time today to enjoy some of God's beauty or have time to encourage someone today.

Here is what I used to make this card:
Paper: pretty in pink, certainly celery, whisper white
ink: basic black, versa mark, pretty in pink, cameo coral, apricot appeal; markers - pumpkin pie, celery, pretty in pink, rose red
stamps: God's Beauty, Thoughts and prayers
accessories: scallop circle punch, 1" circle punch, black embossing powder, heat gun, dimensionals, sponge

This card is the same as the other one except I used bashful blue and brocade blue markers to color the butterfly.

God's beauty with vases

I was thinking about God's beauty lately as the sunshine is making things brighter and nicer and also because I need to finish my scrap page for class on Monday. So I've been thinking about what that means to me. After doing that I picked up the God's Beauty stamp set and started playing with it. Here is one of the cards I came up with. It's a little hard to see here, but the flowers and butterfly are embossed and cut out and also raised up with dimensionals. The wings of the butterfly are curled a little too. The leaves are not embossed but are cut out (they are just green flowers cut apart). The little vases - are the small oval punched out and I trimmed both ends and then edged with marker. I hope you enjoy the card and take a moment on this beautiful day to think about God's beauty and blessings. God bless.

Here is what I used:
paper: celery, bashful blue, whisper white, pretty in pink
ink: versa mark, black, olive: markers -bashful, brocade, pretty in pink, rose red, celery
stamps; God's beauty (hostess level 1)
accessories: heat gun, black embossing powder, dimensionals, small oval punch, snips

Wednesday, April 22, 2009

Flower pot pocket card

This was a flower pot pocket card that I made. I thought it was really cute when I saw one similar to this. You can use any kind of flowers or greenery to decorate the pot. I chose to use the Big Shot as it's one of my favorite toys at the moment. Even the pot is textured using the textured plates from the Big Shot.

The top part of the card pulls up to reveal a little card. You could stamp a sentiment, write a note, include a small thin gift. You could probably even fit a gift card in it.

Like I said earlier. I'm in the spring mood and so ready for it to be spring, so I keep making flower cards hoping it will help it get warmer faster. :) At least that's what I am hoping for anyways as I don't like it when it goes straight to a hot summer without any cooler weather. So I hope you enjoy some more flowers and have a beautiful day today.


Here is what I used for this card:
paper: close to cocoa, whisper white, elegant eggplant, rose red, ballet blue, kiwi kiss
stamps: sincere salutations
inks: rose red, chocolate chip
accessories: Big Shot, Simple Flower embosslit, little leaves sizzlet, brocade blue 5/8" grosgrain ribbon, cropodile, key tag punch, textured plates for the big shot, scallop border punch, vintage brads, piercer, mat pack, dimensionals, linen thread, dauber

Tuesday, April 21, 2009

Cased Bella Bleu box

I took some time recently to try out this box that Susie Nelson posted on a demo challenge site. I'm not sure who created it, but I thought it was very pretty and couldn't wait to try it. She actually used hers to hold the little sizzlet dies from Sizzix. She created tab inserts and everything. She even had a little medallion type thing on the front to pretty it up some too. I unfortunately barely had time for the box. I still think it's super pretty though and I thank her for sharing her posting.


It's made out of Not quite navy 12x12 cardstock and the Bella Bleu DSP. I used the eyelet border punch and sticky strip (although I need to add a small piece to the back border where I forgot to use sticky strip). Sticky strip is awesome for boxes. It holds them together much better then regular adhesives. The little bow on the front is made out of paper too. It's what I call a cheat bow. You just wrap around the paper (or ribbon) and secure it with a glue dot or other preferred adhesive. Then you wrap another piece to hold the middle down and make it look pretty. So it's not really a tied bow, just looks like it (hence the name). So this is my simple version that I learned how to make from another demo and thought was super pretty. So I hope everyone has a great day and gets some time to create. I'm hoping I get some again soon.

Monday, April 20, 2009

club project - big shot flowers and decor elements

I got to spend tonight with some enjoyable ladies. They are so fun. Here is the 3d item we got to make at club. I found these cute little pails at the Target dollar spot. We decorated them with the Eastern blooms Decor elements. I then painted some candy sticks with green galore reinker, which matched the pails perfectly. Then I die cut the flowers out of the Big shot (2 each one) and inked, curled and layered them to form the flower. We attached them to the sticks using pop up glue dots. I then stuck them in some floral foam and covered it with the crinkle grass that matched the green. For the leaves I punched out an oval and snipped the ends and used the bone folder to create lines and then I attached them on with glue dots. I thought it was a fun spring display. With the cold weather and rainy days lately I just wanted something festive and lively.
So I created this and it's bright and cheery and fun. So what do you think? Do you like it? You'll have to share what you think. Hopefully it will bring a smile to your day.

Here is what I used to make this from SU.
paper: lovely lilac, tempting turquoise, regal rose, so saffron, green galore
ink: turquoise, regal rose, lovely lilac, green galore reinker
accessories: Eastern blooms decor elements and applicator, pop up glue dots, glue dots, big shot, flower layers #3 & flowers, daisies #2 Big shot dies, 1/2" & 3/4" & 1 3/4" circle dies, sponge or daubers

matchbox die - school theme

Well with the Get connected campaign going on I broke down and bought the matchbox die. Hey I spent $40 from the mini and I got an item from the under $10 page for free. I hate to say it but I'm a wimp when it comes to sales as I have no will power. :) Plus I thought it was a good deal.
The matchbox die itself makes one little box and 3 tags. The box will hold small items (nuggets, kisses, small chocolate bar, little toys, small jewelry etc.). I figured there were various uses for it (gift box, ornament box, small treasures, etc). Then I saw some ideas where you attach several together to make items like the one pictured here. I got this idea from demo Patti Lee. I did modify slightly some colors, but the basic idea with the school theme is her design. I've also seen these put together to mimic little drawers (like a dresser). Either way was cute to me and I couldn't resist. I thought this idea was especially cute as it could even be a little teacher gift, which teacher appreciation is coming up soon. Inside you could put desk helps. Patti put paper clips, rubberbands and I believe little post its in hers, but you could put little flags, erasers, basically anything small.

Here is what I used to make this item.
paper: real red, old olive, summer sun, chocolate chip, vanilla, whisper white
ink: old olive jumbo roller, real red, olive, chocolate chip markers
stamps: tart and tangy, nursery letters jumbo roller
accessories: 1 1/4", 1 3/8", scallop circle & word window punches. Dimensionals, Big Shot, Matchbox die, sticky strip, bone folder, cutter.

So thanks for looking and have a great day.

Friday, April 17, 2009

eastern blooms friend card

This is a card I put together a little bit ago. There is a couple different thing in this card that is hard to see in the picture.
One the larger red piece is actually DSP from the Raspberry tart kit. Secondly, the middle of the flower is colored in and then coated with Crystal effects and glitter to give it a shiny puffed up effect. You can actually make your own kind of Stickles type of product by mixing Crystal effects and glitter into its own bottle. Didn't know if you knew that or not. Also, I cut out the flower and curled the petals to give it dimension and roughed up the edges some with the distressing tool in the cutter kit.
So I hope you like it and have an awesome day.

So this is what I used to make this card.
paper: kiwi kiss, raspberry tart dsp, whisper white
ink: rose red, kiwi kiss; olive marker
stamps: Eastern blooms, a little somethin (hostess)
accessories: rose red grosgrain, crystal effects, glitter, distressing tool from cutter kit

Wednesday, April 15, 2009

Don't forget about the get connected campaign

Don't forget about the get connected campaign this month.
Spend $40 in the new mini catalog or host a workshop with $150 in product sales and earn a free item from the under $10 page (page 208 in the main catalog). This includes the two mini note kits too, which include stamps, a chocolate stampin spot and note cards in a little plastic case (like the one stamps typically come in). These are fun and could also make a great little gift to give someone. It's all ready to go, just decorate with a fun belly band and a tag and it's a cool gift in and of itself. Just a thought to help enable. :) I just had to share as I've already gotten a couple myself and found them to be pretty nifty.

Don't forget the scraps

I am such a pack rat. I hate to throw anything away, but I've been trying to be better lately. I've already given about 3 boxes of stuff away and have at least 4 more to go and I've cleaned out some areas.
Yay! I'm so excited. Now I need to work on my craft room. Unfortunately that area is hard for me. I'm horrible about thinking - "but I might use that somewhere else soon". It's even harder when I use scraps to make cool things. Like, I had some leftovers from the pieces I used to make my scrapbooking your faith page for this month's study, so I thought I'd see what I could make with them. I came up with this card. I basically just added whisper white cardstock and some olive ribbon and a dimensional and the rest was pieces form the sskit I had left over. The petals are actually the middle of a flower (the parts you poke out and possibly throw away.) The stem and leaf are actually pieces cut out of the sticker sheet (it was the leftover outline of a sticker cut out to form a stem and leaf - another throw away part). I thought it turned out pretty good for parts that I was going to throw away. So if you have scraps just lying around I challenge you to actually use them to make something fun. That way you can have fun creating and also actually use some of your stash. :)
I'd love to see them if you do, so don't forget to share. I love seeing what others create too.

Tuesday, April 14, 2009

I'm ready for sping already

Okay, I'm ready for spring. :) I'm not a fan of cold weather one day and warm the next. That's what you get when you live here though. Shorts one day and snow the next. So I'm ready for spring to really be here. I love the colors, the flowers the warm (but not hot) weather. The breeze. So I wanted to show something bright and cheery. I know this is more reminiscent of summer, but since I haven't had time to create new stuff, I had limited choices and this was as about as bright as I could find. :)
So here are a couple of bag toppers I made with the Tart and Tangy stamp set. I thought it was good for two reasons - one I haven't used this set lately and it reminds me of some things it would be good for and two it reminds me that it's fun to decorate bags too.

I thought these turned out really cute. I found some cheap bags at Michaels that match our colors really well. There were at least 4 different color bags to the set (orange, pink, green, purple - there might have been one more, but I can't remember). Those were the ones that went the best anyways. You can use a lot of our stamps and create fun bag toppers to go with your bags. Add a little card to go with it and you have a matched set. Super fun. They just slide right over the handles ( I folded the paper and punched half way in with my word window punch) . Just punch a little past the handles but not all the way across to make it slide. I did score it a little (maybe a 1/4") to help it lay flatter though, so the top part looks flat by that much.

Anyways here is what I used to make these bag toppers. I hope these inspire you to maybe make some toppers or pull out this set and use if for some fun springy type things too.

Papers (you might need to adjust some to fit colors of your bags) - green galore, only orange, whisper white.
ink: only orange, green galore: markers - real red, pixie pink, old olive
stamps: tart and tangy
accessories: word window punch, bone folder, cutter

Monday, April 13, 2009

One of a kind card

I didn't get time to create tonight but that's okay as I got to spend time with a good friend of mine tonight. I actually don't get a lot of time this week to create unfortunately. It seems like there is stuff going on every night this week. Sometimes having a real job is no fun, when I could be home creating. :) But since I'm new, it pays the bills.
So I pulled out an older card to show you today. This one is a simple card that I put together. I thought it was kind of fun though. It uses several punches and uses a set out of season. I like to see versatility in sets, so it was fun thinking outside the box a little. So I hope you get some time to play even though I didn't. I'd love to see some of your ideas and designs. Email me or comment and let me know what you are doing or working on. Have a great day.

I used the following materials to make it.
paper: night of navy, whisper white, old olive
ink: old olive, night of navy
stamps: Spotlight on Christmas, a little somethin' (hostess) and One of a kind.
accessories: star punch, oval punch, designer label punch and dimensionals.

Sunday, April 12, 2009

Happy Easter

Happy Easter everyone. I hope everyone is having a great day.
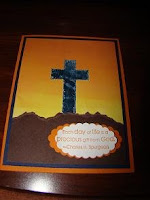
Here is the second card I made with the Refuge and Strength stamp set. I thought it was great for today. I made the one yesterday to represent the death of Jesus and this one represents his resurrection. It's still the cross, but it reflects the dawning of a new day - one bright and full of hope, as our savior has risen. Hallelujah!
I hope you have a bright and wonderful Easter holiday.
God bless.


What I used for this card:
paper: pumpkin pie, night of navy, glossy white, whisper white (words), chocolate chip
stamp: refuge and strength
ink: pumpin pie, barely banana, summer sun, cameo coral, pumpkin pie, ruby red; markers - chocolate chip & close to cocoa; night of navy craft ink
accessories: heat gun, clear embossing powder, brayer, scallop oval punch, spritzer.
technique: brayered sky

Saturday, April 11, 2009

What Easter is about part 1

I wanted to showcase a couple of cards that really reflect what the Easter season is about. I tried to do that with the Refuge and Strength stamp set. This is the first card I made. I wanted it to remind me of when Christ died on the cross... for me. I made it darker to help symbolize His death. But the great thing is that even though he died, we don't have to fear. He was the ultimate sacrifice. He died for us. Although that is sad, he did it to give us life. We really don't have anything to fear. Just as the saying says "God is our refuge and strength, therefore we will not fear. Psalm 46: 1,2". In making this card it helps remind me of the sacrifice he made for me...for us. It's humbling and I hope you can take a moment and think about what that means to you, my friends. As God loved you so much that He gave his one and only son, that whosever believes in him will not perish but have everlasting life (John 3:16 paraphrased). God bless you my friends and have a great day of reflection.

To make this card:
paper: night of navy, elegant eggplant, whisper white, chocolate chip, glossy white
ink: night of navy, eggplant, brocade blue, bashful blue: Chocolate and cocoa markers; craft night of navy
stamps: Refuge and strength
accessories: brayer, clear embossing powder, heat gun, spritzer, curly label punch, dimensionals
technique: brayered sky

Thursday, April 9, 2009

Never ending card

I hope I can explain this well.
This technique I learned from a demo named Dawn Griffith.
It's called the never ending card. Why? Because it never ends. lol. You keep opening the card and it opens to the next layer. You flip that layer and it goes to the next, etc. Till eventually you end up back at the front again and you start it all over again.
It's good to use a set that has a lot of images that coordinate as some are repeated on the next page. I decided to use the new set in the mini called Just Beachy. I thought this was a fun set. I could use it on cards, scrapbook pages, etc. We have water pictures, aquarium pictures, etc and thought it would be pretty cute. They are definitely fish with character - just like my family.

For this project, I tried to make the pages slightly different so you can see the differences. The top picture is the front of the card. It's hard to see but the top right says Hey There - it's from the Really Retro stamp set.

When you flip open the middle section (see partially flipped on this picture) you get the second part, which is this next picture. I colored this one in some with the aqua painters. I also made some clouds - do you see those at the top? I'll have to show that on another post where I can get a better picture of it close up.

The words on this page say "My Fabulous Friend" from Really Retro.


Then you fold it again and you get this third page. Can you see how the pails are the same on both pages?

The words on this one say "miss you already..." again from the Really Retro set. There is another section under my fingers too, but I couldn't get a good picture unless I pushed on the bottom part so the flap wouldn't pop up at that angle.


Then you flip it again and you get to the back page which I used as another fish page to give it some unity.

Flip open the horizontal part and you get back to the first page that's at the top of the post and it starts all over again. What do you think? Pretty cool, huh?
I think it was fun. You do have to pay attention to where you put your stamps and which pages they are on. I almost messed up, but I think I fixed it okay. Hmm..... I wonder what other stamps would work with this idea? I may have to play some more.

Wednesday, April 8, 2009

circle card using thoughts and prayers

I saw an idea similar to this from a demo named Natalie (Natalie.is.stampin is her posting name) . Sorry, I don't know her last name, but I didn't create the idea. I just modified it. I substituted some colors and didn't use dsp, but the basic idea is the same.
For this card I used the circle scissors to cut out the circle layers. I inked the Thoughts and prayers stamp with chocolate chip and bashful blue using markers and stamped the tree. Then I stamped the saying from Heard from the Heart with Chocolate chip. All this is on whisper white. I then backed it with chocolate and then bashful blue. I then topped it off with chocolate chip grosgrain ribbon. It opens like a regular card. You just place the card a little below the circle you want so it doesn't cut the top.
I'd have to measure again, but I'm almost positive it would fit in our extra large or square envelopes. If not it would make a fun card to stick on a package to decorate it. You could also use an embellishment like this to add to a scrap page or decorate a bag even. It has flexibility.
I liked how this picture came out too. It's one of the few that I think looks cool. I added the flower pen to the picture to keep it from rolling (as it's a circle). It almost looks professional. lol. :0)

Easter is a coming

Sorry, it's been a few days. We were really trying to play catch up here at home and since it was Spring break wanted to spend a little time with the kids. I was going to post yesterday but felt really puny. I guess I caught a 24 hour bug, because I didn't feel well at all. But I feel better today and got to play some after the kids went to bed.
I made 3 items tonight. The first being this little basket.

I like Easter time for three reasons. First, for the main intent of the Easter season and that is celebrating the resurrection of Jesus and what that means to me. Secondly, I was brought up with the "Easter bunny" and love the fun that comes with it. The hunting eggs, dressing the kids up, spending time with family, etc. Thirdly, I like it because it's another signal of spring time and spring colors. I'm usually ready for spring to be here as I'm not a cold weather person.
So I put together this cute little basket that I saw how to make from Dawn Griffith (another demo). It hits two of my items (Easter bunny and bright springy colors). It is made out of a 6x6 piece of dsp (a hostess item) and another piece (1 1/2 x 8 1/2 of regal rose) for the handle. It was pretty quick and easy to put together. I then stamped the bunny from Eight Great greetings (in the mini) and colored it in with markers, punched it with the scallop circle punch and adhered it to my basket. Pretty quick and fun. So what do you think? Is it starting to feel like spring yet?

Saturday, April 4, 2009

Get Connected campaign

Get Connected Campaign:
From April 1-30, spend $40 on products in the Occasions Mini Catalog or host a $150 workshop and get a FREE item from the “Under $10” page in the Spring-Summer 2009 Idea Book & Catalog (p. 208).

With spring starting and people venturing out now is a great time to connect with friends and family. What better way to say I'm thinking of you then with a home made card or gift.
Let me know if you need anything to get you started.

I know I love receiving cards or notes letting me know that someone cares. I'm sure you have friends and family that do too. Is there anyone you'd like to share a kind thought with or say I love you too? Now is a great time to do that. It will make their day I'm sure. So I encourage you to share a kind thought or bless someone's day by letting them know how much you care.

Raspberry Tart class

I'm offering a class on April 26th in time for Mother's Day and Teacher appreciation week. The deadline to sign up is April 12th. The class starts at 2:00pm at my house.
There are two options for the class, let me know when you sign up which option you would like.

Option 1: 10 cards (2 each of 5 designs) for $17.
Option 2: Option 1 plus the box at the rear of the photo for $20.

This class will show the Dahlia fold and faux silk techniques. There is also shading with markers and some other fun items. It also includes our new Raspberry Tart paper on every card. Everything but adhesive is provided during the class.
Let me know if you are interested. If you have questions, just ask.

Thursday, April 2, 2009

more baseball scrapbooking

I may not get to post much the next day or so. I'll have to see how it goes. I've taken a couple of days off of work to get caught up on some much needed items here at home. Many of you know we got water in our basement last year and we got that fixed last year. we also had to empty out three rooms of stuff. Unfortunately it hasn't all gotten back to where it needs to be. I spent today cleaning out one room and didn't get finished and have several more to go. There is also general catch up work to do too. Combine that with spring break and my children wanting to do some things as well. Anyways I'll try to post the next few days, but won't promise. Everything should be back to normal next week though. At least I hope.

So here is another page I did of my nephew playing ball. I again used Brilliant blue, white and black papers. The Go Team is from the Sporting and the balls and hat are from Just Baseball stamp sets. The balls are punched out and backed with black and they are raised up on dimensionals. The hat is raised up too. I added a little E on the hat using the white gel pen to match the teams logo. Here is a close up of that. I've had fun scrapbooking these pictures. I hope you enjoy them and are having a great week.