Sorry, I haven't posted much. It's year end at my real job and I have been working a lot. I also might not be posting as much the next few days as I'm going to try and move some of my items upstairs to start working on stuff up there. I'm getting older now and my knees just aren't the same to keep running up and down. Plus all my classes and events are upstairs, so it makes sense. It will just take time to move all my addiction...er.. I mean stash up. :)
So I'll try and keep up, but can't guarantee it.
So on to the project.
Aren't these the cutest things. I cased this idea from demo Sandi McIver and thought these were just great.
They are made with various punches. Mainly circle punches and then the ornament punch which is available until Jan 4th. I'm hoping it comes out in the new catalog as I've seen really cool stuff made with its shape. The blue angels went through the Big Shot and the petals a plenty folder. The wings I just ran the 2 way glue pen over and sprinkled Dazzling Diamond glitter over it. Their halos are just the gold cardstock punched with 2 sizes of circle punches. The hair is just a snipped circle. Everything is glued together and then hung with the cording also from the mini.
I also made the little red one without the Big Shot as some of my customers don't have that yet and wanted them to see an alternative way to make her pretty too. Here I used the background stamp in versa mark and then clear embossed it on the red. The wings are embossed in silver. Otherwise they are the same. Except that I just realized that the red angel lost her ribbon in traveling up the stairs. I was bringing up so much that it must have got caught on something. At least you can see a little better how it goes together that way. I also added another punch (the color of the hair) to make things look nicer in the back.
Anyways, I did think these were very cute and it was so nice of her to share her idea. I ended up making these for all my club members for Christmas. So fun.
Wednesday, December 30, 2009
Saturday, December 26, 2009
tag boxes
Here is a box we did for club, holding several tags made with the ornament set and punch. I thought they turned out cute. They have a piece of acetate covering them holding everything in. The colors used for it were Crushed Curry, Night of Navy, Rich Razzleberry and Always Artichoke. Of course it's tied with Rich Razzleberry ribbon and the tag is tied on with linen thread and the ones inside are tied with either silver or gold cording that was in the mini.
I also made this sample box using the Level 2 Hostess set. I didn't add cording to these though as it was to show how you could modify the box as needed. These were punched out using various coordinating punches. These were fairly quick and easy to put together. The hardest part was the acetate as the score lines are harder to see, but other then that a fairly simple design. You just make the outside box and then add the inserts (2 long sections and then one down the middle). Just adhere it down well is all you do. Put the top on and tie it with a ribbon and you are done.
I hope you enjoy the boxes and ideas. You could always substitute the Christmas tags with birthday or other holiday tags and give this gift year round. Have a great day. If you have any questions, just ask. God bless.
pop up Christmas tree card
Wow, Christmas was hectic this year. Normally I'm way ahead and it isn't so crazy. Not sure why I was so far behind this year, but I was. I wonder if any of you were the same. Sorry I haven't posted much the last few days. I love making the holidays special for the family and we had 3 events in a 24 hour period to prepare for and two of them were at our house and the other I helped a lot with.
I know it's too late to make some of these projects but I wanted to show you some fun Christmas projects we have made at club and some other items I made. Maybe they can inspire you to get a jump on next year. lol. I know I need it if it's anything like this year.
This is a pop up tree card that I thought was a lot of fun. We stamped the tree parts, which were cut out with the Big Shot, with the Baroque Motifs stamp set in olive. The red skirt was also cut out with it as well. The front is embossed with olive using the snow swirled tree and Merry Christmas from Four the holiday. It's just such a wow card as everyone always ohhs when you open it up and see it pop up. It was so much fun I just had to share it.
So I hope you had a great day today and got to spend time with friends and family. I hope you got to take time and enjoy the real reason for the season too. I know I had to take time out and thank God for what all he has given me and my family. I wouldn't be where I am today without him. Merry Christmas everyone and have a great evening.
Labels:
3 d class items,
big shot,
christmas,
christmas cards
Tuesday, December 22, 2009
watercolor notecard bab
Here is another CAS note card that I did. This one I colored with ink pads and an aquapainter. I stamped them in stazon and then colored them Navy, Razzleberry, cocoa and chocolate chip. The words are in navy as well. These use the new build a bear sets and are so cute in my opinion. Very versatile and they are continuing into the next catalog too, so will be around for a bit. I was trying for simple so I basically only colored with 5 colors. The fifth color is going gray which I used to add a shadow effect. If you look under their feet or under their arms and such you will see a light shadow. Acutally you could really only use 4 colors and add double of the cocoa to get the darker muzzle if you'd like.
Aren't they cute? I think they make a cute card and simple too. I think I may have to make some of these as a gift for some teachers too, maybe some thanks yous for my kids and put girls only or boys only where appropriate. Hmmm... What other uses, my brain is turning, which is never good this late at night. lol.
So I hope you enjoy my note card today.
Have a great day today. Don't get too stressed. Remember to take time and enjoy.
God bless
Monday, December 21, 2009
simple christmas thank you
Wow, I don't know about you, but Christmas will be here before you know it and I'm behind. I don't think I've ever been this far behind before. I'm not sure what's up with that.
So I have some quick and easy note cards to show you. You buy these in a pack and they come with envelopes too. The ones I got are whisper white. They are smaller then a regular quarter sheet size card. I needed some quick and easy and reproducible cards for a gift and some easy thank you's as well. So here is my really quick and easy Christmas thank you. I liked it because it was simple, but still looked nice. I have some more to show you, but one at a time for now as I don't have a lot of time to create at the moment. This one was made with the snowflake punch and has a silver brad in the center. The Thank You is from the set Thank You Kindly and is stamped in night of navy as well. Some days I just like clean and simple cards.
Anyways, I just thought I'd share in case others of you are busy too. Hope you have a great day today. I get to go to work and then make some fun Christmas stuff with my club ladies. Lots of fun. Can't wait to post those items too. God bless.
Saturday, December 19, 2009
different snowflakes
Aren't these fun? I had seen some other demos try this and I had to try it too.
We are clutter bugs and keep everything it seems. We always think, we might could use this some day.
Now I don't typically keep cans, but we do recycle them, so we had several of them. I even took an empty one from work as it had snowflakes on it if that says anything. :)
The Big Shot can go through a lot of different sizes and types of materials and this is one of them.
We may have to break down and buy some different drinks to try some different color cans. :) I've heard the green cans like 7up and such make for some pretty snowflakes, maybe an orange drink...hmmm.
It was cool though. The top one is a Coke Santa can. The middle one is a Diet coke with snowflakes and the last one is the coke can again, next to a snowflake punched out of the leftovers of the diet coke can cut out with the snowflake punch. It worked too. It just curled it some, but it worked.
I thought these would be fun on a package, card, on the tree, maybe hung outside as they might hold up (I don't think they rust readily). So fun.
You do have to watch cutting it out and a little afterwards as the edges can be sharp during that process. This isn't a kid friendly project, but still fun. It helps show the versatility of the Big Shot too. Speaking of which, several of it's dies are on sale right now as well as raw vinyl, so if you are interested go to my site and check that out http://detailmama.stampinup.net
Go to Shop now (upper right hand corner) and then click on 12 days.
I'm also working on some card gift ideas, club projects and all the other Christmas stuff we have to do. So I have more to show you, just slower getting to it all, so please bear with me. Hope you have a great day today.
Wednesday, December 16, 2009
my digital studio calendar june
A couple of neat things about My Digital Studio software is that you can make custom backgrounds and you can also decorate the grid section of your calendar. This was my June section of my Calendar. The first picture is the top part and the grid is the bottom. The background in the top is a picture which mainly included water. The background of the bottom one is also a picture but I changed the opacity so you could see through it. Isn't that cool? It allows for more picture usage. So much fun. I'll have more ideas to show you later, but I thought I'd share these ideas with you today.
Also, there are new downloads available for you to purchase. You can go to my store and click on Digital crafting and then downloads to see what's new. There are new calendar ones too that aid in making your calendars if you are interested, as well as Christmas papers, Halloween papers, and several stamp sets. So you should go check it out (http://detailmama.stampinup.net ).
Have a great day today :)
Tuesday, December 15, 2009
scrapbooking your faith - thanksgiving
I just realized that I hadn't shared our last scrapbooking your faith class pages. These were done at the end of last month, so we focused on Thanksgiving. For these pages the ladies were suppose to scrap items/people/events, etc that they were thankful for. We talked about being thankful for what we have, for giving thanks to God and to others who make a difference in our lives, for events that have helped shape us into who we are now or for anything else that they were thankful for. As a last resort they could just scrap some thanksgiving pictures, but I hope they really think about what blessings they have received or what has shaped their lives.
These pages were fairly easy to put together. They are on very vanilla bases. The main mats are rich razzleberry. Then the words are backed with vanilla, crushed curry, rich Razzleberry, and Always artichoke cardstock. The leaves are the same colors (minus vanilla) plus pumpkin pie, dusty durango, soft suede, & handsome hunter. The leaves are cut out using the Big Shot and the leaves die. The colors for the letters are rich razzleberry, dusty durango, hunter, curry, pumpkin and artichoke.
Pretty quick and easy. I hope you enjoy the pages and it helps remind you what blessing you have in your life and what all you can be thankful for. I know during this busy season, it's sometimes the little things that are often forgotten.
Also, what a great gift to give someone - to let them know how thankful you are that they are in your life and what they mean to you.
Hope you have an awesome and thankful day.
Saturday, December 12, 2009
masculine birthday
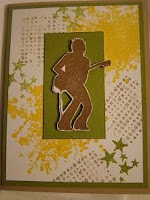
I can't believe how big my family's kids are getting. My nephews are growing up so fast. One of the things my one nephew asked for on his birthday was an Itunes card. So naturally I couldn't help but make a card using my extreme guitar stamp and my extreme elements set.
I thought it appropriate. A guitar player for a music card. I thought it a fun thing to put together. I didn't add any frills since it was for a guy. The guitar guy is popped up on dimensionals and I inked the edges. Inside it says Happy Birthday to you from the Birthday wish stamp which is on the dormant list and retiring in early January.
If you didn't know it already there is a list of dormant stamps and all of them retire early in January. They are all the stamps that were new in the last catalog that was less then a year old. Now they are a year old and are now retiring. So I hope you enjoy my card and have a great day today.
Thursday, December 10, 2009
bab pajamas
Okay, here is the other bear we made. It's made with the leftover pieces of the santa suit. They showed us something like this at convention. Don't they look like pajamas? I thought this was stinking cute, especially with a tad of his belly showing. Reminds me of my children as they are growing so fast their jammies do this from time to time. I love it when they first wake up, walk out and look like that, hair sticking up and all. :)
Just a note: Some people have trouble with the eyes and buttons and such. They are really too small to try and leave in and not fall out, so what I do and they suggested is poke them out (they are already cut) and then back them with whatever color paper you want. The first one I just used scraps of paper glued to the back and then I remembered that the circle punch worked just as well, so you could punch out a circle and it fits right over the eye/nose area. I did the same for the buttons but on the back of the shirt so you can't see it here. Just a piece of scrap. So easy. Reminds me a little of my childhood. So fun.
We cut out some clothing too of different colors, but we ran out of time for putting them together as we had a family event, but can't wait to get back at it. So many things to do, so little time. I'm sure you all understand. Is it me or does time seem to be going quicker this year? I'm not sure what's up with that. Well, just one day at a time. That's all we can do. :) Hope you have a great day today and enjoy the pajama bear.
Wednesday, December 9, 2009
bab santa
My son and I had so much fun playing with these. I got these last month with the hostess special and hadn't gotten a chance to play with them yet. This is the build a bear die (bab) or what it cuts out and then I got the Christmas outfit to go with it. I was so busy helping him get all his pieces together that I realized I messed up on two things. One I forgot to add his muzzle. Two I think I would have liked a different buckle better. Other then that it was really fun and he enjoyed it too. He had a little trouble with cutting out the fur pieces but I helped him there. It is really easy as it's perforated. He just turned 6 and still working with scissors though. I'm debating if I want this on a card or a bag for decoration. Decisions, decisions. I don't have time at the moment, but I'll show you one more I did with the leftovers later. Hope you have a great day.
Monday, December 7, 2009
pillow box santa
This is a little ornament that demonstrator Jackie Topa shared on her site. I just had to try it out. It's really cool and you could even fill it up with some money, a small gift, candy, etc. It's base is the pillow box die and then a scallop circle die cut piece, then punches on top. Since it's a box, it's closed up except at the top and that's why you can add a little gift. I love trying new things and finding different ways to use something, so I thought this a great project using the pillow box die. The only thing non SU here is the cotton ball. I love Christmas and especially ornaments, so I thought this a fun one to copy. Thanks to her for sharing her creative ability. That's one thing about demonstrators, there are so many really nice ones and also ones that share so much. It's great. Christmas is coming too and I can't wait.
I hope you guys are keeping up with all your Christmas stuff this year. Time seems to be going fast. Have a great day and don't forget to take time and enjoy the season. We just got our tree today and I'm enjoying the fresh pine smell as I type. Blessings.
Saturday, December 5, 2009
window sheet snowflakes
I went to a craft store recently and they sold something like this and we decorated it similar to this, so I wondered if I could make something using SU items. I thought it turned out pretty cool and the pictures don't do it near the justice of what it looks like in real life. This is a snowflake cut out using the Big Shot and then embossed with the Petal's a Plenty embossing folder. I used one of the thick window sheets so it's really sturdy. It also didn't appear to hurt my folder either. I then sprayed the snowflake with shimmer spray made with the platinum shimmer paint and alcohol, so it has a silvery, glittery look to it. It's also really textured giving it a cool appearance. For the tag I stamped the To/from from the Christmas punch set using platinum shimmer paint, then punched it out with the circle punch and then punched out a mat using brushed silver cardstock. I then punched a hole and threaded silver cording through it all.
Wouldn't this look really cool on a package? If you take the tag off you could make an ornament for the tree too. Not a bad little project for just playing around. This was a cased idea though, but fun. I tried to take a close up with the first photo, but it kept glarring off the shimmer. I need to figure out a way to get clearer pictures of shiny items. I might have to play around some with the camera. So for now, this will have to do. I hope you get the idea though.
Have a great day today.
Thursday, December 3, 2009
table setting tree
I was playing around the other day and I had this swirly olive piece that was cut out using the Table setting die. It was leftover from my flowers I made back in November. I picked it up and it and was playing with it. I thought how when it stretched out it looked like a tree. It need something, so I picked up some scraps and started punching circles and stars out. Then I thought they needed some bling so I added some glitter. I punched a hole in the middle and threaded some gold cording to let it hang and I glue dotted the star on (it has glitter too). I thought it a fun easy project. I think my kids would have fun doing these too. I hope you enjoy and get inspired to make some ornaments or other Christmas projects too. Have a great day.
Wednesday, December 2, 2009
decor on a computer
Just a quick message tonight. Sorry things have been busier then normal.
If you don't know, my husband is a techy geek type of person. He loves computers and gadgets. If there is a new gadget out there that's cool it goes on his wish list. He has lots of gizmos and such and is given a lot of older parts and gadgets too, so he has a lot of parts and working technical type "toys". He's great at using them, using the parts to help people or improve something or making something, etc. Needless to say he has a room full of technical stuff (kind of like my craft room is full of crafting stuff), but we won't go there. lol. Anyways, we saw this Decor element and thought it appropriate for his computer, so this is his computer with a decor element on it. It fits him so well. It's funny his Christmas list is almost as long as my children's lists. Anyways, we thought this was cool on his computer and wanted to share.
Hope you enjoy and have a great day today.
Sunday, November 29, 2009
ribbon wreath
I was so excited. I actually got to play in my craft room for a few hours yesterday. I made some ornaments, figured out club ideas and made a couple of other decorations. It was fun. I love making Christmas stuff, especially now before it gets too crazy. Growing up we'd all get together the day after Thanksgiving and make Christmas stuff, but we don't get to do that much anymore. I say stuff because it could have been a little bit of everything - an ornament(s), gifts, decorations, even goofy junk - it just had to deal with Christmas. So it was fun to take part of a day and do some creating this weekend. Reminded me of old times a little bit. If you can't tell Christmas is my favorite holiday. I love it all - from the true meaning and its significance to the secular side and all the fun entailed in giving. To me it's just great.
Anyways, I was inspired by the little ribbon wreath in the Holiday mini to make this little wreath. Mine has more ribbons that are closer together and I made a smaller layer on top to give it dimension, but it's a similar idea. I also chose little ribbon knots on mine verses buttons and I tied a bow on mine. I thought it a fun and easy project. My sister made one too. She is using hers as a ring around a candle - a very creative use for it I thought. I love it when others share ideas. We all learn from each other and it makes it way more fun.
So I hope you enjoy my little project and are inspired to make some fun Christmas stuff of your own. I'll share more in the next few days. Have a great day. Blessings.
Friday, November 27, 2009
Hey everyone, I hope you have had a good Thanksgiving and got to have a great meal with some good friends or family. It always makes it more fun spending the holidays with special people for sure. We have another meal planned tonight with my side of the family, so we get two days of fun and good food. :)
This is the last item we did for club. I first saw this idea presented by demonstrator Angie Kennedy Juda.
I took notepads that I bought at any office supply store. I've heard you need those verses the cheaper ones, but haven't tried it myself to check for sure. I then took them to have it cut into 3 sections. The nice clerk actually did mine for free. I was so excited. I took a huge pile and they cut the whole pile at once. It was super cool. I picked the super long notepad, but you could use smaller ones. I'm a list maker so I like long lists, so I decided to use the big pad.
Since these were so long, a strip of 12 x 12 paper barely fit down the back, so I cut one piece to fold over the top and then I backed the whole thing with a matching piece of 12 x 12 strip, so it looked all nice and neat. Now if you wanted to you could add magnets to the back, but I haven't done that yet. I took the shopping bag from the Things I Love set (a freebie from convention - yeah) and colored it in using old olive and chocolate chip markers. I thought that appropriate since I was making shopping lists :) . You could use anything really though - butterflies, flowers, etc. I then punched it out with the 1 1/4" circle punch, then cut a real red piece with the 1 3/8" circle and then a chocolate chip scallop circle. I then put that all on the top of the pad (don't hit the paper though or you won't be able to rip them off, with a dimensional for depth. Then you are done. I think these in a package with a beaded pen and some other items would make a cute little gift for just about anyone.
So I hope you enjoy the little gift idea. Sorry I haven't shown a lot of new items lately. I've been trying to spend some time with family the last few days, something we haven't done a lot of lately. I hope you get some time to create soon with all the holiday happenings though. If not, I hope you at least got to spend some great time with family. Have a great day.
Wednesday, November 25, 2009
punched pumpkin box
Happy Thanksgiving everyone! We hope you have a great day and get to spend some time with friends or family. There is so much to be thankful for if you stop and think about it and I hope you get a chance to consider that thought some. I know it can be a busy day for some of you who have to prepare meals and such, so make sure you get some time to spend with others and just enjoy the moment. Those dishes can wait till later, right?
We personally get to have dinner with my in-laws tomorrow and then get to have dinner with my side of the family on Friday. Nothing like 2 good meals in a row with time to visit. We decided to do that years ago, so we could spend more time with each other and not be rushed.
Well, it seems like I've neglected poor thanksgiving this year and I've hardly posted any projects for it. This little box here is not my original creation and I've seen it on several sites so I'm not sure who originally created it. If you know let me know and I'll add it in. I've seen it made several different ways. I've seen pumpkins on both sides of it, with handles on it, with other attachments added to it, etc.
I made these for my club ladies and filled with little candies, so I only decorated one side as my hands couldn't punch and cut that many more. One of the side effects of too much ball playing as a kid I believe and of course age (but we won't go there) :) . It's hard to tell by the photo but it's a small box and it's decorated with wide oval punches made into a pumpkin. You punch 5 ovals per pumpkin. I inked my edges and glued them together. I used the Autumn Harvest stamp set to make the leaf and cut each out by hand. The stem is just a strip of Chocolate chip and I free hand cut the top edge. The little box is just folded pumpkin pie cardstock sealed with sticky strip. I thought it was a cute project and just had to make it for them. I'm thankful that there is such great talent out there that share their ideas. It is greatly appreciated and makes it fun to see so many great projects. I'm also grateful for my club ladies, my friends and family, as they help me faithfully research, try, and also create new items each month to make new and fun projects for them. It greatly helps me stretch my creativity. I'm also thankful to God for the talents and blessings He has bestowed on me and my family. We are truly blessed.
So Happy Thanksgiving everyone. Enjoy the day. God bless.
Sunday, November 22, 2009
singing Rudolph
Here is another card we did at club. I cased this card from Amy Celona who cased the original reindeer idea from Jackie Topa. I thought it was so cute. I just had to copy it. It always brings a smile to my face when I see it. It was very creative and fun and it was so nice of them to share these ideas.
It's a little hard to see but the book is raised up on dimensionals, so it stands up off the page. I wrapped his little arms around so it really looks like it is being held. My last sample had the snow lower so you could see more of his body, but I gave it away, so this one has a little thicker snow. I just took a piece of white cardstock and tore downward at an angle. Then I flipped the torn piece around and added it to the back of the front piece. I then edged the tops of my papers with the two way glue pen and dipped in dazzling diamonds to make the snow sparkly. The book is the curly label punch folded in half and then trimmed into a v shape and then reopened. The rest is all punches, except for the antlers which is made with the Big Shot. The words are from Four the Holidays in the mini.
So I hope you enjoy the little singing reindeer and it brings a smile to your face too. Christmas is just around the corner and it's great to just enjoy the small things. Blessings
Friday, November 20, 2009
serene snowflakes meet soft suede
For my club members I try to teach new things or showcase a little different color pattern. Here we used soft suede, bashful blue and whisper white, and sahara sand. The bigger snowflake stamp is stamped in bashful blue, the little snowflakes are in sahara but I stamped off first once. The peace on earth is the suede. I also used the sahara sand on the bottom of the base cardstock too. Then we used the soft suede polka dot ribbon to tie a knot.
Besides this different color scheme the other thing we did to this card that the picture doesn't do justice too is that we sprayed the white with a shimmer spray. We mixed some frost white paint with a little alcohol and mixed together in a cheap spray bottle (or an old stampin mist bottle). It gave it a really shiny look. It almost reminds me of the shimmer paper we sell as it's that shiny. This bottom picture shows a little glimpse of the shiny effect. The members thought it cool to see another trick for an accessory. You can do this with the others too, but the silver was a little dark for this card. I haven't tried the gold colored one yet (champagne).
So I hope you have a peaceful day today and take some time to try something new too. It's fun to do that when you get a chance.
Wednesday, November 18, 2009
anniversary card
Here is an anniversary card that I made. I used the brayer to make the sky (it was whisper white before I started). I used barely banana, summer sun, apricot appeal, pumpkin pie and a little dusty durango for the brayered area. I start with the lightest color and keep moving down blending as I go. The flower silhouettes are embossed in black with black embossing powder. I did that part first then brayed the sky, although with black you could probably do either way. The stamp set is Kind and Caring thoughts and is a hostess set. The saying is from Teeny Tiny Wishes.
I think this is a very versatile set and has lots of sayings in it for a lot of occasions. It's one of my newer favorites. The saying is stamped in pumpkin and punched out with the word window and the mat is punched with the modern label in chocolate chip. The card is layered on pumpkin too and followed up with Chocolate chip (a little hard to see against the wood background).
I thought this turned out pretty good and could be used for other occassions just as well.
So I hope you enjoy the card today. I hope you get a chance to stop and enjoy the sunset. It's those little things that make a big difference and as it is getting darker, those beautiful moments in the light make a big difference. Blessings, Lisa
Tuesday, November 17, 2009
Christmas cardinal
I don't believe I've shown this card yet. This is the same set I used for my father's birthday card, but I made this one into a Christmas card. This is a set on the dormant list and is still available for purchase. I just really like this set as it reminds me of trees I used to see in the park growing up. Every winter we would have cardinal birds sitting on them in between getting food. It was always so peaceful to watch them. So I thought of this when I made this card. So I hope you have a peaceful day today and get a little chance just to enjoy today. I know many are starting to think about Christmas and the holidays, but take a moment and see and enjoy God's beauty. Look in the eyes of someone you love or care for and let them know you love them today. Enjoy the moment, enjoy the present, as tomorrow will come soon enough. Have a great day.
Here is what I used for this card.
stamps: branch out, teeny tiny wishes
ink: chocolate chip, bordering blue, real red
paper: real red, chocolate chip, whisper white
accessories: sponge, Chocolate chip grosgrain, Modern label and word window punches, dimensionals
Here is what I used for this card.
stamps: branch out, teeny tiny wishes
ink: chocolate chip, bordering blue, real red
paper: real red, chocolate chip, whisper white
accessories: sponge, Chocolate chip grosgrain, Modern label and word window punches, dimensionals
Monday, November 16, 2009
Regional card - Berry Christmas
I didn't see where I shared this card with you guys. This is another card we made at regionals. Isn't it fun? It took the little flower/wreathe from the set and it was repeated to form a tree shape. I thought it was a cute use of the stamp. The colors that were used were celery, chocolate chip, bashful blue and real red. The red strip is actually the red polka dotted ribbon turned backwards. The button has twine through it and tied and the little flower has a brad and is popped up. The make merry is cut out and mounted on top.
I've seen some different looks this Christmas and I'm loving the variety.
I apologize for not posting as often lately. I haven't gotten a lot of time to create lately outside of what I have had to do. I'll have some club projects tomorrow, but I like them to see them first. I do have a couple of other projects as well, but I need better lighting to take some pictures. I do hope though that you all are getting time to create. I've heard some are working on gifts and Christmas projects. Now is definitely time to do that before the big Christmas push and everything gets crazy. If you get a chance to share some of your creations I'd love to see some. Send me an email or bring them over when you get a chance.
So I hope you are having an awesome day today.
Tuesday, November 10, 2009
scrapbooking your faith - fear
Here are our pages for October's scrapbooking your faith study.
I guess I should have taken a little better close up of the pages. The title says To fear or not to fear. Fear is in Basic gray and Not is in pumpkin pie. The little words are written using a Basic Gray marker. The alphabet is the new Jayne's type alphabet. I also stamped a bat in eggplant and a spider in black and cut them out and placed them at the top. On the pages in black are the big stamp from "From the Crypt" and spiders from the same set. I also added on each white piece a spider stamped in going gray, so you could write over it if you wanted to (you can probably see it better if you click on the picture).
I thought these were fun and easy pages. I also thought they had options.
Our study that night was about fear. How fear of God leads to wisdom, how when we rely on God he helps us overcome our fears and how our fears keep us from using our gifts and talents - which we discussed last month. I love it when studies work together.
When it comes to the pages, I also shared some ideas about what we could put on them. Since we are suppose to be scrapbooking about ourselves, I shared how it would be good if they only used pictures of other family, kids, church events, etc as a last resort. Basically only if they couldn't come up with anything else. I shared how it would be good to talk about and put pictures of things we were afraid of - hence the spiders and bats on the page, or they could talk about a time when they overcame their fears and was able to do something good. I think it's important to our families (especially younger generations) to realize that we had fears and struggles and how we got through them. I loved hearing the stories my grandmother shared both good and bad as those talked about her character. I wish now I had more. So that's what I'm trying to accomplish for my children. That way they can know me better and what my faith means to me and what I can do with God in my life. That I have struggles and celebrations. That I love them and through good or bad God loves them and can see them through anything.
So I hope you enjoy the pages and they help you think about things you can share with your family and friends. To me, it adds a great dimension. Have a great day.
Sunday, November 8, 2009
rich razzleberry birthday card
Can you tell that Rich Razzleberry is one of my favorite IN colors? I use it a lot it seems. I'll be sorry when this one goes away for sure. I like this new variation of the purple series. It adds a lot to the color schemes and choices.
This is a card that I made for my step mother's birthday party. We celebrated her birthday last weekend. We went to another birthday event tonight and have at least 3 more planned this month alone, besides Thanksgiving. Lots of family and friend get togethers this month. Is it just me or does this year seem to be flying by? I can't believe it's already so close to Thanksgiving and then Christmas - yikes it will be here before we know it. I hope you guys have already started on your cards or gifts. I know it takes a while for some of you, so hopefully you at least have your stuff ordered.
Anyways, on to this card. I used two stamp sets: Eastern Blooms and Teeny Tiny Wishes.
I used Rich Razzleberry, old olive, whisper white and Crushed curry. I punched the saying using the Word Window and Modern Label punches and it is raised up on dimensionals. The flowers are also cut out and raised up on dimensionals. I curled the edges a little of the flowers but that is hard to see in this photo. The centers are just colored in with the marker. Besides the cutting out of the flowers which took a little time this was a pretty quick and easy card.
So I hope you enjoyed my cards. I thought it fun to show a couple non-Christmas ideas for a bit. Although I plan on working on some more Christmas this weekend. I need to get a jump on things or I won't get done.
I hope you guys have a great day today and I hope you get to take a moment to encourage someone today. God bless.
Friday, November 6, 2009
father's birthday card
I made this card for my father for his birthday. We celebrated his and my step mother's birthday this past weekend. I decided to make him this card as it reminded me of where we grew up. We grew up living right next to a park. Fall was always a great time to live next to there as you got to see all the beautiful leaves up close every day. The best part is that we didn't have to rake most of the leaves as they were in the park. Of course this time of the year we would really see the wild life preparing for winter. It also never failed that every time we would look out we would see a cardinal bird. So I made this card in rememberance of that.
This stamp set is still available but it's on the dormant list. I bought it and then like a month later it ended up on the dormant list, which is sad as I liked this set. There are several sets on the dormant list which are still available, so if you are interested in seeing that list let me know. The birthday sentiment is from a Little Birthday Cheer and is popped up on dimensionals.
So I hope you enjoy my little fall birthday card. I also hope you have a great day today.
Wednesday, November 4, 2009
another calendar idea
At Regionals they showed us this idea, so I had to take a picture of it. It's another way to display the little calendar in the mini. They put them on the blocks. Isn't that a fun way to display them? You could put out a month at a time or display all three if you put 3 months on a different block. Then when the years over you can just cover them up with whatever. I also liked the striped ribbon as a gift wrapping idea. I think it turned out really pretty, so I just had to share. I hope you enjoy it.
Monday, November 2, 2009
regional card
Here is another card we made at Convention. It's fairly simple. The hardest parts were cutting out the ornaments. The saying is stamped in Chocolate chip on kraft paper. This card is folded at the top so it's a 4 1/4 x 11 card folded in half. the strings are also in Chocolate chip. I just noticed I'm taking a picture looking up at the card, so you can see the edge of the string. If you were looking down on the card you wouldn't see the edge. I just love the polka dotted ribbon. It adds such a fun festive flair don't you think? There is also a little rhinestone brad added to the garden green ornament. Also, both ornaments are raised up with dimensionals. All in all it was a fairly simple card. If you didn't want to cut that much you could also use the Ornament punch and coordinating stamp set too. There are options. I love it when things have options. I just wish I had time to create everything I want to create.
So I hope you enjoy another Christmas card idea. Have a great day today.
Sunday, November 1, 2009
bitty box and card
okay, I just had to show you a little card my son made.
To me it's really cute. Yes it's uneven, but he's 5. He played with some materials after one of my classes. He cut a small piece of paper and ran it through the Big Shot. He then sat down on his own and cut out the green background card base and colored in the petals and dots all by himself. No instructions or ideas from me. I haven't even made anything with the dots or petals colored in, so it's neat he created it on his own. The thing in the center is a heart that he drew. Isn't it sweet. I just had to brag and show off his design.
Next is a little box we made at Regionals. It is one using the bitty box and envelope die. I placed the image on the ribbon, so it just slides off that way and you can reuse it and not tear it open. Inside is several tags using the same images, but used with different colors and rearranged some. I just realized I didn't take a picture of the tags. It makes for a cute gift idea. Who wouldn't love a little box filled with tags for the holidays.
It used Real Red textured cardstock to make the box and we used the Real Red polka dot ribbon to tie around it for decoration. We also used the stamp set called Berry Christmas from the mini. I cut out the leaves and added them on for some dimentsion and I tied the ribbon with linen thread. It was a fun little box to make and I hope you enjoy seeing it.
So I hope you enjoy my shares today and have an awesome day.
Items used for the box
paper: real red textured, whisper white, bashful blue
ink: real red, bashful blue, chocolate chip, certainly celery
stamp: berry Christmas
accessories: real red polka dot ribbon, linen thread, snips, Big Shot, Bitty box die, sticky strip, dimensionals
Friday, October 30, 2009
gifts and talents - scrapbooking your faith
Wow, I can't believe I let the time slip by me. I didn't realize it had been since Monday since I last posted. This week has flown by. We had something every night this week. A lot of the week was taken up with school tours. You would think picking a middle school would be easy, but each one is different and offers different items depending on your child's interest. My child has several interests so we get to tour several schools and we aren't done yet. It's very overwhelming some days, but I know God will see us through it.
I also hadn't realized until just recently that I hadn't posted my last scrapbooking your faith pages that we did last month. Our theme last month was gifts and talents. I saw an idea in our Stampin' Success magazine and I modified it some to make two pages out of the design. I thought they came out kind of fun and different. It was a little out of my comfort zone, but I like them. I actually found several pictures for my pages and it was really cool to see the progression of how my talents and gifts have evolved over the years. My evolution started with me thinking I had very little to offer, so I worked mainly behind the scenes or behind the stage. The next thing you know I was performing, then leading, then mission teams, then actually planning and helping lead ministry work. It was cool looking back on it seeing the transitions and where we were at the times and what what we were doing. God can work that way though if you let him and are open to His will.
In our study we basically talked about various gifts and talents mentioned in the bible. We also talked about some different bible characters and their gifts and talents, like Moses for example. We talked about what he did, but also how he felt - inadequate. Even he questioned his abilities, but with God's help he made it through and God gave him the resources to get what he needed done. I asked the ladies to think about their respective gifts and talents - from small to big. I reminded them that not all talents are performance oriented or big. Even something like sending cards to people to encourage them is even a gift or fixing a sick family a meal, etc. I then challenged them to figure out what their gifts were and look for ways they could use their gifts. It ended up being a good lesson time.
So now on to the info about the pages:
One thing I did differently on these pages was on the Soft Suede but it's a little hard to see. SU's paper is solid all the way through. I found if I rip a side of my paper and then ever so gently take my paper piercer and pick at it a little I can actually separate the sections of the paper. I then ever so gently pulled back a little of the top layer (once it starts it's easy to keep it going) and rolled it a bit. To highlight it I just rubbed it over the ink pad to make it darker. You can see it a little better in the top picture. I then used my Extreme Elements and Extreme Guitar to stamp my images. I actually let the ladies pick other items beside the guitarist if they wanted too to represent their talent, but this was my page, so I picked the guitar because I liked him. Not that I have musical ability, but I thought he went well with - you rock. The words are stamped using the Just Perfect Alphabet in Crushed Curry. The guitarist is also popped up on dimensionals too, so you can slide pictures under it if you needed too. So I hope you enjoy them and it encourages you to scrap about your gifts and talents too. We focus so much of our scrapbooking on others or events, so I like being able to share parts of me with my family too. So that's why we are doing them.
Here is what I used for these pages:
stamps: Extreme Elements, Extreme guitar, just perfect alphabet.
inks: Brilliant blue, crushed curry, soft suede, garden green
paper, kraft, whisper white, crushed curry, garden green, brilliant blue, soft suede
accessories: both star punches, circle pundhes, dimensionals, silver brad, paper piercer, snips, Crushed curry polka dotted ribbon
I also hadn't realized until just recently that I hadn't posted my last scrapbooking your faith pages that we did last month. Our theme last month was gifts and talents. I saw an idea in our Stampin' Success magazine and I modified it some to make two pages out of the design. I thought they came out kind of fun and different. It was a little out of my comfort zone, but I like them. I actually found several pictures for my pages and it was really cool to see the progression of how my talents and gifts have evolved over the years. My evolution started with me thinking I had very little to offer, so I worked mainly behind the scenes or behind the stage. The next thing you know I was performing, then leading, then mission teams, then actually planning and helping lead ministry work. It was cool looking back on it seeing the transitions and where we were at the times and what what we were doing. God can work that way though if you let him and are open to His will.
In our study we basically talked about various gifts and talents mentioned in the bible. We also talked about some different bible characters and their gifts and talents, like Moses for example. We talked about what he did, but also how he felt - inadequate. Even he questioned his abilities, but with God's help he made it through and God gave him the resources to get what he needed done. I asked the ladies to think about their respective gifts and talents - from small to big. I reminded them that not all talents are performance oriented or big. Even something like sending cards to people to encourage them is even a gift or fixing a sick family a meal, etc. I then challenged them to figure out what their gifts were and look for ways they could use their gifts. It ended up being a good lesson time.
So now on to the info about the pages:
One thing I did differently on these pages was on the Soft Suede but it's a little hard to see. SU's paper is solid all the way through. I found if I rip a side of my paper and then ever so gently take my paper piercer and pick at it a little I can actually separate the sections of the paper. I then ever so gently pulled back a little of the top layer (once it starts it's easy to keep it going) and rolled it a bit. To highlight it I just rubbed it over the ink pad to make it darker. You can see it a little better in the top picture. I then used my Extreme Elements and Extreme Guitar to stamp my images. I actually let the ladies pick other items beside the guitarist if they wanted too to represent their talent, but this was my page, so I picked the guitar because I liked him. Not that I have musical ability, but I thought he went well with - you rock. The words are stamped using the Just Perfect Alphabet in Crushed Curry. The guitarist is also popped up on dimensionals too, so you can slide pictures under it if you needed too. So I hope you enjoy them and it encourages you to scrap about your gifts and talents too. We focus so much of our scrapbooking on others or events, so I like being able to share parts of me with my family too. So that's why we are doing them.
Here is what I used for these pages:
stamps: Extreme Elements, Extreme guitar, just perfect alphabet.
inks: Brilliant blue, crushed curry, soft suede, garden green
paper, kraft, whisper white, crushed curry, garden green, brilliant blue, soft suede
accessories: both star punches, circle pundhes, dimensionals, silver brad, paper piercer, snips, Crushed curry polka dotted ribbon
Monday, October 26, 2009
table setting die
Stampin' Up! has a great hostess incentive right now. If you host a party that has $250 in sales you get to pick an item out of the mini for $10 and if your party hits $400 in sales you get the $10 item and the new My Digital Studio for half off (used as part of your hostess benefits). So it's really cool to host a party right now.
One item that is in the mini is this new table setting die (which could be a $10 item). I decided to show a couple of projects off using it at my last club. I made a place card for each member and I made them this little treat bag using the swirl cut out image. The swirl part can be used to make flowers or pine cones or little ornaments, whichever you prefer. I chose to make a flower using our new Rich Razzleberry paper. I used the hostess set Holiday best for the words colored with Razzleberry and Old olive. The leaf is also cut out with the die. It can be used as a leaf or petal. The rest of the bag is made using the Top Note die and a cello bag.
So I hope you enjoyed my little treat and I hope you have a chance this week to share a little something with someone - even a little thank you encouragement email is a great way to think of someone and so easy or better yet a hand made card or a phone call even. We have so much to be thankful for - how about you?
Saturday, October 24, 2009
more my digital studio
Here are a few more scrap pages. Some of the nice features are you can change the colors of pretty much everything. You can add shadow effects so items look 3d like I did with my words on the stamps on the top page. You can also change the colors and sizes of the punches too. As in the wide oval on the bottom page.
I can't remember if I said this before, but there are some stamp sets in the studio that aren't in the catalog. One of them is a cute cats stamp set. In that set is a mouse and on every page in my book I hid a mouse. In these two pages he's easy to find, but others are very difficult because I color matched them. So I hope you enjoy the pages and get some ideas for some of your own pages. Have a great day today.
Wednesday, October 21, 2009
another mds
Here is another page I did with My Digital Studio. I added some stamps from the All in the family set. I just used a basic design since I wanted to show off the pictures and the special bond between father and son.
It was so quick and easy to do.
I hope you enjoy the page. Sorry, I've been a slacker. It's been crazy this week. One thing after another. Hopefully I'll be back on track more next week. I'll try to sneak in some more time to spend on here soon. Thanks for being patient.
It was so quick and easy to do.
I hope you enjoy the page. Sorry, I've been a slacker. It's been crazy this week. One thing after another. Hopefully I'll be back on track more next week. I'll try to sneak in some more time to spend on here soon. Thanks for being patient.
Saturday, October 17, 2009
my digital studio
I'm so enjoying My Digital Studio. I've already created some cards, a book, scrap pages, a flyer and I'm working on a calendar. It's been really fun to play around with. It's easy to work with too.
I put together a couple of pages of our trip to Salt Lake city this summer. This is some fun we had in our free time.
These two pages are in my book. I tried to put on each of my double layouts at least one rhyming thing and then I hid a mouse on each page. There is a stamp set in the digital studio that you can't buy and it includes cats and it has a mouse in it. My kids like the story Good Night Moon, so I did something similar and put a mouse on each page. The fun thing was that you can color match stamp sets, so sometimes I made the mouse really hard to find. Hey, I couldn't make them all easy. Gave them something to look forward too. :)
Also, didn't this paper match her shirt so well? I couldn't resist using it. Besides Designer papers and cardstock you can also use your own pictures as background.
Sorry I haven't posted as much lately. I'm having 5 events this month which is a lot for me especially when you add on work and all the kid's stuff too. It's no excuse, but it does take time away from my creative side some. Anyways, I hope you enjoy seeing a couple of my sample pages.
Hope you have a great day.
Subscribe to:
Posts (Atom)