Wednesday, December 29, 2010

scrapbooking your faith - may - church family

These were our May Scrapbooking Your Faith pages. We focused on what a difference church makes in our lives and also what a difference our church families make in our lives.
The church I just hand drew and cut out the various pieces. Then used those to create more. The clouds are punched scallop ovals. The door is just smaller then a circle punch and slide through to round the top. It's also stamped with the woodgrain background stamp and then I added a gold brad to make a doorknob. The grass is just the pinking hearts border punch.
I stamped a couple of sayings - one is the definition of inspire. The other one says, "The greatest gift is a portion of thyself - Ralph Waldo Emerson". I thought that fit- one because Christ died and gave his all to us. Also as we serve in our church environments we also give of our time and talents and in doing so get a great blessing in return - like a gift. It makes for a great reminder I think and we can also share how much our church and our church family means to us, which is a cool memory to scrap too.


The main colors used are Bashful Blue, Always Artichoke, Night of Navy, whisper White, Basic Black, oh and Chocolate chip for the door. Inks were Bashful, Navy and Chocolate (for the door) and Sahara Sand (to ink the edges of the church with a dauber). I also used an Artichoke marker to add little grass pieces to the green grass, which are hard to see in the photo. So I hope you enjoy the share today and gives you another great idea of a memory to scrap about.

scrapbooking your faith - easter

I just realized how far behind I am in my postings for my syf class. I didn't realize that I hadn't posted these. I apologize that I didn't post them sooner. The good thing is that these months aren't that far off and many of the materials are still available.

This one was the Easter pages that we had done back in April. There are some things in this picture that are hard to see. First the sun has shading on it and then each little ray has a bit of glitter added to it for extra sparkle. The crosses have the wood grain background stamp stamped on them and then we colored in nail holes with a marker. The concord mats and the sand are spritzed with shimmer paint mixed with alcohol so they both sparkle. The ribbon was a ribbon from the last catalog and a bulk buy for demonstrators, but could be substituted for a different kind. The shadows were just created with a dauber. These are 2 - 12x12 pages pushed together. There is one cross on one side and two on the other. I thought these were a neat change of type of page. Everyone is wanting the mats for the 4x6 pictures so that is what we are incorporating for now. Limits the creativity a little, but really helps in the completion process which many of us need right now.
I hope the pages inspire you some and help you share some of your faith and traditions with your family. So many times we scrapbook events or trips and very little about what we believe, our traditions and what is important in our lives today. That's why this class was formed to help us at least take a few pages to share those types of things.
I hope you enjoy the pages as it won't be long before that season arrives again and our focus shifts from Christ's birth to his death and resurrection.
Hope you have a great day today.

Monday, December 27, 2010

step-mother's journal


One thing I did this year was purchase journals for a few of my family members. It is one of the newer items that Stampin' Up! creates for you with it's MDS print service. This was one of them. Each one I made had a different look and color scheme to it. My other one I made was more relaxed and traditional and my daughter's was more funky like. This one is busier, but I still like it. I'm showing you the front and back. The spine had printing on it too (had the name on it, which I think is cool). You just create it in the digital program and then upload it to the printers and you get back a journal. Fairly easy to do.

We had a get together a few months ago and we got her family and our family together and we took pictures of each family and all the grandkids. I thought what a fun way to showcase some pictures for her. Now every time she writes in her journal, she can see pictures of her grandkids and her family. What fun!

Sunday, December 26, 2010

Thank you card - Christmas

This was a card I gave out to most of my club members. It uses the embossing folder and some white craft ink. It's really pretty in person and the snowflakes really show up. This picture isn't the best though. I used the new Cherry Cobbler seam binding which works similar to regular ribbon. The saying is stamped and punched out and added on with dimensionals. I like the Baja with the Cherry cobbler. They look good together.

I really appreciate all the support my club members give. They come every month excited to create new things and it makes it fun sharing items with them. So I gave them a small little gift and one of two different cards.
The top one or this other one, which is the same snowflake embossing folder, just with a different color scheme. This one I inked it up using some bashful blue. I then punched a couple snowflakes and added on the same thanks with dimensionals. I then added a couple of jewels and some navy satin ribbon to round it all out. I liked them and I had fun making them. I hope they enjoy them too.

Saturday, December 25, 2010

Christmas card - mds

This was the front of our Christmas card that we got a few samples made. I wasn't exactly sure how they would turn out, so I only got a few to begin with. They turned out really cool though. You can print on both sides, which was one thing I thought turned out really neat and we had not gotten before. It had thicker paper and the print quality was really good. We got some others made to to compare to and there was quite a bit of difference, both with the picture quality and paper thickness.
This was one of the new size cards. There are several options on the MDS program and you can chose which direction you'd like and I chose this one. Since I wasn't sure how the printing on the back would come out I had a little more blank space then I needed to have, but it's okay. I know now and hope to make some fun ones for future use.

I chose some of our more fun pictures for the back. It was so hard to get pictures of our kids this year. I think we took about 20 just to get the 3 on the front. They kept making faces or laughing or poking on each other. If you have a sibling, I'm sure you know what I'm talking about.
So anyways, I wanted to share my card with you guys.
I hope you have a great day and an awesome Merry Christmas.

Wednesday, December 22, 2010

come to bethlehem bags

These were some little gifts that my kids gave to their church teachers. Just a little something to say thanks for all their hard work and for working with them. It wasn't a lot and definitely not what a teacher is worth, but just a little something to say I'm thinking of you - thanks.
We really appreciate all the teachers and adults that work with our kids, because it really does take a village to raise a child.

This was made with the Come to Bethlehem stamp set and I used my new circle punch to punch out a circle of whisper white. I then stamped the magi in concord and then I used my Crumb cake dauber and colored in the sand and the edges of the circle. I then stamped the saying and punched it out using the modern label punch. To get the red behind it, I just punched out a second punch and cut it in half to make the ends red. It is also raised up on dimensionals. I then just filled one of our cellos with some goodies and then added the embellishments. It's hard to tell here but the star has glitter on it too, so it sparkles.

Saturday, December 18, 2010

calendar page - boyscouts

I made some calendars for some Christmas presents this year. This is one of the pages.
This was November's page. I chose my son for November because that's his birthday month. This year he started boy scouts and is really enjoying it, so I picked boy scout pictures for this page.

The calendar page, I included a picture on too. I like how you can coordinate the two and put them together and how you can put pictures on the calendar part too. I've been trying to keep the calendar pages simple. This is one of the busier pages, but still pretty basic in design.

If you haven't checked out My Digital Studio you should. It's pretty easy to manipulate and move around in. The projects come out really pretty too and makes a great keepsake item. You can also make them into DVD/CDs to give to people. Lots of choices on how to finish your project.

Tags til Christmas

Here are some of the tags I made for the teachers. Several are just plain stamped and others I punched or colored in. They were fun to make and I hope they like them. I tried to vary colors some too, but it's hard to see in this picture. The santa suit is Riding hood red, Navy is the snowman, Concord is the ornament, Cherry cobbler is the ornament, Pear is Dec 25th and olive is the main color of the tree limb as well as chocolate and espresso. Before putting them into the bags I punched holes and added linen thread or the retired su silver cording to hang them.
The hardest was the Santa suit, coloring in the black on the belt took some time, especially around the buckle. I ended up cheating on the buttons and used my Crop-o-dile to punch out some black circles. I hope you enjoy my tag share today. Have a warm and great day.

Monday, December 13, 2010

jolliest time bag

I have been looking at this stamp set for a while, so I finally decided to get it. It's a fun set and reminds me of my childhood, so I decided to get it. It has a santa, a snowman, a tree and a saying. All are happy, fun images. I took the santa image and colored him in using the markers (Real Red and Basic Black) and then I used my blender pen and Blushing bride to color his face. I also used my two way glue pen and some Dazzling Diamond glitter to highlight some of the snowflakes falling down, but that's hard to see on this picture. It makes for a fun, sparkling snowfall. For this package I just punched out using the 1 3/4" circle punch and our new scallop circle punch. I used Garden Green and real red papers. All the candy and tags are in one of our large cello bags. This is my sons treat bag for his special area teachers. It's a mixture of hard candies and chocolate along with some Christmas tags. I hope they like it. We had fun making them.

I also made this image into a tag. You can also make it into an ornament. It has varied usage. It's a fun image I think.

I got the punched out idea from Demonstrator Becky Roberts. She had some samples using it, and I thought what a cute idea. It was the last sample I saw before finally deciding to purchase the set.

So I hope you enjoy the share. Christmas is coming and it is very exciting for our family. Lots to look forward too. Hope you have a great day.

Wednesday, December 8, 2010

gift card holder - snowflakes


This is a gift card holder that I made for a teacher. I used the skinny tins that SU sells. I stamped the white snowflakes with white Stazon on the front, back and on inside top of the tin. I then created a belly band to go around it which is the center part. It's stamped in navy and bashful blue using the Serene snowflakes stamp set. I then added thin navy grosgrain ribbon and attached a tag. The tag is a stamp from the Tags till Christmas stamp set. It's stamped in navy and I used my real red, Black and Garden green markers to color in parts of the snowman. I also punched out a navy snowflake using the snowflake punch and layered it behind the tag. They were actually pretty quick and easy to put together, which is good as there are several teachers that will be getting a gift. My kid's teachers are great and my kids love school mainly because they have good teachers. So we are giving them gifts for Christmas.
So I hope this packaging inspires you some too. Especially those of you that like to give gift cards. Hope you have a great day.

Sunday, November 28, 2010

lovely as a tree birthday

I needed a masculine birthday card, so I picked out one of my all time favorite sets and that is Lovely as a Tree. I masked an area and inked it in using Sahara Sand and then stamped the tree using Old Olive and Early Espresso markers. I stamped 3 times without inking to give the variation in the colors. I also did another new one on the outside of the card to make the one in front stand out. I used the new 1/8" Espresso ribbon. I love the new skinny ribbon. Very versatile. I used the saying from Teeny Tiny Wishes and the Word Window and Modern Label punches. A fairly quick card to put together and such a neat effect I think. This style has been around for a while, but I hadn't used it in lately, so I wanted to revisit it again. I keep thinking this set will retire, but I do love it as it can be used for so many different types of cards. It can be used for Christmas (this tree makes a neat Christmas tree), a winter scene, masculine cards, various techniques, and of course all kinds of nature cards.
So I hope you enjoy my card today and have had a great holiday weekend.

Saturday, November 27, 2010

November 30th deadline fast approaching

November 30th is fast approaching. If you are interested in the amazing recruit special or the online extravaganza special let me know. Both are really great deals.
You can't beat half off the starter kit and the sale has items from 20-50% off.

fall birthday card

We have several family and friends that have birthdays in the fall. Here is one of the cards I made. I used the Day of Graditude and On Your Birthday stamp sets.
I love all the colors in the fall and tried to incorporate a few of them on the card. I used Cajun Craze, Old Olive, Daffodil Delight, and Early Espresso. I cut out the large medallion type stamp on the front as well as the little yellow center in the middle. I also cut out one acorn and one leaf. The saying is popped up with dimensionals and is punched out with the Modern Label Punch.

I even decided to decorate the inside since the cajun color was a little darker. I stamped the sayings and then decorated it with a little leaf.
I thought it turned out nice. I love this set and I hope it continues in the next catalog. In case it doesn't the mini ends January 3rd, so if you like it don't forget to add it to your order.
Hope you enjoy my card share today and hope you have a great day.

Friday, November 12, 2010

Christmas treat box

This is the Big Shot treat box die. With a little bit of bone-folding it's really easy to put together. They are fun to make. I used Old Olive paper to make mine and then rolled it with my jumbo roller and the Jolly Jingles roller with Olive ink. I tied it with real red Grosgrain ribbon. I punched out a white snowflake and then inked the ornament with red and also punched out with the ornament punch. The ornament is in the tags till Christmas set in the mini, which ends around the end of December and is currently on special. I then punched it out popped it up using a Dimensional and then added some olive grosgrain ribbon for the bow and a little pearl for the center. It really was a quick and easy treat to make. I really like quick and easy. Especially lately.
I hope you like the little box today. I also hope you have time to make some little treats for someone special. It's always fun and nice to give little surprises. Hope you have a great day today.

Thursday, November 4, 2010

6x6 ghost page

This was a cute little page I did for a demonstration. It can be used for a 6x6 scrap page or you can move the sentiment down and make it a 3x6 card. I love the versatility of it and even if Halloween is over, I know some of you have some cute pictures to scrapbook.
This page was really easy. I used the jumbo roller to roll the bats for the background using Old Olive ink. I scalloped a piece of Concord crush and added our new black lace ribbon to the top. I used a saying from the Wicked cool set and punched it out using the large oval and then punched a scallop oval using Concord again. The ghost if you look closely are basically upside down owls with the feet cut off. I just punched them out, inked the edges and then used my black marker to add eyes.
I thought it a great idea - using the owl punch that way. I'm not sure who first thought of it, but I got the idea from our Stampin' Connection site that demonstrators can send ideas too.
Anyways I thought it was fun and thought it might help you come up with a fun page idea for your pictures.
Hope you are having a great day.

Sunday, October 31, 2010

pop can mummy

Hi everyone,
I'm sorry I dropped off the face of the earth from a blog stand point. Time flies without realizing it. Who knew middle school would take so much time? Take that in consideration with a new sport my child is playing, the bible study I'm teaching now, my son starting boy scouts, and all the fun holiday projects I've been making have taken all my free time. Sorry it's been so crazy. I know these are too late for this year, but might give you some ideas for next year.

Now this mummy idea isn't new. I made a card with it last year. What was fun about this project was that we made pop cans with them. We just took a fruit can and I opened the bottom of it with a safe can opener. I then covered it with vanilla cardstock and a few vanilla strips edged with soft suede ink. I used punches to punch out the eyes. Really fast and easy. Then we filled them with treats, rimmed the bottom with crystal effects and sealed the bottom back on. They can pop the top that way. It was funny though, my daughters teachers were afraid to open them - afraid something would pop out. That would be a fun idea though. I might have to think about that for next time. Too fun.
I hope you have a Happy Halloween today and get more treats then tricks. :)

Wednesday, September 15, 2010

Just believe club project

This was one of our last month's club projects. We used the Just Believe stamp set. We decided to create a sunset look using daubers this time. This picture really doesn't do this card justice. It really doesn't show the gradual shading or the glitter that is in various spots showing some shine.
Basically we stamped the flowers with black stazon on Whisper White paper. We then took Daffodil Delight, Pumpkin Pie, Bashful blue, Not Quite Navy and Night of Navy to apply shading to the card. We also used markers and colored in the saying (Pumpkin and Navy) and then punched with the 1 3/4" circle. The Pumpkin circle was cut using the Big Shot and the circle die.
The ribbon is our fun new 1/8" taffeta ribbon in Daffodil Delight. It was a pretty quick card even with all the shading. I hope you enjoy the card today and I hope this reminds you to take time to enjoy some of God's beautiful gifts he gives us.
Blessings.

Sunday, September 12, 2010

matchbox and big flower club project

We made these little matchbooks at club. I saw the idea first I believe from Becky Roberts a fellow demonstrator. I did modify it some though. I used Poppy parade, a new incolor, and Not Quite Navy and whisper white. This little book opens up to hold little 3x3 note cards. The flower on top we made with the big flower punch. We then took a smaller circle punch and then punched the ends of the petals. We then cut in with our snips toward the center. I thought it looked like a pretty summery type flower. Just a little blue is all. :) We then stamped the circle from Just Believe and punched that out and added a dimensional underneath and a little crystal jewel on top for a little added bling. We scalloped the front using the scallop border punch and tied Whisper white ribbon around the bottom to hold the "secret" staple that holds it all together.
It was a fun little project that holds a few little cards.
It was fun to make and very easy. Just a few scores, a few punches and it was all done. I added a card on the inside that looks just like it except I added a saying to the front of the card on the bottom right side of the white.
So I hope you enjoy my share today. Sorry, I'm such a slacker. September is such a crazy month with several items a day on the agenda for most days. Have a great day today.

Monday, August 30, 2010

6x6 progressive pages elements of style

Okay, I showed you the 6x6 page or card I did for my last workshop and here is where I showed off my progressive pages (it was also one of my hostess gifts.) What are progressive pages? Well, it's one way to show how you can "progress" a 6x6 page into an 8 1/2 x 11 page and then into a 12x12 page. That way you can show how to use what we make in a workshop to fit other sizes. Not everyone scraps in 6x6 so this shows them another option.

This first page has my 6x6 page on an 8 1/2 x 11 page. I matted it with Razzleberry and then added some more vanilla and then an 8 1/2 x 11 piece of razzleberry. I again stamped the flowers from the Elements of style set and punched out another butterfly with my Big Shot and then added some olive satin ribbon. Have I said how much I like the satin ribbon? Well I definitely do as you can tell by most of my samples. :)

Next I laid my 8 1/2 x 11 page onto a 12x12 piece of vanilla and then stamped and inked some more and then of course added more butterflies. I wrapped the butterflies with the linen thread and tied the knot near the top to make them look like antennae. I thought it turned out to be a pretty page and can't wait to add some pictures and journaling.
So I hope you enjoy the share and it gives you an idea of how to make some progressive pages if you need too. Sometimes it's easier to start with a smaller project and work out, especially if you just have maybe one or two pictures.
Have a great day and hope you get a chance to be creative today. Blessings.

Saturday, August 28, 2010

workshop project - elements of style

This is a card that I made for a friend of mine's workshop. It folded into a 6x3 card that will fit into one of our open ended envelopes.

They got the choice of making one of these cards or a small 6x6 scrapbook page, which I will show below.

For this version of the card I inked up the large flower with stazon and stamped it over the large and small butterfly. I then took the ink pads and a blender pen and we colored the small butterfly using Rich Razzleberry, certainly Celery and Old Olive. We then inked all edges with Suede ink and a dauber. We stamped the saying using Razzleberry and punched it out using the large oval and then punched a scallop oval out of suede. We layered all of this over rich satin Razzleberry ribbon to finish it all off. Pretty quick and easy. It showcased our punches, markers (which I used for the saying), daubers, Big Shot, blender pens, ribbon and dimensionals (for the saying). I thought it was a nice, but elegant card to make. Not to mention that some of them learned a new technique (coloring with blender pens).

I got the original idea of making this from a fellow demo named Dawn Olchefske. I changed some colors and added some items, but got the original idea from her.

So I hope you enjoy my share today.
Have a great day.

Tuesday, August 24, 2010

door prize notes

Hi all,
I wanted to share a little note card I made. Actually I made up several of these and packaged them up for a door prize at my last workshop. I think they make adorable little cards. With this color combination, I think they also make a great little teacher gift too. I may have to make up a set of these for some of the kids teachers. Good teachers really put in a lot of time and energy and I think they deserve little thank yous along the way. I'm hoping I'll get some extra time soon to make some as my children have some really nice teachers.
I took these cards and added an envelope (also stamped with the apple) and put it into a cello bag and made a bag topper to match. I'm sorry I didn't get a picture with it all packaged up. I was in a hurry and did manage to make an extra card, but had to hurry to get the packaging done. But I basically used the same colors and theme for the bag topper.
It's hard to tell in this picture, but the circles in the background are stamped with daffodil. The rest of the colors are Real Red, Old Olive and Basic Black. The set is a level 2 hostess set called Apple Blossoms. Something to earn with a qualifying workshop. If you are interested in hosting a workshop let me know and we can set one up.
So I hope you enjoy my little note today. Have a really great day today. Don't forget to take some time to say thanks to someone or send them an encouraging note. It only takes seconds, but can mean a lot.

Saturday, August 21, 2010

tropical note happy birthday

Sorry I'm such a slacker. There has just been a lot going on. I took some pictures of some projects I've done lately so hopefully I can post more often in the next few days. Our kids started school back this past week and one is now in middle school. She is on a school sports team and she has kept us hopping with car pool duty for all the practices and such, Especially since she goes to a school 25 minutes away from our house.
So between that, work, church, and a special training that Stampin' Up! is providing for us I haven't had much free time lately. So probably until the season is over and the training from Stampin' Up! is over I won't get to post as often. Hopefully you will still visit from time to time to see what is here and it will help inspire you to create, which is the best part of it all. :)
For this project - I created a small Tropical Party 3 x 3 notecard for a make and take. I thought it ended up being a fun little birthday note to add to a gift or a package. I can even imagine a gift bag stamped with the same set. Maybe I need to stamp one of those soon.
I really like this set for summer pictures. When you stamp it with some fresh fun summer colors you can get some pretty designs.
This set is only available through the end of the month though, so if you'd like to get it now is the time to get it.
The saying is from Teeny Tiny Wishes and can really be switched out for several different sayings even as they are all about that size give or take a little.
I like these little cards. They are good for gifts or a thank you even. Just something small to say hey I'm thinking of you. We sell envelopes to go with them too, so you can stamp them to match as well. I have another one I did recently too which I packaged up into a set. I'll have to show you that little card next.
So I hope you enjoy my small share today.
Hope you have a great day.

Saturday, August 7, 2010

butterfly builder roller birthday card

Hey everyone, I hope you are having a good day today.

This was another card that we did for our last club night. We used the new builder wheels with the jumbo roller. I left out the middle wheel so we could use the new satin Razzleberry ribbon in the center. It's so pretty and adds a nice shine to the card and the space looks really good with that width of ribbon. I rolled the wheels with Old Olive ink. I used the Punched Posies hostess set for the butterflies. If you don't have this one, then Butterfly Prints in the main catalog is really close. For these butterflies. We used Rich Razzleberry and Concord Crush to ink the butterflies using the Rock and Roll technique. The middle one is popped up with dimensionals to give some dimension to the card. :) I just thought this was a fun and pretty easy card for a birthday. You basically just roll it, tie on ribbon, stamp and punch 3 butterflies and your done.
Like I've said lately, I really like easy as the schedule has been a little crazy and will be even more so when school starts.
So I hope you enjoy today's share.
Thanks for looking and have a great day.

Wednesday, August 4, 2010

owl 3x3 for you card

I always like giving my club members a little something extra when they come to club. Just a small way to say thank you for coming and learning together with me and helping support my business each month.
This was a little card I made for them last time they came. It uses our new owl punch. I also used our bird punch (for the leaves) and I also used the Big Shot to texture his little belly area using the textured embossing folder to do that.
I also used the saying from Teeny Tiny wishes which is a great versatile set with lots of different sayings. It's one of my favorites since there are so many to chose from.
This punch is kind of fun to work with. I've also seen several other things made out of it that I'll have to try soon. I mean if you look at the base of it what can you make out? hhmmm? I see a flower, an animal head (without the feet) and possibly some other items too. I'll have to play around with it some more, so I can share some of the different items it makes. If you see something in it you'll have to share what you come up with too. That's one of the fun parts - being creative and sharing together. With our new Stampin' Connections website that demos can access there are thousands of ideas out there. I love being able to access that and getting to see and get all the new stuff first. It becomes almost like Christmas...too fun.
So anyways, I hope you enjoy my little note card. I also hope you have a great day tomorrow and are able to stay cool. Blessings.

Sunday, August 1, 2010

elegant lines birthday

Seems like lately with so much going on, I'm really liking easy. To me this card is soooo simple and yet very classy. I just ran the Marina Mist paper through my Big Shot with the Elegant Lines embossing folder.
I just love the embossing folders. They give such deep rich embossing and look so pretty.
I then stamped the birthday sentiment from the Perfect Punches set in Marina mist. Punched it out with my wide oval punch. It's so much fun when sets coordinate with punches. I can't resist those types of set. :)
I then tied on some vanilla satin ribbon and tied in a little bit of 1/8" marina mist taffeta ribbon for the knot. I then added some of our new self adhesive pearls to the little circles that were embossed and that just gave it the last right touch I thought. I didn't come up with the pearl idea, but have seen it on several cards lately along with jewel brads, crystals and various items like that. I don't know who originated the idea, but I like it. For this card though I thought the pearls especially matched the paper and silky look of the satin ribbon perfectly.
So I hope you enjoy the share for the day.
Keep creating and have a great day.

Tuesday, July 27, 2010

scrapbooking your faith -things I love

Sorry I've been such a slacker posting lately. It's been very busy here. Last week we took some vacation time even and I used a lot of the time to get caught up on cleaning in various parts of our house. You know you are busy when you don't have time to clean. :)
We did go somewhere too, but the days we stayed home we did quite a bit of cleaning. Not that you could tell it much in our cluttered home, but it did make a dent and made a couple rooms much nicer.

So I haven't had a lot of time to create outside of class material lately it seems. Between work, having to lead a bible study at church now and trying to keep up with family stuff along with my stamping classes it's been busy. I need to take another vacation day and just create I think. :) That would be lots of fun.
So I was looking at my blog and realized what a slacker I had been with my blog and especially with my scrapbooking your faith posts. I haven't posted those the last several months and I hadn't even realized it. So here is the pages we did several months ago. We used a few sets here as well as some punches. The main stamp set we used was the Things I Love stamp set. We also used some others too, but they aren't all in the new catalog. There is a similar one though so that's good. We also used several punches including the full heart punch, large oval and some circle punches. We also inked all the edges.
We focused this lesson on the things we focus on and spend time on or with - kind of like our favorites. We put a cross near the front because I hoped those attending the bible study placed God high up in their lives as well as their families and loved ones (hence the saying, "but most of all you" punched out with the oval). The others were used mainly for favorite items, but could be interchanged depending on likes or what photos they had. I tried to pick items they might have pictures of and could journal about. I placed strips so they could add lists of favorites or multiple photos. They could do it like in columns even if they wanted to. Have pictures with lists under or around them.

I made these pages for a couple reasons. One, I thought it might help us focus where we spend our time and such. I also thought they could be fun page to look back on. Our favorites change over the years and sometimes it's fun to look back and see what we liked - what foods, what styles, what events, etc. Even what people were in our lives at the time as they change over time too.
So that's my share for the day. I hope you enjoy it and it gives you an idea to scrapbook about as well. Have a great day today. Blessings.

Monday, July 19, 2010

Because I care in black, white and Marina

I'm surprised how much I like this set. It's not one that when I first saw it that I thought I'd like that much. I was at first drawn more to the set that matched the punches and the paper and some other ones. I ended up receiving this set for free from Stampin' Up!. It wasn't long and I was using it and for some reason I have used this one set a lot lately. It has definitely grown on me and it fills my need to color and I think it looks great on these little note cards.
I do think it's pretty versatile and it includes sayings too, which is great in my opinion.
I know I like to color which also helps. So for you guys who don't like to color, here is a card with no coloring on it made with the same set. I stamped one image with my staz-on pad and then punched it out with my square punch. I then punched out another square in Marina Mist to mat it on. I then stamped the saying and punched it out with the large oval and then backed it with a scallop oval punched mat in black. It of course is raised up on dimensionals too.

It sits on top of the new marina mist 1/8" taffeta ribbon. It is very pretty. I'm including a close up picture so you can see it in better detail. Some of the new colors have some very pretty ribbons and this new thin ribbon is no exception.
I bet this new ribbon will be great for the holidays too. It is just small enough. I can see ornaments tied with it and craft projects, and little gifts, etc. I know I'll have to get more of this real soon.
So I hope you have a great day and enjoy my share. Blessings.

Thursday, July 15, 2010

Because I care razzleberry

Can you tell I like this set? :)
I made this card for a birthday for a family member. I thought it turned out pretty and different. I stamped the flower from this set as the background on Sahara paper. Then I stamped again on white and then colored it with Rich Razzleberry, Certainly Celery and Old Olive. It's also matted on Razzleberry and black paper. The ribbon is our new Razzleberry satin ribbon. I love the way it shines. I used the linen thread to tie it together in 3 different spots for a slightly different feel.
The family that got it really liked the card. They thought it was store bought at first. I think that it's always fun to see the expressions when you tell them you made it. Then they really start to look at it.

This card wasn't difficult at all and this set has such a nice effect. It's definitely been one of my go to sets recently.
So I hope you enjoy my card. Sorry, it's been kind of crazy here this week with VBS. Hopefully I'll get some time to play this weekend.
Have a great day. Blessings.

Tuesday, July 13, 2010

club card - black magic with a twist

This was the second club card we did last month. It used the Close as a Memory stamp set which retired, but any set that's solid can be used and there are several in the new catalog. I still thought I'd show the card idea though. Black magic is a cool technique, but the name isn't quite right. Nothing weird or bad was done to this card, lol. It gets it's name because it's stamped on black or dark cardstock and it's kind of "magical" how it works. In real life this card is pretty cool. It's a little hard to see the various shadings and dots on the flowers, but it gives you an idea of what it looks like completed. This card is done with our watercolor pencils. I also used the scallop and wide oval punch. The saying is raised up on dimensionals. I also used satin white ribbon overlayed with the Razzleberry polka dot ribbon (also retired). I'm bummed this ribbon retired, but there is some very pretty Razzleberry satin ribbon in the new catalog, which I really like. This card takes a little time with the shading of the coloring and such, but it's not really hard. I thought it looked really pretty with the returning Pacific Point paper.
So I hope you enjoy my share today. I'm not sure how much I'll post this week as we have VBS at our church and my daughter has field hockey practice too. Just another busy, busy week. I'm sure many of you can relate and understand the crazy schedule thing.
I hope you have a great day and get some time soon to be creative. Blessing.

Saturday, July 10, 2010

club card - flores suaves

This cool flower can be found in our hispanic catalog. This is part of the set called Flores Suaves. The saying is from Asian Artistry a hostess set from the last catalog. This class happened before the last catalog retired, so that's why I used it. There are lots of nice sentiment sets though that would work with this card, so it can be adjusted depending on the occasion.
This card was one of our club cards we made. The flower is colored with the ink pads and a blender pen. If you haven't ever used blender pens they are cool. It's basically a wet pen. You dip it into the ink and then apply it to your paper. It's like an instant marker, just a little softer.
The cool part is that it can be re-used again and again. Just wipe off the old ink and it's ready to go for the next color. Kind of like an aquapainter, just not as wet.

Here I used Rich Razzleberry and Certainly Celery and Old Olive to color the flower. The background paper was an easy version of the emboss resist technique. The paper already came embossed with the swirls and all we had to do was color it with Razzleberry ink. I just took a sponge and sponged the whole piece of the paper. This particular paper retired, but the Presto Patterned paper is different, but does the same effect and is still available. Of course you can always emboss your own paper too and it has a similar effect.

The words are popped up off the card and I also used white grosgrain ribbon.

This card looks really pretty in real life in my opinion. I think it's one of my favorites so far.
So I hope you like my share today. Hope you have a great day. Blessings

Thursday, July 8, 2010

Baby's first Birthday

We got the pleasure recently of getting to attend a good friend of ours baby's 1st birthday party. He had lots of fun and got gooey and sticky several times from all the good food. :)

I saw this color combo and similar idea in the new catalog and thought I just have to try this. Since I thought of my friend when I originally saw it, I figured it was a perfect occasion for it, as they love animals and especially monkeys.

I used Baja Breeze and Crumb Cake for the main colors. The happy birthday is from a new set in the catalog called Perfect punches. This particular stamp fits the wide oval punch. I love stamps that match punches and this is a whole set that matches. The monkey is also cut out and raised up on dimensionals for some added 3d effect.

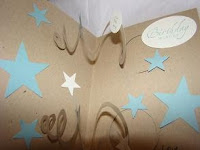
I wanted it to be fun when it opened so I created some spirals with my 1 3/4" circle and then I punched out large and small stars to decorate it with. I also used the School days stamp set in the mini and stamped 1st and then punched it out with a circle punch too (that's what the little circle in the upper middle is). I added some white and baja items over the whole inside of the card. The card goes lower, but I forgot to take a picture before I wrote my greeting on the bottom so I only took the upper portion in the picture. The saying near the top says Birthday wishes and is again punched with the wide oval punch. I like moving fun cards, so I enjoyed putting this together for him for his 1st Birthday.
So that is my share for the day. I hope you enjoy it and have a great day. Blessings.

Wednesday, July 7, 2010

Because I care in red/pink

Sorry I've been such a slacker posting. I have had to start teaching a weekly bible study group and that has been taking quite a bit of my extra time working on the study.
We are going through Philippians and we are only like on vs 19 of the first chapter in four weeks if that tells you anything. lol. It is good though and has been a great time as this class has all ages in it and it's been a great sharing and learning time. I just love getting to know all the ladies better. It just takes time making up and praying through all the lesson material. So between that, my family and making thank you cards and keeping up with club and my scrapbooking your faith class, I haven't had much free time lately it seems. So I'm sorry that I have less posts lately, but it has been for a good reason. :)

So since I've been on a roll making these thank you cards, I thought I would try different color combos. This one is Pretty in Pink and Rose Red for the flower. It again uses the Celery and olive for the leaves and Olive ribbon.
These have been really fun cards to make. Especially since I like to color. Now if I didn't like to color this would be a pain, but I do, so it's cool.
I have another sample I made for those of you that don't like to color and I'll show that soon, but this is one of the coloring ones.

So I hope you enjoy seeing this color scheme. There are just so many new cool things in the new catalog. I'm like a kid in a candy factory. So many choices and it's so hard to chose. :) If you haven't seen them yet, the new catalogs are great. We have 3 new ones. The regular Idea book and catalog, the new Decor elements line and the hispanic catalog. We also have the mini going on until August, so lots of fun things out there to chose from.
If you have any questions, let me know.
Have a great day today. Blessings.

Sunday, July 4, 2010

masculine july thank you

Since I've been trying to send out some thank you cards,
I wanted to send a thank you card to some men in our church that help out a lot. I don't have a lot of masculine sets, but I thought this one would be good for this month. This is the 4th of July set that is in the mini catalog. I used razzleberry, pacific point and daffodil as the colors on this card. The thank you is from the new level one set called Because I care. The star is popped up on dimensionals and I used the square punches to punch out the various pieces to make them all uniform. I've been using the notecards for convenience, which I'm really liking, so I ordered more. It all came together fairly quickly, which was great.
It's nice sometimes making quick and easy cards. I hope it encourages you to make some thank yous for some people too. there are just a lot of people we take for granted and sometimes it's nice just sending a note of thanks.
Have a great day today and God bless.

Tuesday, June 29, 2010

level one hostess thank you sneak peek

This is a sneak peek of a new level 1 hostess set coming out called - Because I Care. I created this easy card to say thank you to several people. It had to be quick and easy since I had to make several. I also needed to mail it, so I didn't add too much bulk on this card. I also stamped it on the note cards for ease of cutting. I really like the little note cards as they are just the right size for a quick note.

I've been trying this set with different mediums. This one uses markers. It's stamped with Stazon ink and then colored in with markers. I used the new color called Marina Mist (it's the darker blue color and the scalloped oval). The lighter color is Bashful and the greens are celery and olive.
The ribbon is olive. I used the large oval and the scallop oval punches with the saying. It was pretty quick actually. The longest time was shading the flower, but with the marker it went pretty quick. Every now and then I just like clean and simple (CAS) cards.
So I challenge you to come up with an easy idea to encourage someone you know. Hope it inspires you to do something like that too. Have a great day.

Monday, June 28, 2010

presto prom page

A friend of mine's daughter got to go to prom this year with her boyfriend for the first time. I decided to make her a page for some of her pictures. It's really hard to tell by these pictures, but this is super sparkly and really is neat in person. Her prom dress had purplish blue stripes on it. So I took one of our presto pattern papers and inked with navy and lilac. I then spritzed the paper with vanilla smooch spritz and made the whole thing glimmer. Her shoes and his tux cumberbund was silver so I added silver paper mats. I then punched out some flowers using the Big shot and drew lines on them and smooched them too. I inked the edges and put together with a silver brad. I punched the word prom out of my Big shot as well and added more smooch. Basically everything on this sparkles, even the mats.

I tried to get some close up shots to see the glimmer, but couldn't get it to pick up well. I would try again, but I don't have the page anymore.

So I hope this gives you an idea of a way to use these papers. I have had questions on how to use them and this is one way you can use them. You can also cut them up and just color parts and use on cards or as accents and such.
Hope this helps. Have a great day today.